The grid has gone down, and you have no heat! Luckily, there is the internet with loads of information about how to make a survival heater.
Oh, wait…
The internet isn’t exactly going to be working when the grid is down, so hopefully, you put these DIY emergency heater designs to memory now before you need them!
Better yet…
These DIY heaters are better than nothing and could save your life. But they are far from efficient. It’s much better to buy a proper heater in case of emergencies. I like emergency propane heaters or indoor kerosene heaters for prepping.
Important:
Whenever you burn something indoors, there is a risk of carbon monoxide (CO) poisoning. Many people get sick or die after natural disasters because they improperly use heaters indoors. While it seems counterintuitive to open a window or door when trying to heat a space, you must have ventilation to ensure CO gas isn’t building up.
Get a battery-operated carbon monoxide detector for your home and read this info on CO poisoning and heaters.
Metal Can, Alcohol and Toilet Paper Emergency Heater
Here is one more reason to stockpile lots of toilet paper in your emergency supplies! This emergency heater is made of a tin can (large soup cans and gallon paint cans work well), toilet paper, and isopropyl alcohol. (Amazon Link)
Just put a roll of toilet paper into a tin can. Pour the alcohol over the toilet paper, so it is just saturated. Then light the alcohol on fire.
The alcohol is the fuel, and the toilet paper is like a wick in a candle.
The emergency heater can burn for over an hour and does an excellent job of heating the air. Because only the alcohol on top is on fire (where it touches the air), the bottom can stay cool.
You will need a few of these to heat a room.
Ventilation Requirements:
Alcohol burns very cleanly, so this emergency heater has little risk of CO poisoning. You’ll still want to crack a window. However, you won’t need a flue – keep the stove on a flat surface away from flammable items.
Terracotta (Flower Pot) and Tea Light Emergency Heater
You’ve probably seen this design for an emergency heater before. It is genius and can be used as supplemental heating in non-emergency situations too.
The traditional design for this DIY heater calls for:
- 4 tea lights (Amazon Link)
- 1 smaller terracotta flower pot
- 1 larger terracotta flower pot
- A metal pan + grill rack to set on top of it
- Small piece of aluminum foil
Instructions:
- Put the tea lights on the metal pan. Light them.
- Put the grill rack on top of the pan.
- Set the smaller flower pot on top of the grill rack; the flower pot should be upside down, so the open side is towards the tea lights.
- Use the aluminum foil to plug the drain hole on the smaller flower pot
- Set the larger flower pot on top of the smaller one (do not plug its drain hole)
The idea behind this emergency heater is that the smaller pot works as a convector to gather the heat from the tea lights, and the larger pot acts as a radiator.
The only real problem with the tea light-flower pot heater is that the tray can get hot.
You could try setting your tea lights on bricks instead and propping the ceramic pots up with more bricks.
Or, you can put in a little bit more effort and make the design shown in the video.
Rocket Stove
There are a bunch of ways to make rocket stoves. You can even make small ones out of coffee cans to use for off-grid cooking. If you want to heat with a rocket stove, you will need to have something much larger.
An old propane tank or beer keg will work great. The problem is you’ve got to be able to cut the metal tanks, which will be difficult in an emergency.
That is why I like this rocket stove design which is made from a 5-gallon bucket.
Ventilation Requirements: Rocket stoves make a lot of smoke. So, you will need to make a flue to funnel all of the smoke out. One solution is to use the rocket stove in your chimney. Or you can rig up an exhaust out your window, but then you will need to seal it off to prevent cold air from getting inside.
This video’s quality is bad, but the guy does a great job explaining how to build a rocket stove.
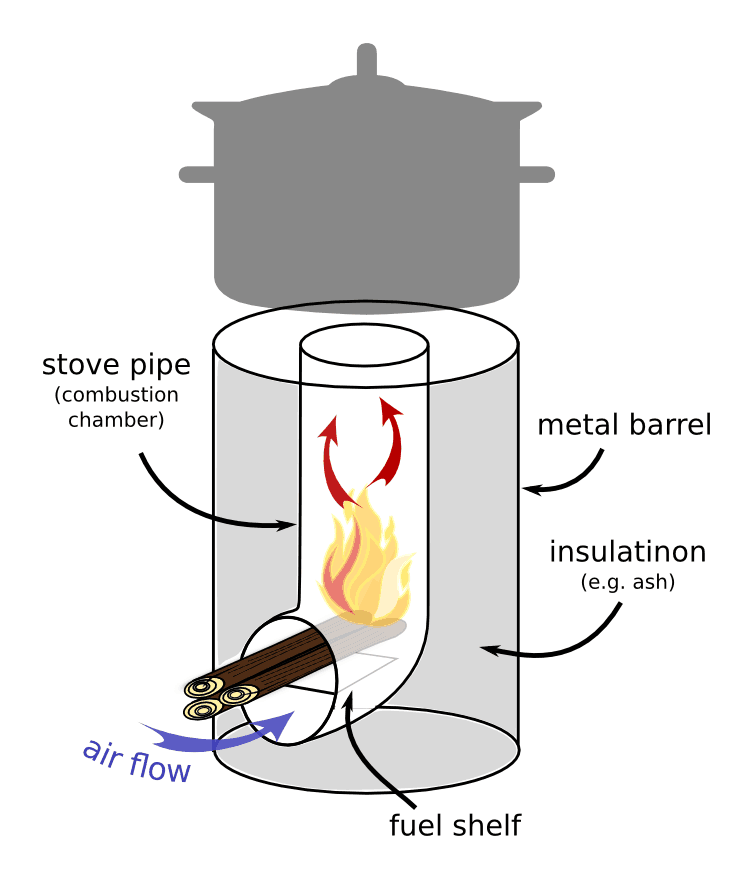
And here is a picture illustrating how a rocket stove works.
If you don’t have the time to make one, they are also available on Amazon – see here.
Paper Logs
So, you’ve got a rocket stove, wood-burning stove, or a fireplace; now you need something to burn.
Before you start hacking up your furniture for fuel, you should consider making paper logs.
First, you drill some holes in the bucket. Then, mix paper and water in a big bucket to make paper pulp.
Put something heavy on the pulp to drain the water out.
When it dries, you will have a big briquette made out of paper. It will burn for hours.
Ventilation Requirements: Depending on the type of paper you used to make the logs, it can burn pretty cleanly or make lots of sooty smoke. You’ll want a good flue to keep smoke from filling your home.
DIY Solar Heater from Tin Cans
This project is more intensive and not something you will probably need to rely on for short-term grid outages.
But, if you have a Bug Out retreat like a cabin, this project is worth considering.
The idea is to make a wall out of the tin cans. Cold air is drawn out of the home and goes through a heating panel (which is the columns of cans). The heated air is then returned to the home.
For this to work, you have to put them where there is a lot of sunlight. Install it in the room which has the most direct sunlight.
For this project, you will need the following:
- About 200-300 aluminum cans.
- 3 – 8 ft. 2x4s.
- 4 ft. x 8 ft. x 1/2 in. sheet of plywood.
- High-temperature silicon. (Amazon Link)
- 4 ft. x 8 ft. sheet of Plexiglas or Lexan.
- A can of heat-resistant flat black spray paint. (Amazon Link)
- Plastic tubing.
- Drill Press with wide drill bits.
- Screws.
Watch the video for the full instructions. Or you can find written instructions here.
Also, see best indoor stoves.
Have you ever tried making any of these DIY heaters? Let us know in the comments below.

There’s also a heater made with a metal bucket full of sand with a homemade candle in the middle surrounded by a large ring made out of copper tubing. The candle heats the tubing, the tubing heats the sand, and then heat radiates from the entire surface of the bucket on the sides and the sand on the top. Trying to remember where I saw it – maybe an instructable or on youtube… I’ll see if I can locate it again, and post the link if I can find my way back here again afterwards!
I found it! That’s a very cool design. Thanks for the info 😀 https://www.youtube.com/watch?v=xp66vawuYQc
I used a charcoal chimney starter. I put a can of sterno inside and cooked also it gave off good amount of heat. What would you think of using this method for emergency heat?
Sterno is basically alcohol, so it’s the same as the first emergency heater in this list. But you’d really need to burn a lot to heat a room. I’d invest in a good propane heater rated for indoors.
A consideration to the use of poorly or unventilated combustion:
1) Fuel; It doesn’t matter what fuel you intend to use in your heating device. They are almost all a mixture of Carbon, and Hydrogen… and sometimes with a little Oxygen thrown in. Examples include Propane (C3H8), Kerosene (actually a mixture of hydrocarbons with the nominal formula (C12H26), or Alcohol (Isopropyl Alcohol is (C3H8O). When you BURN them they combine with an EXCESS of Oxygen in the air (Complete Combustion) to form Carbon Dioxide (CO2) and Water (H2O), and HEAT of course…
2) The problem of CO (Carbon Monoxide) occurs when the system lacks enough oxygen to complete the combustion process. Also most heating processes don’t mix the fuel with an excess of air efficiently resulting in at least a small amount of CO being released as a result (Advice given earlier and repeatedly on the requirement to have CO detectors should be well considered.)
3) For Example.. An unventilated propane heater used in a 10 x 12 x 8 room (960 cubic feet) of a house of modern construction (that means vapor barriers on all six sides double insulated windows and appropriately sealed doors).
In that 960 cubic feet of air you have only 196 cubic feet of oxygen, about 16 lbs. Of that 16 pounds, you cant burn more than about 3.1 lbs before you reduce the concentration to < 19.5% O2 in the "ROOM". That Concentration is not conducive to life. Of course you will be generating CO along the way. You only need to read the news from Texas to see that good ventilation and CO detectors are required.
4) Along with the hazards think about all the water that is generated. The water vapor penetrates the walls of the room. It will condense on the inside layer of the vapor barrier. It affects the interior wall covering be it plaster or conventional wallboard. Enough will cause major damage and can, as a relative found out, may cause structural failure. He and his spouse were rudely awakened when the plaster ceiling collapsed onto them.
5) I suppose i could go on, but I think I've gone on long enough… BUT… Please ventilate. And if you are living in a house, consider alternatives before you need them.
Great advice — especially the water vapor advice as this often goes overlooked. Thanks. 🙂
I made a few passive solar air heaters that sat outside a window. It was a top glazed enclosed frame that held black painted corrugated tin in the middle. The window sat on top of the split opening into the house. The lower opening was a boxed in cold air duct by the floor and the top opening allowed the heated air to enter the room. Both used rubber foam plugs to seal the openings after sundown. Later on I extended the bottom so I could add 2 layers of 3/4″ aluminum clad foam insulation so the cold air from the house didn’t get colder as it passed thru and heated faster when passing beneath the hot tin. Got the idea from an old issue of Mother Earth News.
You sound like a good person to know during a grid-down situation. 😀 I’ve also seen these in Mother Earth News but haven’t tested them.
I didn’t see the old cardboard and wax in a can trick mentioned… you cut the cardboard (corrugated type works best) to just below the height of the can roll the cardboard up and insert it into the can… melt the wax and pour over the cardboard and light the cardboard which works as a wick… Tuna cans work great for this… I keep 1 or 2 of these in my car just in case… warning: the can will get hot.
I also like that trick (learned it from an Israeli soldier a long while back). But I tend to consider it more of an emergency stove or light than a heater. I guess it would produce some good heat though in an emergency. Thanks for the comment!
We learned this cardboard and wax in the can trick in the boy scouts back in the mid 70s. They called them Buddy burners.
Many moos ago when I was Cub Scout we made these and used a large can which we cut a slot for the tuna can to slide under. The two holes on the side near the top for venting. Thus a stove we called a buddy burner.
I was in Girl Scouts and we did the same thing!
I have a 7 1/2″ cooking pot and a dryer vent help me make a little fire pit to heat my shed please.
My question is the same “dumb” question as above. Therefore, we know it’s not really a dumb question because there’s two of us asking (LOL). Where is for the heat to go if not right up the chimney. It’s not like a bunch of wood that laying there burning.
I answered the not-at-all-dumb question above. 🙂
They say no question is a dumb question so here goes. If you vent the “stove pipe” of a rocket stove into a chimney (which I understand the need for that part) then the warmth you get is whatever is radiating from the metal housing of the rocket stove, right?
Definitely not a dumb quesiton. 🙂 Yes, the stove pipe goes up the chimney so the heat you get is what’s radiating off the stove. You could even do things like putting a few big bricks in front of the stove to capture the heat and “store it” for later. However, you are right: Radiant heat stoves emit heat in ALL directions so some of the heat will be lost up the chimeny flue.
It’s not ideal but that’s why this is about EMERGENCY stoves. Hopefully you don’t have to use one of these methods because you got a smarter, more efficient stove. The Mr. Buddy propane stoves are great for disaster prepping and don’t cost that much. Just need to slightly crack the window of the room you are in to release the CO gas.
Btw, you can see some pictures of DIY stoves people used in Bosnia during the war. They’d use a long vent pipe to the window so the stove could sit inside the actual room and heat wouldn’t be lost up a chimney. https://balkaninsight.com/2017/05/31/wartime-furnaces-remind-bosnians-of-struggle-for-warmth-05-31-2017/
I’ve got the paint can/TP set up ready to go, one in each vehicle in case of a vehicle break down in cold temps, and two in the house. I also stock denatured alcohol as fuel in place of the rubbing alcohol… I feel it burns cleaner. By sectioning off the rest of the house from our open living room and kitchen with a pair of light-blocking curtains on an expansion rod, the two heaters can keep the space we occupy during a power outage very warm.
If used in a vehicle, I’ll section off the front of the vehicle from the back with the tarp in my BOB, for the same reason, to heat a smaller area and conserve fuel. I also keep two metal pie tins in each vehicle to put the cans on to make a sturdier base and so the cans won’t melt the vehicle’s carpet/seat material.
I’ve never been able to generate anywhere near enough heat with the terra cotta pot & tea candles… I understand others have, but it’s not for me.
Last point… any time you’re using a fire-based heat source, be it propane, LP, gas, candles, kerosene, wood stove, etc you absolutely, positively MUST ventilate the area. You don’t have to throw open the front door, but do crack a window about 1/2″ while the heat source is running, fire EATS oxygen, so oxygen must be replaced in quantity.
Nice setup you got going there TX. The terracotta pot method is a strange one, some swear by it but many say it is not effective. The only way to confirm is to try this method out before a situation occurs and then plan accordingly.
Good idea about the pie tins as a base. And also very good point about CO poisoning. I’m going to update the post now to include this! So many people end up sick or dead after emergencies because they used a generator or other oxygen-sucking heater indoors without adequate ventilation. :/
The pot and tea candles are a hand warmer. Unless you are in a very small closet they are not capable of much heat. It is all about Btu’s and those tea candles are not capable of generating many. The pots only spread the heat out a bit. They will not make it any hotter then what the candles can generate. Do no depend on this for any sort of life saving heat. As I said, it is a hand warmer.
I have used both the tea lights and terracotta pots and the toilet paper and 70% alcohol. My high school students were amazed at the amount of heat both can provide. I’ve also shown them how to use cotton balls and Vaseline to make fire starters.
Which of these options, of any, could be safe indoors long term? We live up north with no way to install a wood burning stove or anything similar in case power goes out in the winter. What would you recommend to keep at least one room warm without risking carbon monoxide poisoning?
Hi Stephanie – you could look at an indoor kerosene heater – https://www.primalsurvivor.net/best-kerosene-heater/
When power goes out I bring out the Big Buddy Heater. It has worked very well for me in an emergency to heat the living room and dining area. I also use one Dietz lantern in the bathroom and one in the kitchen to prevent those areas from getting to cold in the winter when the power goes out. Haven’t tested the total amount I would need for say two weeks. But I’m going to guess that three 20lb propane tanks should last me if I run it on and off during the day for two weeks. And yes I do have battery powered carbon monoxide detectors.
I’ve read that those tea lights only put out about 100 btu/hr each. A Dietz Jupiter lantern will put out around 1400 btu/hr and run approximately 114 hrs on a gallon of kerosene or clean heat. You would need to burn 14 tea lights every 4 hrs to equal the heat output of this lantern. Or burn 399 tea lights total to get the equivalent heat output from a gallon of kerosene.
And if your concerned about the smell of kerosene or other health issues during a power failure or SHTF situation then you can also consider a wall mount propane heater. I believe my friends has a Dyna Glow 30,000 btu heater with a thermostat. He has it hooked up to a 100 lb tank that sits outside. Works well in a pinch.
I also have made two solar can heater boxes that sit on the inside of my south facing windows. I use them to supplement heat on sunny days during the fall, winter and spring. Saves me money. I can also run them both with a 75 watt power inverter hooked up to my deep cycle battery when the power is out. I didn’t feel comfortable drilling a hole in the wall if the solar can box was installed outside. And I don’t care if it blocks my view looking out front because I have installed security cameras anyways. The boxes are easily taken down and stored in the garage for the summer.
Where theirs a will theirs a way.
We are looking onto a printing option at the moment.
I second Mildred’s request. I copy and paste articles into another program to print but what a great idea to have them easily printed off in a binder.
You have some great articles, but can you make them printer-friendly? I would like save some of them in a binder I have. Thank you!