I got my first survival knife when I was 8 years old, and my mom (yes, it was my mom and not my dad who gave me the knife!) was very clear about the safety rules.
That didn’t stop me from slicing my fingers open a few times while whittling sticks. These knife injuries happened while we were far from medical help (and before the cell phone era, so there was no way of calling 911).
Knife wounds are among the most common backcountry injuries; there is also the risk of stab wounds.
You can’t always call 911.
So, whether you are a prepper, outdoors person, or homesteader, if you believe in being self-reliant, you’ll want to know how to treat a knife wound.
Start by downloading our first aid supplies checklist below.
FREE FIRST AID CHECKLIST
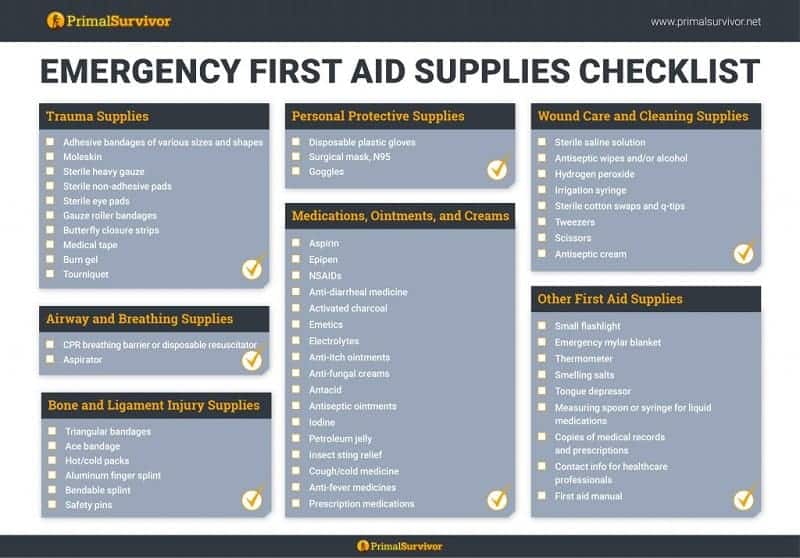
Get organized fast with our completely free checklist.
1. Have the Victim Lie Down
The crazy thing about knife wounds is that, because of adrenaline and extreme stress, knife victims don’t always notice their injuries until later.
As the person administering first aid, you want to take advantage of this initial shock period and get the victim to lie down.
Why? Because:
- The patient won’t be able to see their knife wound while lying down. This will prevent the patient from freaking out.
- Reduces the risk of injury from falls due to dizziness
- Stabilizes the victim
Of course, there are exceptions to this rule. You wouldn’t put knife wound victims on their back if the wound were to the back or if lying down would affect the patient’s airways.
2. Remove Clothing Around Area
It is good to have scissors in your wilderness first aid kit. Or, use your survival knife for this (carefully).
3. Put On Gloves or Wash Hands
It is easy to want to skip this step during an emergency. However, if you don’t take the 20 seconds required to put on gloves, you could infect the wound with your dirty hands.
If you don’t have gloves to put on, then wash them thoroughly. At the very least, rub some antibacterial hand sanitizer (Amazon Link) on them first.
4. Get Bleeding Under Control
The human body has approximately 10 to 12 pints of blood. The body can usually lose 1 pint of blood without severe effects.
- A loss of 2 pints of blood will lead to shock.
- A loss of 5 to 6 pints of blood will cause death. (Source)
Here’s the scary thing: if the knife wound hits an artery, the rate of blood loss can be very fast. According to this college professor, fatal exsanguination from an arterial wound may only take 20 seconds to a couple of minutes. Even venous bleeding could cause death in 4 to 5 minutes if the injury were large enough.
Know What Type of Bleeding You Are Dealing With
- Arterial Bleeding: The blood will be SPURTING out. It will be a bright red color.
- Venous Bleeding: The blood will be oozing out. The blood will be a darker color.
- Capillary Bleeding: The blood will slowly come out. It will eventually stop on its own.
Apply Pressure
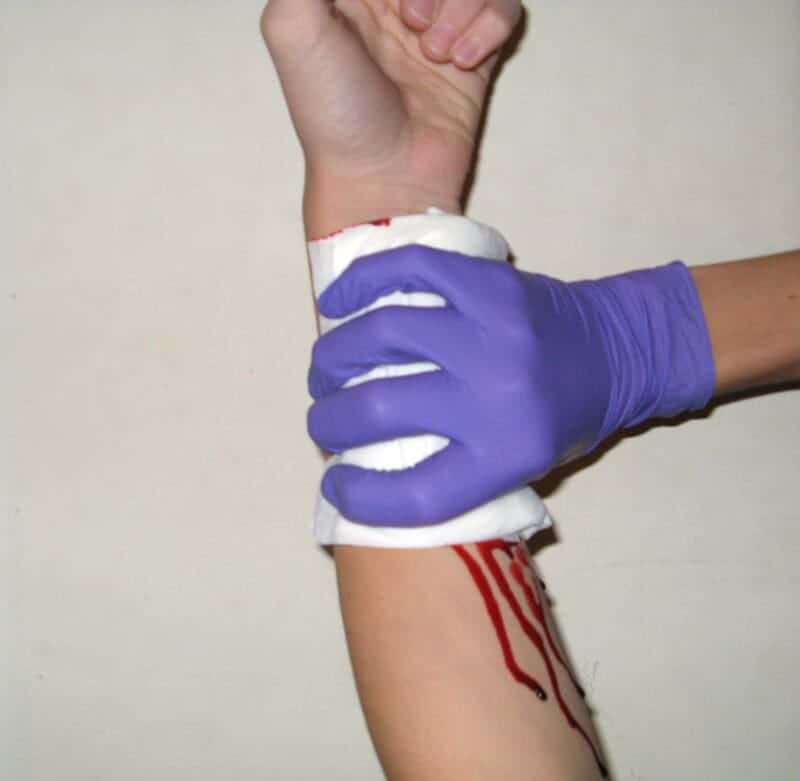
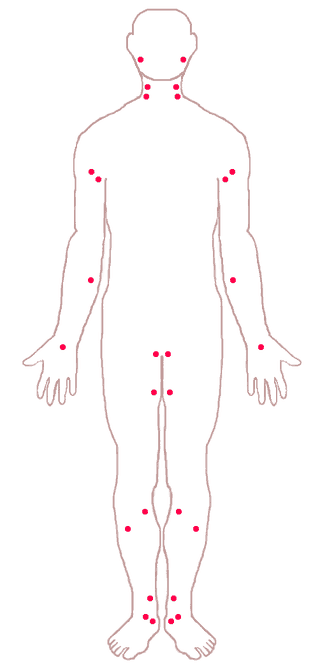
Applying pressure to the wound will help stem the flow of blood. In arterial bleeding cases, you will also want to apply pressure to the major artery leading to the wound. You will need to use both hands for this!
For example, if the knife wound is in the thigh, you must apply pressure to the femoral artery.
10 to 15 minutes of direct pressure should be enough to control the bleeding of most wounds you’d encounter in the backcountry.
Reposition the Victim
The heart is what pumps blood throughout the body. If the wound location is below the heart, blood loss will occur faster. To prevent this, position the victim, so the wound location is above the heart.
For example, if the knife wound is in the leg, have the victim lie down and elevate the legs.
Seal Sucking Chest Wounds
One of the worst possible knife wounds is a stab to the chest which penetrates the lungs. The outside air entering the lung will cause it to collapse, and the victim will die quickly.
It is critical for these types of knife wounds that you seal the wound ASAP to prevent air from getting into the lung. This can be done by putting any of these over the wound:
- A credit card
- Duct tape
- Plastic bag
- Your hand
Even with this step, there could still be complications from pressure buildup. Thus, Heiskell recommends having a Chest Seal (Amazon Link) in your first aid kit.
When to Use Tourniquet
Recent studies have shown that early use of a tourniquet can be beneficial when trying to stop severe bleeding. There are some potential complications, so read our article on using a tourniquet.
5. Decide Whether to Remove the Knife
Is the knife still in the wound? Under normal circumstances, you should never remove the blade. But, as JEMS talks about, you might need to remove it if no help is available.
Before you remove the knife, you better make sure you are ready to stop the blood flow, which is likely to start gushing out immediately!
6. Clean the Knife Wound
Once the bleeding has stopped, you’ve got to clean the wound to prevent infection. Cleaning an injury is always an essential part of first aid, but it is vital when you are far away from professional medical help.
The last thing you need is to get an infection that develops into gangrene or spreads throughout your body.
A typical medical saying is, “The solution to pollution is dilution.” In other words, you need to dilute the wound site to get out any contaminants that would lead to infection.
- Use tweezers to remove large pieces of debris in the wound.
- Use at least 1 liter of fluid to clean each wound.
- Saline solution (Amazon link) is best for cleaning wounds. If not available, use sterile water (boiled for this purpose).
- Direct the fluid at a perpendicular angle from about 1 to 2 inches from the wound.
- You must use enough force to dislodge any foreign debris in the wound but not so much pressure that the tissue will be damaged or the debris will get pushed deeper into the wound.
If Water is Limited or Not All Debris Can Be Removed:
Hopefully, you have supplies in your first aid kit. To clean the wound, you can use a 1% povidone-iodine rinse (Amazon link).
In the past, alcohol and hydrogen peroxide was recommended for cleaning wounds. However, these are no longer recommended. Evidence shows that they don’t help wound healing and can make it take longer for wounds to heal since both substances may damage skin tissue.
However, salt is a great natural cleanser. You can mix 1 tbsp. of salt with 1 cup of warm water to make your own saline solution for cleaning the wound.
Apply Antibiotic Ointment
Apply copious amounts of antibiotic ointment (Amazon link) over the wound. Not only does this help prevent infection, but it also can help prevent the dressing from sticking to the wound.
As Hartley Brody notes, antibiotic ointments are NOT a substitute for cleaning a wound. You still need to flush the wound well (no matter how much the patient is screaming of pain) before applying the ointment.
7. Decide Whether to Close the Wound
Under normal circumstances, where you can call 911 or go to the hospital, you should NEVER close a knife wound. This will trap bacteria and other contaminants in the wound, leading to infection. If you do close it, the nurses will just open it up for cleaning at the hospital.
But we aren’t talking about normal circumstances here!
Closing a wound reduces airspace, prevents further contamination, and speeds up healing.
Yet, if a wound is closed and develops an infection, the pus won’t be able to drain, and a life-threatening illness can develop.
Thus, the safest way to treat a knife wound is to leave it open!
Leave a Knife Wound Open Under These Circumstances:
- The wound is infected
- The wound has been exposed to the air for more than 6 hours
- There is dead tissue in the wound (dead tissue is discolored and won’t bleed)
- The edges of the wound are so far apart that closing it would tear the skin or put pressure on the skin
- The wound is from an animal or human bite (I know we are talking about knife wounds here, but I want to remind you NEVER to close an animal bite because they are teeming with bacteria!)
Close the Wound Under These Circumstances:
- The wound is large and refuses to stop bleeding
- The wound penetrated through the entire skin (you’d be able to see underlying tissues)
- The wound has been open for less than 6 hours
- The wound is over a joint or moving part of the body and won’t close by itself
- The wound is gaping open and won’t be able to close without your intervention
If You Are Unsure What to Do:
Doctor Joe Alton over at Doom and Bloom recommends a “delayed closure” if you aren’t sure whether to close the knife wound. This means waiting 72 hours to see if any signs of infection develop. If they don’t, then close the wound.
Open Wounds
An “open wound” does not mean you leave it open to the elements. The wound must still be covered (dressed) to prevent contaminants from entering it. Remember, even the air contains bacteria, so the wound must be dressed at all times.
- Apply antibiotic or antibacterial ointments
- Wet a sterile dressing (Amazon link) in saline solution or sterile water (read why wounds should be kept moist)
- Apply the wet sterile dressing over the wound
- For large wounds, you’ll need to pack the dressings into the wound
- If you don’t have any sterile dressings, you can boil rags or pieces of clothing
- Use dry tape or a bandage to hold the dressing in place
- The tape or bandage holding the dressing should be loose
- Clean spider webs can be used over the dressings and under the tape as a natural antibacterial layer
Closing Wounds
- The wound should be dry before closing it
- Unless you are a trained medical professional, don’t try to suture the wound unless it is a last resort. If you have no choice, read this about how to suture a wound in an emergency.
- Use butterfly bandages to close the wound
- If you don’t have butterfly bandages, you can use pieces of adhesive tape to make a butterfly closure
- Cover the closed wound with dressing or bandages
- Avoid using tape to cover the closed wound; it is hard to remove without further damaging the wound
Here you can see a video of how to close a wound with duct tape;
8. Monitor the Wound
Regardless of whether you left the wound open or closed, you need to monitor it for signs of infection.
For Open Wounds:
You’ll need to change the dressings every 12 to 24 hours. Be careful not to open the wound when you remove the dressings. Apply ointment to the wound before putting on the dressing each time. The cream helps prevent the dressing from sticking to the wound and speeds healing.
If you don’t have enough sterile dressings, you can boil the used ones to sterilize them before reapplying them.
Expect a bit of redness or pus as the wound heals. However, severe infection is likely developing if the skin gets very painful, hardens, turns bright red, or is hot to the touch. Re-clean the wound, and take antibiotics if you have them.
For Closed Wounds:
Even if you close the wound, you still need to monitor it. If the wound area swells up, gets red and crusty, or stinks, then an infection has developed.
You’ll need to reopen the wound and clean it again. Leave the wound open this time and start saying your prayers!
Want to get prepared for medical emergencies? Read this post on How to Take Your First Aid Skills to the Next Level.
Related

I taught first aid and cpr to first responders for over 15 years.
There are a few quick hints I suggested to be added to first aid kits. In addition to what you wrote, which is very good, I recommend adding a tube of cake frosting to the first aid kit. This is used for diabetics having an insulin reaction. Its pure simple sugar and has a shelf life of years.
I would also recommend keeping your medical gloves in a sandwich bag. As you stated the care for emergency chest wounds included blasting bags. All you have to do is remove the gloves and turn the baggie inside out. Handy and sterile (reasonably anyway)
Great tips! Thank you for the input. Though I’d say that packets of honey are probably easier to carry than a tube of frosting 🙂
Yes, honey is definitely the way to go. Icing will crystalize and harden in a tube, while honey? Honey found in ancient Egyptian tombs is still 100% safe and edible, it is the most time-resilient food known. Not that we’d expect a first aid kid to last many thousands of year, haha, but going with best shelf life is a force of habit I am sure with many of us.
Thank you for the information
excellent write up. This knowledge can save lives and I’m happy to see it posted.