Fire is essential to survival. You need it for warmth, to cook food, and to boil water for purification.
So, it is no wonder survivalists recommend keeping a ferrocerium rod – a ferro rod – in your survival bag.
What they don’t tell you is that starting a fire with a ferro rod isn’t as easy as it seems.
Here are some expert tips to ensure you can use your ferro rod in an emergency.
Choosing a Ferro Rod
Ferrocerium rods are usually made from 50% cerium, 25% lanthanum, and 19% iron, with some small amounts of other metals.
The recipe used by ferro rod manufacturers varies. Some survivalists will tell you to avoid cheap Chinese-made ferro rods because they have low amounts of cerium.
However, I’ve found that even the cheapest ferro rod will get the job done with enough practice.
Read our in-depth guide to the best Ferro rod.
However, the LENGTH and WIDTH of the ferro rod matter!
The longer the ferro rod is, the more contact time you will have on the surface when you slide the striker over it.
The wider the ferro rod is, the more surface area you have, and more sparks will fly off.
If your ferro rod is part of your Everyday Carry, you probably don’t want a goliath rod to carry around. However, if you are just getting started, I suggest getting a larger ferro rod to practice with. It will be easier to hone your technique with the larger ferro rod.
Note
Once you receive your ferro rod in the mail, you’ll notice a black coating. This is to prevent rust. You’ll need to scrape some of this off. You should be able to see a shiny area where you are scraping.

Choosing a Striker
While the quality of the ferro rod doesn’t matter too much, the quality of the striker (aka scraper) does matter!
The small, flimsy strikers that come with cheap ferro rods don’t give you much control. The edges of these also aren’t very sharp, so you won’t be able to make many sparks.
Remember, the key to using a ferro rod is strong, controlled strokes! You’ll need a good scraper to do this.
The best striker for a ferro rod is the back of your fixed-blade survival knife (read about survival knives here).
Read more about some DIY Ferro rod striker options.
NEVER STRIKE A FERRO ROD WITH YOUR KNIFE BLADE!
Doing this will cause your knife to get dull very quickly. Instead, you should use the blade’s flat, squared-off back edge. Hopefully, you’ve chosen a survival knife that does have a 90-degree edge on the spine.
Alternatively, the saw blade on a multi-tool makes a great ferro rod striker. The saw blade is solid but flexible, thus giving it good drag across the surface of the ferro rod.
If you don’t have a knife, saw blade, or the striker that came with your ferro rod, you can use any number of items as an alternative striker.
Trash like broken glass works well (which you can unfortunately almost always find in the wilderness). Hard rocks also make good scrapers.
Tinder for the Ferro Rod
We call ferro rods “fire starters.” But a ferro rod will NEVER make a fire. Ferro rods make SPARKS.
Making a fire out of sparks can be tricky.
You’ve got to get the sparks to land on VERY DRY and FLUFFY tinder. Otherwise, the sparks will die out before they can ignite your tinder.
Tinder, which would typically work well for matches, or a lighter might be too large and heavy for starting a fire with sparks.
Many survivalists recommend using a cotton ball with petroleum jelly on it as tinder. But, if you thought far enough ahead to bring cotton balls with you, then you probably should have brought a spare lighter and more matches.
Other than in practice scenarios, I can’t imagine when I’d realistically have cotton balls but no matches.
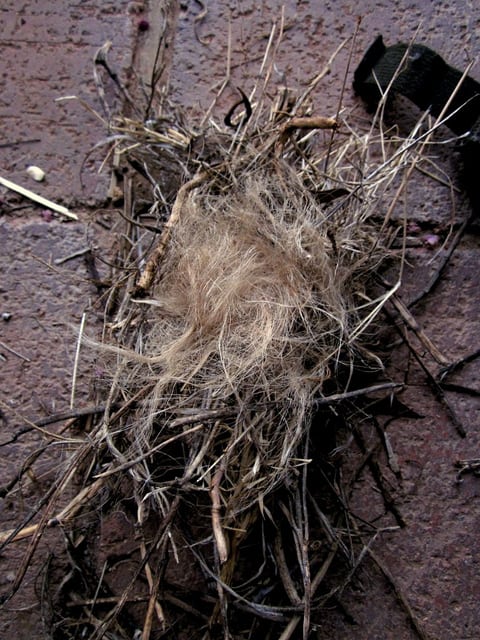
Good tinder for a ferro rod is…
- Fluff from plants
- Dry grass “birds nest.”
- Feather stick
Best Solution…
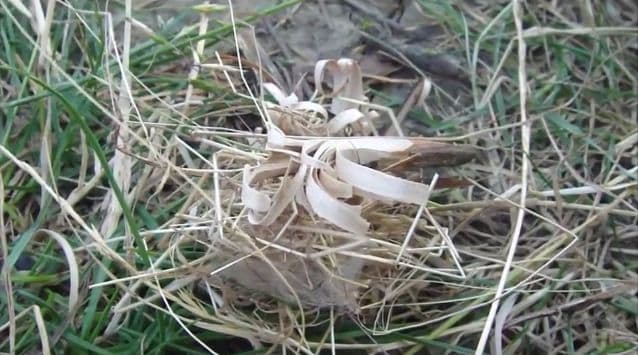
Fluff and dry grass don’t always produce a full flame, and feather sticks can take a while to catch on fire. I’ve found that the best solution for starting a fire with a ferro rod is to use all three tinder types.
- Make a “birds nest” of dry grass on the ground
- Top the bird’s nest with plant fluff (if you can find some)
- Make a feather stick and put it on top of the fluff and dry grass
- Use your ferro rod to rain sparks down on the configuration
With this setup, the fluff and dry grass will catch your feather stick on fire, which can then be used to light your kindling and make a fire.
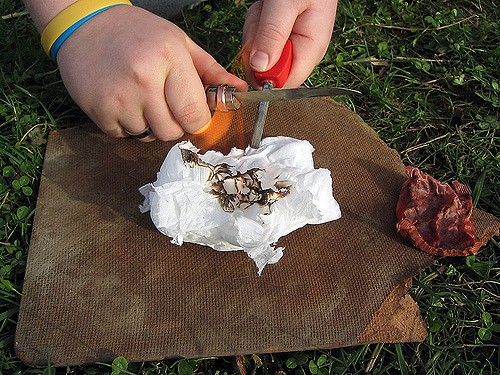
Or Use a Char Cloth
Using a char cloth is an even better method of making fire with a ferro rod A char cloth is made from 100% cotton, which has been turned into charcoal. Charcoal ignites to produce a hot ember very easily.
We recently made char cloth; check out the post for easy-to-follow instructions.
Ferro Rod Technique
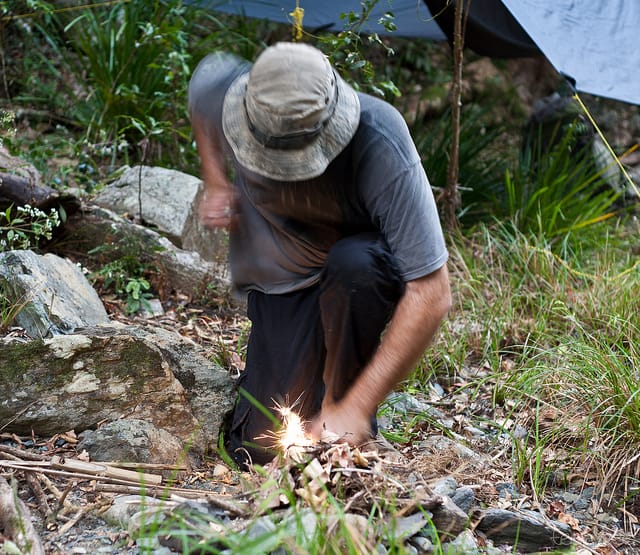
Many people make the mistake of using a ferro rod like a match. But a ferro rod does NOT need to be struck very quickly and delicately. Instead, you need sturdy, firm strokes to make lots of sparks fly off of it.
Correct technique for using a ferro rod
- Hold the scraper at a 45-degree angle.
- The end of the ferro rod needs to be right next to your tinder.
- Pull the ROD back, not the scraper!
- Sparks should rain down on your tinder and light it.
Tip 1: Note that step 3 is to move the rod, not the scraper. This method is much more effective because you’ll be able to get sparks closer to the tinder. By contrast, when you move the scraper instead of the rod, your hand gets too close to the tinder. You’ll either knock over your tinder, or the sparks will cool down too much by the time they land on it. The “move the rod” method also makes it easier to get your sparks dead center on the tinder instead of showering them all over the place.
Tip 2: Ferro rods only work if your tinder is VERY DRY. If your tinder is even a bit damp, you won’t be able to make it ignite from the sparks. One expert solution is to rub the rod back and forth over the scraper. It will produce many sparks, which will dry out your tinder so it can ignite.
Practice!!!
The best advice I can give for starting a fire with a ferro rod is to practice! Start by practicing with something easy, such as a cotton ball with petroleum jelly Then practice on different types of tinder, especially ones you’d find in wilderness survival situations. And don’t forget to practice with different kinds of scrapers too.
With a bit of practice, you’ll soon be a fire-starting master!
Or, try these methods of starting a fire without matches!
Have you used a ferro rod for making a fire? Let us know your tips and tricks in the comments!

Hi Folks… the only reason I always carry 2 BIC lighters (separate locations) is in case one of my arms / hands become incapacitated and I need to start “one handed” fires. I always carry multiple ferro rods, a F&S kit and several dependable tinders along with a working knowledge of “Naturally available” tinders. Take Care and Stay Safe… Mike
Thanks for your tutorial. I have just bought my first ferro rod, 5″ x 1/2″. It isn’t producing many sparks even after scraping the paint (?) off and getting a Bayite striker, so I might try a different supplier. But my first question is, if you are holding the striker still and moving the rod, would it be better and more natural to hold the striker in the non dominant hand and the rod in the dominant hand, with the rod above the striker?
Also, are magnesium shavings effective with a ferro rod, or would fat wood be better?
It’s all about practice (and patience). I personally found it more difficult to master the “blowing a spark into a flame” aspect than actually making sparks with the Ferro rod.
If you want to get a new rod, I’d recommend getting a long one. It makes it much, much easier to generate lots of sparks. As for the dominant hand issue, I’m not sure: I’m a lefty living in a righty world, so have already learned to do a lot of things better with my right hand (can’t use scissors with my left, for example). Magnesium shavings will work with ferro. IMO, they are easier than fatwood but you still need to know how to blow the spark into a flame.
This is a wonderful web page of information because not everyone just knows this stuff. It’s helpful to many a guy and women, single moms who maybe want to be taking their sons out to learn about camping and be able to teach their son or daughter, or both, such important skills. I firmly believe that learning how to make fire without matches and without a lighter is just as important as the skill of learning how to swim. We don’t always need to swim and we will not always swim, but how enjoyable and confidence building it is that we know how to swim and in some cases it saves our lives, just like the fire skill will.
Granted, learning to make fire with sticks is the ultimate goal but a good ferro rod is what I like. I even have made several of them into a necklace with the striker. In an unexpected situation it works just fine and can serve the purpose. I’ve made those trendy survival style necklaces out of the 1 inch ferrp rods with two holes in them that allow them to also be worn into a shoe or boot lace. I attach the round strikers (the ones that have sharp teeth on one edge) and wrap some dollar store jute over the teeth part. The one inch ferro rod that has two holes drilled in it is what I insert the paracord (with several inner white strands) into and it’s an easy to adjust, double stranded survival necklace, complete with Chinese sliding knots. It’s well made and kind of a hip, bohemian cool type of looking necklace. When taken apart the paracord will reach close to 5 ft. So, you have the paracord AND the inner strands. (I also have a make shift fishing set up that I just attach the metal bits I bent up from paper clips, along with the small hooks to a stick or long stick. My emergency fishing pole set up fits in a tiny candy container and slides into a pocket of the knife sheeth I made for my camping knife….I’m a girlie girl, too, but with just a few very important skills I learned, and pass on, I’m an even smarter girlie girl. I love the fact that I appreciate comfort and good things in life, but, there’s more to some women under the surface. I’m proud of that and I’ve made sure all of my kids, and their close friends (and sometimes their parents), learn such things too.
I can’t tell you how many people I’ve given my necklaces to, as gifts, to friends that I know who love the outdoors or just like to do car trips to see places. I make sure that each person I give it to knows how it works. Some wear them all the time because it just looks cool but it’s a necklace that can save a person’s life. It can also be totally out of view under a shirt when worn. To be prepared for the unexpected empowering and brings peace of mind.
Thank you again for creating this detailed and highly informative information for many to read in a way where they are not made to feel stupid.
Actually, your website is a treasure trove of very useful, well presented information. If we have to jump through hoops to obtain a driver’s license I wonder why so many have no interest in some of these basic and life saving skills. Kind of a shame it’s of no interest to some. Nobody has to come off as some wild eyed crazy survivalist just for wanting to learn useful skills for themselves or their loved ones.
The crap hits the fan because too many were not prepared for any number of unexpected situations, so they go all nutters and start acting irrational, insane, and sometimes violent instead of having the confidence and humanity within to know they are seasoned with knowledge, and hopefully some supplies, to go from there or possibly start trekking out on foot with their go packs on.
The California fires had people needing to flee and in some cases, roads were blocked. So, grab a go-pack that has some supplies in it, stay calm, and go to safer areas…maybe that safer area is not very populated but you have your family, they have their “just in case” packs and there’s a tarp or a couple of small tents, emergency food, some supplies, a small radio, solar charger etc… without the insanity of being stuck with a pile of other displaced people who were not prepared? Maybe people will take all of your supplies, your families’ supplies if you get herded in with a large number of displaced people? Maybe it’s best to lay low in a safe place away from the chaos? Who knows. It just depends on every situation and who was wise enough to start caring about how they or their family or loved ones, or friends, are going do deal with some kind of unexpected disaster or who knows what.
Little by little at each person’s pace, just start educating yourselves by reading websites just like this one. This one comes across as a classy survival skill website that speaks to everyone rationally and respectfully.
PS, I actually read your “About” page and it was really nice. Diane Vukovic, your
Contributing Writer, she’s pretty darn cool. She’s also an example of what I think a “World’s Greatest Mom” example should be. She has taught additional self confidence AND survival skills to her daughter just by celebrating and enjoying life with her, not by scaring the poor kid with horror scenarios. I consider that to be in such good taste and very classy, too.
Thanks for the nice comment. It’s not every day that someone gives you a compliment like “World’s Greatest Mom.” 🙂 And I especially like what you said about “Nobody has to come off as some wild eyed crazy survivalist just for wanting to learn useful skills for themselves or their loved ones.” 😀
I would like to see a picture of the necklaces you make. They sound terrific.
I love birch bark, used it as a beginner this morning, worked great! Made sure to put out fire very thoroughly as it was very windy.
Yeah birch bark is an amazing substance, has many other uses too. Look out for a post on that!
Dryer lint works well as an ignition medium. Lights quickly, burns fast, and is easy to come by.
I use hack saw blades. I break/cut them into 3″-4″ long pieces, grind the teeth off and smooth the edges from the bottom of the section I will be holding the striker.
I leave saw blade teeth for 2″ or so but do grind them down by about half. I have found you get MUCH more sparks and material which continues to burn by using ground down saw blade teeth. More contact and yet enough teeth to scrape off material (which is what you want to happen). The sparks fly and the scraped off metal burns after the sparks are gone.
The length of the saw blade means it is flexible. I use the pull-rod method also. With very little practice, you can aim the blade to throw the sparks and material where you want it.
I also grind the front portion of the hack saw blade spine to ensure good 90 degree edges. You can use the spine of the blade as another scraping option. I drill a hole if needed, tie a lanyard and I am done.
One of the things I have learned is you want a rod with more magnesium. I believe these rods are made of a metal combo referred to as “mischmetal”. The magnesium is the metal you see burning after the sparks have died off.
I often see videos of people scraping their rod by moving their knives back and forth. Never understood why they would use this method. You scrape in the wrong direction 50% of the time, and moving a sharp cutting edge never seems like a good idea, especially when their are fingers near by. IMO you have better control pulling the rod. If you are trying to scrape off metal to act as an accelerant, carry a magnesium bar, or, magnesium shavings you made ahead of time and then carry with you in a aluminum pill carrier. You can use a drill and a drill bit of varying diameters to get the size of shavings you believe will work best. Just start drilling into the magnesium bar and save the shavings.
Hey Bob – very interesting technique – thanks for sharing.
well,
just use the striker, but like smoothing out a piece of wood,
just scrape slowly enough to not get sparks.
how do u fix a fire rod when it becomes choppy from testing it, (im new to this trying to get them to work)
what i mean is it snot smooth, its more of a heave choopy look to it now.
If you can get some fatwood this makes very good tinder. Make a small pile of fine shavings and onc you get a spark to land on a fine enough part ot if you will have instant flame. Fatwood also has the benefit of burning longer with a nice hot flame. I have a small ferro rod attached to a piece of fatwood that works well but have also used fatwood I have found.
Hi Robert, thanks for the alternative tip. If you do run a test, drop a comment here, as we would all be interested in the results.
Hi Jacob, as a boy scout in the 50’s, we use linen. The resulting char cloth was stronger when charred than the cotton. Might do a comparison test, just to confirm. Loved this article, especially step 3..yeah, I have been doing it wrong