It’s one thing to survive in the wilderness in mild weather. You might be cold, dehydrated, and hungry, but you’ll probably make it at least a few days.
Surviving in cold weather is an entirely different beast, though. Without adequate gear, knowledge, and skills, you can succumb to the cold or any other number of dangers quickly.
Cold-weather survival skills take much time to learn, practice, and master. Don’t think you’ll be able to survive by just reading this article.
I strongly encourage you to check out survival schools (like these schools in the USA) where you can practice skills with an experienced instructor.
In the meantime, here’s a breakdown of the most important things you need to know to survive in cold weather.
1. Build a Winter Survival Shelter
Any standard survival shelter design – like an A-frame or lean-to shelter — will work in cold temperatures (see 11 simple survival shelter designs).
But, in survival situations with a lot of snow, you might not have sticks or leaves for building a shelter. Luckily, snow is an excellent insulator. It can be used to make a very warm survival shelter.
*You need a shovel to make a snow survival shelter. Make sure you always carry one in your winter survival kit (see our recommendations for top survival shovels).
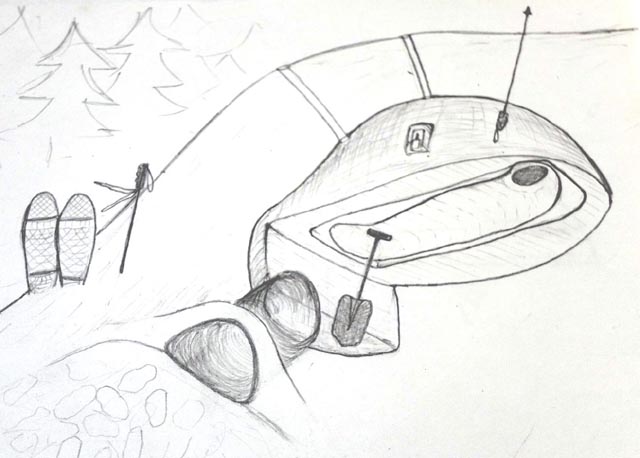
Snow Pits
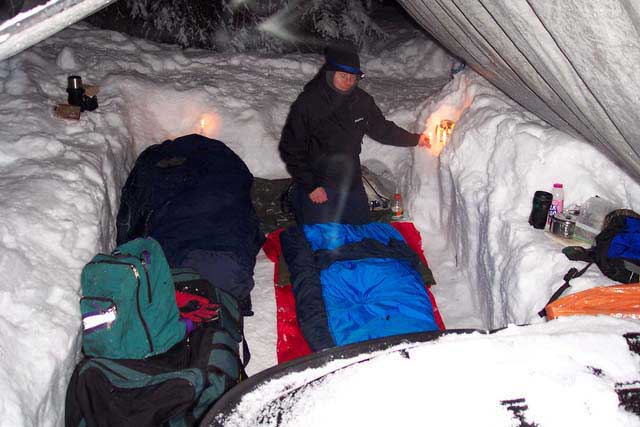
You can sleep comfortably in sub-freezing weather if you have a good sleeping bag, pad, and tarp. You’ll need to dig “beds” into the snow. Make sure the snow is packed down, or your body heat will cause you to sink into the snow!
Why not use a tent instead? Contrary to common belief, winter tents don’t trap much heat. Instead, they keep you warm by blocking the wind (which is important).
A good tarp setup and a snow pit can also block wind.
Basic Snow Shelter
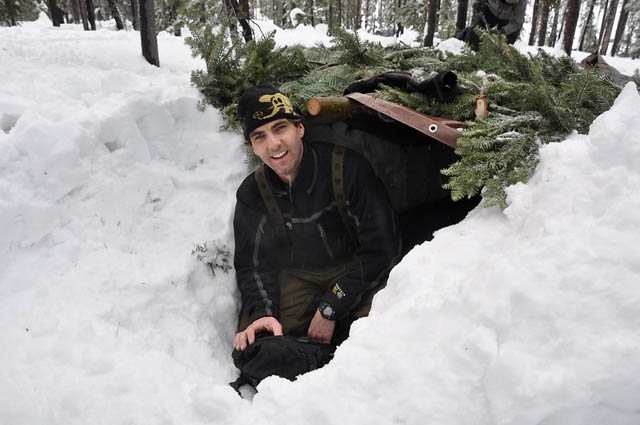
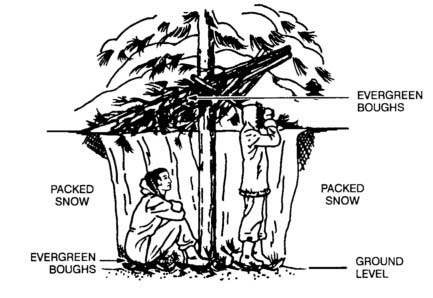
You can dig directly into a mound of snow to create a cave for sleeping. If the snow isn’t deep enough to provide a stable structure for a roof, you can put pine boughs over the top, as shown in the image above.
Quinzee
A quinzee is built by digging a pile of snow into a cave. In most situations, quinzees are NOT a good cold-weather survival shelter. They take a lot of time and energy to make.
If the snow is already this low, you can probably find debris to use for a shelter. It will be faster and save you much-needed energy.
Snow Cave Shelter
A true cave shelter is made so the entrance tunnel is lower than the sleeping chamber. This design is warmer because warm air rises and cold air sinks. Read how to build a snow cave.
Tree Well Snow Shelter
If you don’t have a shovel or are running out of daylight, this simple shelter might be your best shot at survival. The snow under evergreen trees isn’t as deep.
Carefully step towards the tree so you don’t fall into the tree pit. Then, start packing down the snow to make walls and a floor. Break some branches to create a roof.
2. Understand Layering Systems
Contrary to common belief, the layering system does not mean you should constantly add or remove clothes to adjust temperature. Imagine how impractical and annoying that would be!
Also, you lose some body heat whenever you remove your jacket to add/remove a layer.
Layering means wearing clothes that keep you dry, trap heat, and protect you from the elements. A good set of layers will keep you equally comfortable in temperatures of 50°F and 15°F.
Really. I can wear the same layers in winter as in spring. If it’s really cold, I might add an extra mid-layer once I stop hiking, but I’m not constantly adding and removing layers as I move about!
A winter layering system consists of 3 or 4 parts:
1. Baselayer
The purpose of this layer is to wick sweat away from your body. The best base layers are made from wool. Silk and synthetics are also good options. Never wear cotton, as it traps moisture and takes forever to dry.
2. Mid layer
The mid-layer is your insulation. It should be light and fluffy. You don’t want it to be too tight, or it won’t trap air next to your body. Fleece jackets are good mid-layers.
3. Another mid layer
In really cold weather, you’ll put on an extra mid-layer. A puffy down jacket or thick wool sweater is a good choice. Your second mid-layer can be a vest since your core loses the most heat.
4. Shell
The shell is what protects you from the elements. It prevents wind from carrying away body heat and keeps you from getting wet in rain or snow. The issue with shells is that they are not breathable, and thus, you can quickly start sweating.
While active in clear weather, it’s often smarter not to wear the shell so you don’t sweat too much.
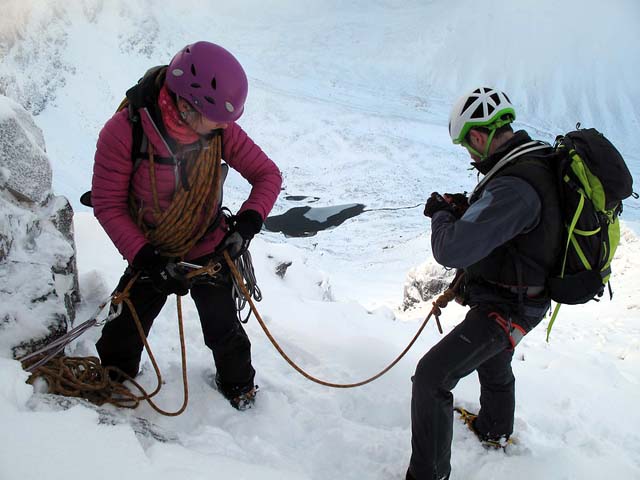
These climbers (above) are utilizing the winter layering system. Note that they are NOT wearing shells because it would cause them to get too sweaty. The shells will come on when they stop moving.
*You also need a base, mid, and shell for your legs. However, because our legs tend to stay warmer (while moving), many people only wear a base and another layer on their legs. Once you stop moving, you’ll want to put all 3 layers on your legs.
Layering Also Applies to Hands and Feet
Don’t think you can wear just one pair of socks or gloves and stay warm. You’ll need to layer your extremities just like the rest of your body. This is important, or you could risk frostbite.
Hand Layering System:
- Base layer glove: A thin synthetic or wool glove will wick away sweat
- Insulating glove: This is usually made from fleece or wool, which will trap heat. It’s important that it is a glove so you can still do survival tasks. Sometimes, shells come with built-in insulating layers.
- Shell mitt: The mitten must be made from a windproof, waterproof material. It will be big and bulky to retain heat. However, it’s challenging to do camp tasks in these. Some mitts have fold-back fingers, so you can easily access your insulating layer without completely taking off the mitt.
Feet Layering System:
- Base layer sock: These wick sweat away from your feet so you don’t end up with blisters or trench foot. Silk and wool are good options. Synthetics get stinky very quickly!
- Insulating sock: Wool socks are by far the winner here. They insulate even when wet. Always carry a spare insulating layer.
- Shell boot: True winter boots are massive with thick soles to insulate your feet against the cold. If you don’t have good snow boots, consider wearing gaiters, as these will keep snow from getting into your boots.
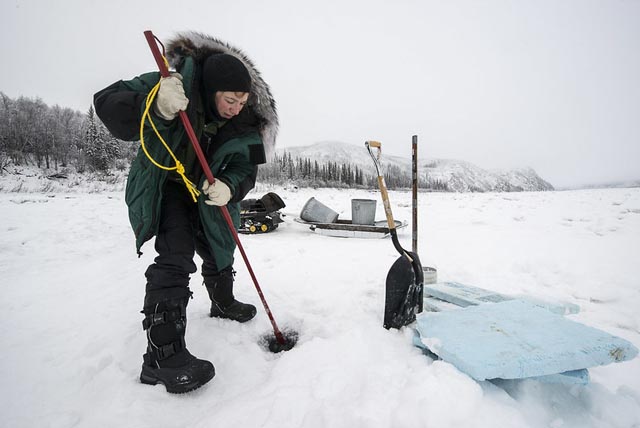
This Alaskan Ranger (above) unzips her shell while clearing an auger pit. She’s wearing insulated shell pants. Notice how massive her boots are!
3. Starting a Fire
Building a fire in the snow is difficult because the ground and wood are wet. High winds can also blow out your fire before kindling has time to burn down. Here’s how to overcome those challenges to make a fire in the snow.
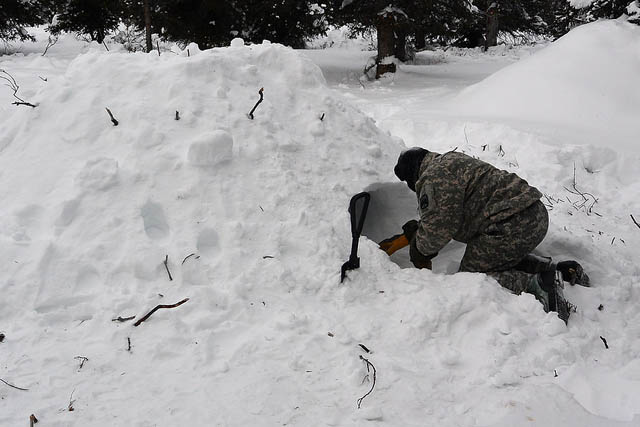
1. Pack Down Your Fit Pit
The snow under your fire will start to melt, causing the entire fire to sink. If the snow is deep, you’ll need to shove it away and pack it down.
2. Create a platform
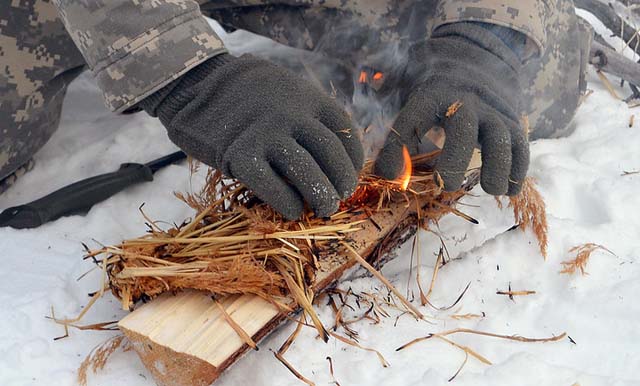
If you try to light tinder directly on snow, the snow will put out the sparks. Instead, build your fire on a dry platform. In the image above, a piece of split wood was used. If you don’t have an ax, you can build a platform out of alternating layers of branches.
3. Create Dry Tinder and Kindling
In winter, you should carry tinder in your fire-starting kit. I like cotton balls coated in Vaseline. They will burn for several minutes each.
Read:
If you don’t have dry tinder, you will need to make some: Peel the bark off of a branch with your survival knife. Then start rubbing your knife blade up and down the branch to obtain little shavings of dry wood to use as tinder. You’ll need a lot of it to get a fire going!
You’ll also need some dry kindling. Often, only the outer layer of branches was wet from snow. Use your knife to shave off the bark, and you’ll have dry wood. Thicker branches should be chopped with a survival axe. If you don’t have an axe, learn how to use your knife to baton wood.
4. Fire Lays for Snow
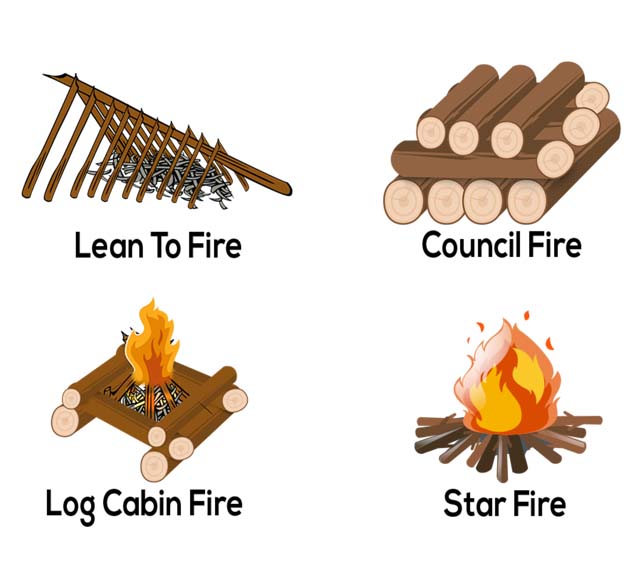
Most people know how to do the tipi (teepee) fire lay. This is the simplest to get going and maintain. However, it isn’t suitable for windy or snowy conditions. The tipi fire lay also burns through wood quickly – you might not have a lot of wood during a winter survival situation.
These fire lays are often better choices for winter survival.
- Lean-to Fire: The lean-to configuration blocks snow, rain, and wind. You can use this to make a fire in the rain.
- Council Fire: Good for making a huge, self-burning fire that doesn’t require much maintenance.
- Log Cabin Fire: The cabin configuration around the inner fire blocks wind. If you use large fuel logs for the cabin, the fire will burn for a long time.
- Star Fire: Also known as a cowboy fire, this configuration is best when you have limited fuel. As the fire burns, push the fuel further into the center of the star.
4. Obtaining Water
Drinking water might not seem like a problem when surrounded by snow, but obtaining water in cold-weather survival situations can be very tricky.
Do NOT eat snow for survival.
Yes, snow will give you water – but the snow will also drop your core body temperature. Instead, you need to melt snow for drinking. This means you need to have a pot and fire or stove.
Tip: Always save some water to put in the pot before melting snow. The water acts as a “starter” and helps the snow melt faster.
What if I don’t have a stove to melt snow?
Fill your survival canteen with snow and put it under your jacket. Your body heat will melt the snow. Each time you take a drink, add a bit more snow.
Constantly refilling is essential. The snow will melt faster when in water. Adding just a little bit of snow at a time will also prevent the water from becoming too cold to drink safely.
5. Finding Food
Finding enough food in spring and summer can be challenging enough. In cold-weather survival situations, your food options will be even more limited. There won’t be many or any leafy plants. Trapping insects (one of the easiest and most nutritious survival foods) will also not be possible.
A lot of experts will tell you to learn how to trap or track animals for food in winter survival situations. Realistically, this isn’t going to be easy – especially if you are already exhausted and hypothermic.
You are better off investing your time learning some wild winter edibles in your area. Read more about foraging.
6. Treating Cold Injuries
I’m a big advocate of never going into the wilderness without a first aid kit. In winter, you must be extra careful about detecting and treating injuries. They can turn deadly very quickly!
These are the main cold-weather survival injuries you must know and prepare for.
- Hypothermia
- Frostbite
- Trenchfoot
I’d recommend getting the book Wilderness Medicine: Beyond First Aid. It’s got comprehensive information on treating various injuries, including those from cold weather.
7. Recognizing Cold-Weather Dangers
Cold weather isn’t the only danger in winter survival situations. Winter conditions can create numerous other dangers. Make sure you know how to recognize and prevent these risks:
Avalanche
NY State has a good guide on avalanche basics.
Cornices
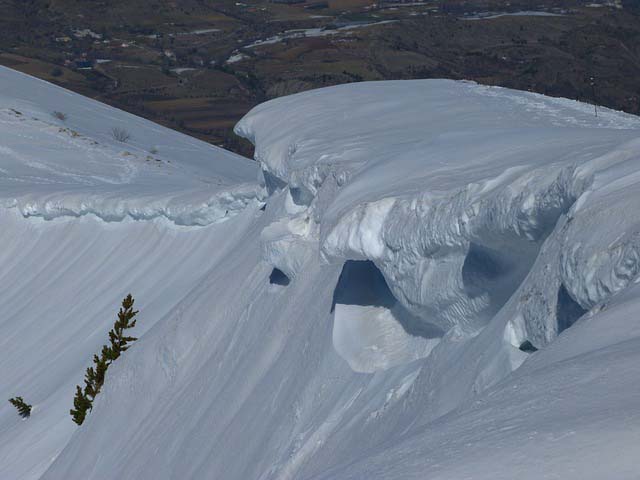
A cornice is a pile of snow that forms when the wind blows layers of snow over the edge of a mountain. Cornices are very dangerous because they can look like part of the mountain. But, when you walk on it, the cornice can collapse and send you falling to your death.
Tree Wells
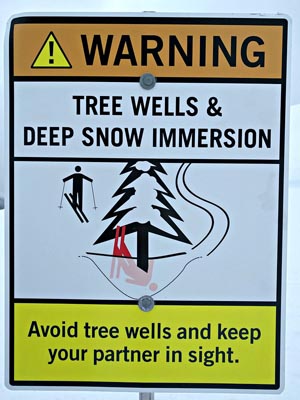
In very deep snow, you need to be careful about tree wells. These are areas underneath low-hanging evergreen branches which don’t have as much snow. If a person gets too close to the tree, he can fall into the tree well – often head first. This often happens to skiers and snowboarders.
The more the person struggles, the more trapped he will get in the snow. The victim can end up suffocating to death in the snow. You can find information on how to survive a tree well here.
Getting Lost
It’s very easy to get lost in snowy conditions. The snow hides trails and markers. You have to walk slower, making it difficult to tell how much ground you’ve covered. And snowstorms can reduce visibility to practically zero.
- Make sure you have a satellite navigation system. This is one time they are more reliable than a paper map.
- Have an emergency communication device. Devices like SPOT (Amazon link) let you send distress signals with your GPS coordinates, regardless of where you are and whether there’s a cell signal.
- Don’t hike in blizzards. If you can’t see, stopping and making a shelter is safer
8. Gear Works Differently in Cold Weather
Your gear, which works flawlessly in warm weather, might not suit cold-weather survival. As with any gear you rely on, it’s essential you test it in real-use situations before you take it out into the field. This means going outside with your gear in the cold and trying it.
Here are some of the ways your gear might fail you in winter.
- Not Glove-Compatible: Ferro rods, touchscreen devices, stove spark buttons, water bottle lids, and other small gear can be very difficult to use with gloves. If you have to remove your gloves, you risk frostbite on your fingers.
- Fuel freezing: Some fuel types do not perform well in cold weather. Liquid fuel (white gas) is generally best for winter.
- Filters: If drinking water from streams, you must treat it first (you don’t want to get diarrhea in addition to surviving the cold!). I usually use a Sawyer Mini filter. However, the filter membrane will be destroyed if water freezes in it. Make sure the filter you use is suitable for winter. See the best survival filters here.
- Purification tablets: Purification tablets work in cold weather, but the reaction time can slow down. You may need to wait a long time before it’s safe to drink the water.
- Water bottles: Non-insulated stainless steel water bottles will freeze shut in winter. This can also happen with plastic bottles; keep them upside down (with liquid water in the lid area) so they won’t freeze.
9. Signal for Help
Sending out a distress signal for help is incredibly difficult when there are high winds, low visibility, and little wood for a fire. Know your options and practice them! Read 5 ways to send a distress signal.
10. Always Be Ready
We think of “readiness” as something we do, but readiness can also be regarded as a skill. And, like all skills, readiness needs to be learned and practiced.
Being ready means going through all the worst-case scenarios and thinking of what you’d do in that situation. Could you do anything to improve the outcome – like packing more gear or practicing skills?
To get started with readiness, I recommend performing Emergency Conditioning Training. It helps you find holes in your plans and ensures you are mentally prepared for whatever comes your way.
Cold-Weather Survival Kit List
When experienced backpackers, alpinists, dog mushers, and other winter athletes go out in the freezing weather, they always carry emergency supplies. Make sure you have:
- Calorie-dense Food: Emergency ration bars are a good option.
- Extra water
- Fire-starting kit: with tinder, a lighter, and a backup firestarter
- Shovel: And an ice pick if the conditions require it
- Closed-cell foam pad: You’ll want this to sit on, even in non-survival situations
- Spare hat, gloves, buff, and socks: It’s easy to lose these, or they can get wet. Bring backups.
- Extra mid layer
- Chemical hand warmer packets
- Emergency Mylar bivvy and tarp
- Headlamp
- First aid kit
- Emergency signaling device
- Cooking pot and white gas stove
- Tools: Knife, folding saw, ax…
- Candle lantern: Ones like the UCO lantern can heat a shelter. Read about the best emergency lanterns.
Remember: You might never get lost in a snowstorm, but winter breakdowns do occur. So also make sure you’ve got a kit in your vehicle. Here’s a winter survival gear checklist for your car.
What do you carry in your winter survival kit? Let us know in the comments.
“Snow Shelter 2” (CC BY-NC-ND 2.0) by John M (2007),
“Westwide Snow Survey Training 2016” (CC BY-ND 2.0) by NRCS Oregon,
“150210-A-SO352-007” (CC BY 2.0) by U.S. Army Alaska,
“Winter mountaineering, self-rescue techn…” (CC BY-NC-ND 2.0) by nineonesix,
“2016_YUCH_YQ_Slaven’s_DKHALSA_027” (CC BY 2.0) by AlaskaNPS,
“150210-A-SO352-003” (CC BY 2.0) by U.S. Army Alaska,

The downside to a snow pit/trench is that it acts as a cold air sump because cold air descends, just as hot air rises. With this set-up you will be lying in the cold air, albeit out of the wind. Not ideal at all! Only in a winter storm would I use such a shelter. For most cold weather situations, I prefer a raised bed above the level of the coldest air (next to the ground), high enough that when you sit on it your knees are at right-angles, incorporated into a shelter that is as wind-proof as possible, plus a decent fire (long fire). Mor my money, this is the ideal expedient extreme cold survival scenario.
When I hiked or backpacked in winter years ago, I always carried wooden matches, some type of starter, a lightweight tarp, parachute cord, suitable sleeping bag (in a plastic bag), high energy food, pop can stove, pot, spoon, two insulated mugs, denatured alcohol, closed foam sleeping pad, water, and a plastic foamed backed place mat to sit on.
I did use the layering system mentioned above.
I learned a lot by taking a winter wilderness survival course almost 40 years ago. I never relied on electronics for anything. I carried a map in a zip lock bag.
When discussing devices such as SPOT, they are subscription services and as such do not directly alert the AFRCC (Air Force Rescue Coordination Center). They are basically a Wilderness ADT, where a third party serves as notifier. A 406 mHz PLB can be bought at REI, Dick’s etc. They need to be registered with NOAA, which is simple and free. They alert AFRCC directly and send your lat/ lon, saving time. And they work world wide