As a kid growing up with cold winters in Upstate New York, I loved digging tunnels and caves into drifts of snow. After making my cave, I could take my jacket off and have a snack while reading a book – my snow caves kept me warm and cozy.
But it’s one thing to build a snow cave for fun as a kid. When you need to make a snow cave for survival, you have your work cut out for you.
Here’s what you need to know about snow caves, when they make sense as a survival shelter, and instructions for making a snow cave that traps heat.
What Is a Snow Cave?
Snow is an excellent insulator because it contains pockets of trapped air. A snow cave utilizes this insulating property to create a warm shelter. A proper snow cave design will keep heat near the body, block wind, prevent condensation wetness, and maintain oxygen.
Design Characteristics of a Snow Cave
These characteristics are what make snow cave shelters different than other winter survival shelters.
1. Requires Large Amounts of Snow
Because you are digging directly into the snow, you’ll need at least 4-5 feet of snow to make a snow cave. If there is less snow than this, you are probably better off making a debris shelter for survival.
2. Thick Walls and Roof
The walls and roof of a snow cave should be at least 1 foot thick. Anything less than this won’t provide sturdy construction, and your snow cave might collapse on you.
3. Roof Is in a Dome Shape
As in any winter shelter, condensation can quickly form on the roof and walls of the shelter. A dome shape (as opposed to a cube shape) allows the condensation to roll down the walls instead of dripping directly on your body.
4. Entrance Tunnel Is Located Below the Main Shelter
There are two benefits to this design trait. First, by keeping the entrance low, wind won’t be able to get into the cave. Secondly, because heat rises, the design also helps trap heat inside the main shelter.
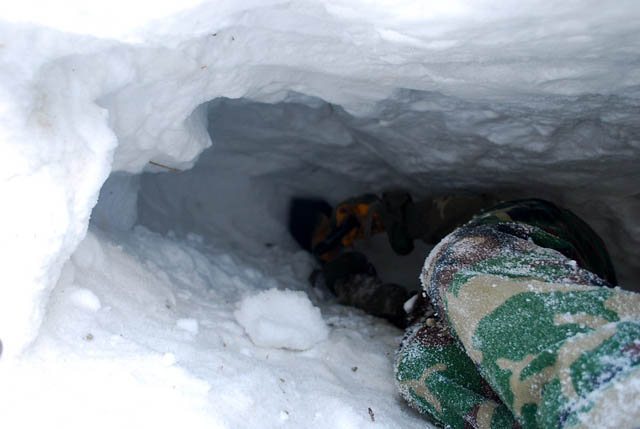
This cave was made by the Washington State Department of Transportation crew, so they could get out of the wind while working. While it’s better than being completely exposed to the elements, this cave design won’t trap heat well because the entrance is level with the chamber.
Snow Cave vs. Igloo
An igloo is very similar to a snow cave. The main differences are that an igloo is made with pre-formed blocks of snow. The snow must be high quality, and the blocks are packed firm. A lot of work goes into making an igloo, and they are meant to be semi-permanent dwellings.
By contrast, snow caves are dug directly into the snow. They are not meant to be a permanent shelter but rather an emergency or short-term shelter.
Snow Cave vs. Quinzee
A quinzee is often considered a type of snow cave. It is made by gathering a large pile of snow, packing it down, and digging a cave into it. However, a quinzee is made when the snow isn’t high enough to dig a cave directly into it. The entrance tunnel is located at the same level as the main space, and thus a quinzee isn’t as warm as a snow cave.
How to Make a Snow Cave
If you aren’t a park ranger, mountaineer, or do extreme winter sports, you will probably never find yourself in a situation where you need to make a snow cave survival shelter. However, making a snow cave is a great skill to know and also fun to practice.
Here’s how to do it.
Tools Needed:
- Shovel: Plastic shovels are out! You will need a sturdy shovel, preferably an avalanche shovel like this one on Amazon.
- Saw: A saw makes it much easier and faster to cut out large blocks of snow
- Ski pole: Or other long pole for poking air vents
Time:
Even with experience, snow caves can take 4+ hours to make. It is a lot of physical work which requires you to crawl and crouch. Ideally, you have a partner to help you; while one person digs, the other removes snow.
Step 1: Find the Right Site
Finding the right site for your snow cave can make it easier and safer. Look for snow on a slope, such as a hill. This will allow you to dig upwards when making the entrance tunnel. The slope also means snow will fall downwards as you excavate.
To stay safe:
- Avoid cornices: These are mounds of snow that build up on and overhang mountain edges. Do not dig into snow cornice, or it could collapse. Don’t build underneath a cornice either.
- Avoid potential avalanche sites: Here’s avalanche info from the NWS
- Watch out for “widow-maker” trees: These are dead trees or limbs which could fall on your cave.
2. Pack Down the Snow
If the snow where you want to build your cave is loose and powdery, it won’t provide a sturdy structure, and the shelter could collapse on you. Take the time to pack the snow down by stomping it with your boots or snowshoes.
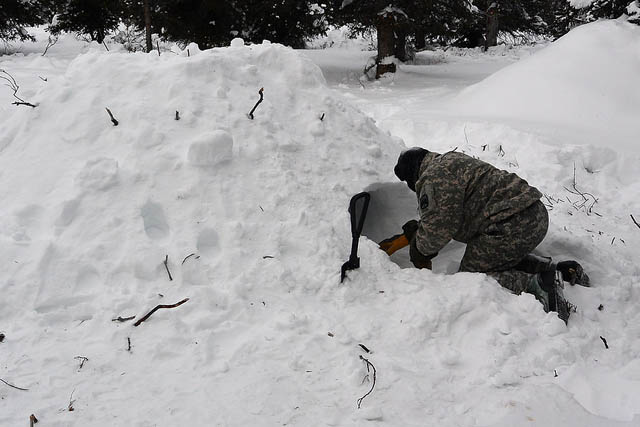
3. Dig the Entrance Tunnel
If you are building your snow cave on a slope, then you can start digging upwards. If you need to build the cave on a flat surface, then you’ll want to dig down several feet (or till you hit the ground) before you start digging inwards.
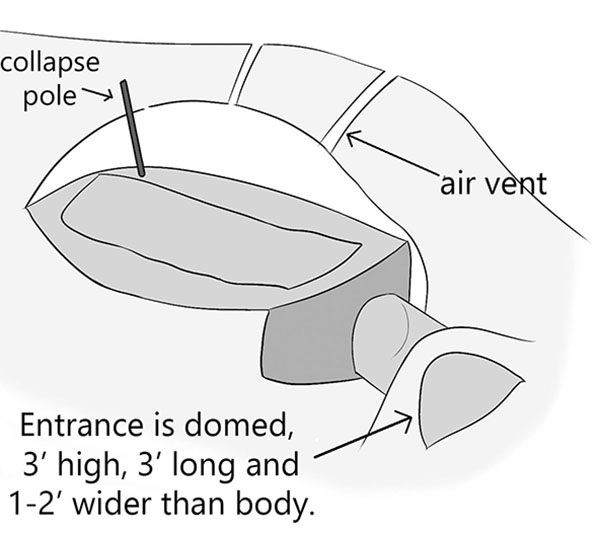
The entrance tunnel should be:
- Dome-shaped
- Approximately 3 feet high
- 1-2 feet wider than your body
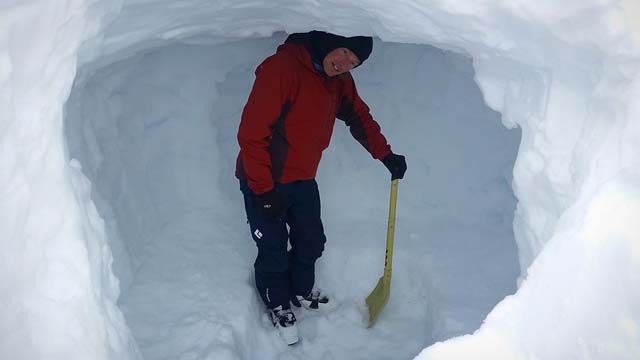
4. Excavate the Cave Space
Once you have dug an entrance tunnel about 3 to 5 feet long, you can start digging upwards. You’ll now begin shaping the snow cave.
Always shape the ceiling of the snow cave first, making sure you keep it in a dome (bell) shape. If you shape the walls or floor first, the cave could collapse on you. The dome shape keeps the structure sound.
Important: Don’t make the snow cave any larger than necessary. A smaller snow cave will trap more body heat.
5. Keep Walls Thick
The walls of a snow cave should be at least 1 foot thick. If they are smaller than this, they won’t provide much insulation and could collapse easily.
As a general rule, you should stop digging if you can see light through the snow. Some people poke sticks one foot deep into the sides of the snow pile. These serve as markers; the excavator will know to stop digging when he/she sees the sticks.
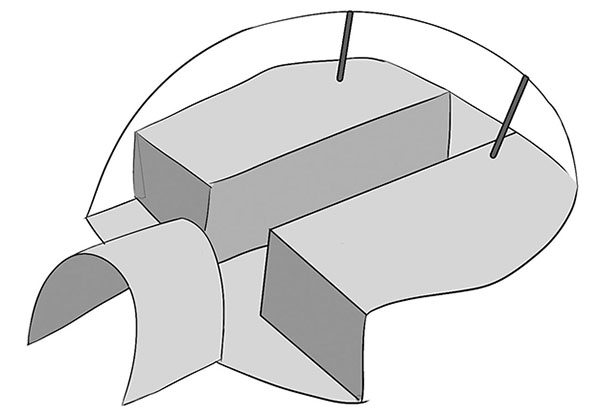
6. Create a Heat Sink
The reason that snow caves work is that warm air rises towards the sleeping platforms. By digging a pit inside the main chamber, you will provide another place for cold air to sink.
Snow caves for two people are often built in a T-shape for this reason (as seen in the image below). The centerline of the T is the heat sink. The sides are raised-bed platforms with a dome ceiling above them.
7. Smooth the Ceiling
It is crucial that the ceiling of a snow cave is as smooth as possible. Once you are inside the cave, heat from your body will start to melt the snow. Any rough or protruding spot on the ceiling will be a point for water to drip on you. Staying dry is crucial for winter survival.
8. Make Air Vents
Using a ski pole, trekking pole, or long stick, you’ll need to poke some air vents along the ceiling of the snow cave.
Snowfall or winds can block the air vents. As a precaution, you can leave one ski pole sticking out through the ceiling. This serves as an emergency air hole.
9. Set Roof Support
If a snow cave collapses while you are sleeping, you could become trapped under the snow with no way to dig out. A precaution is to put a hiking pole (or branch, etc.) upright near your head. If the snow cave collapses, the pole will break the snow ceiling, so you have an air gap. You can also use the pole to dig yourself out.
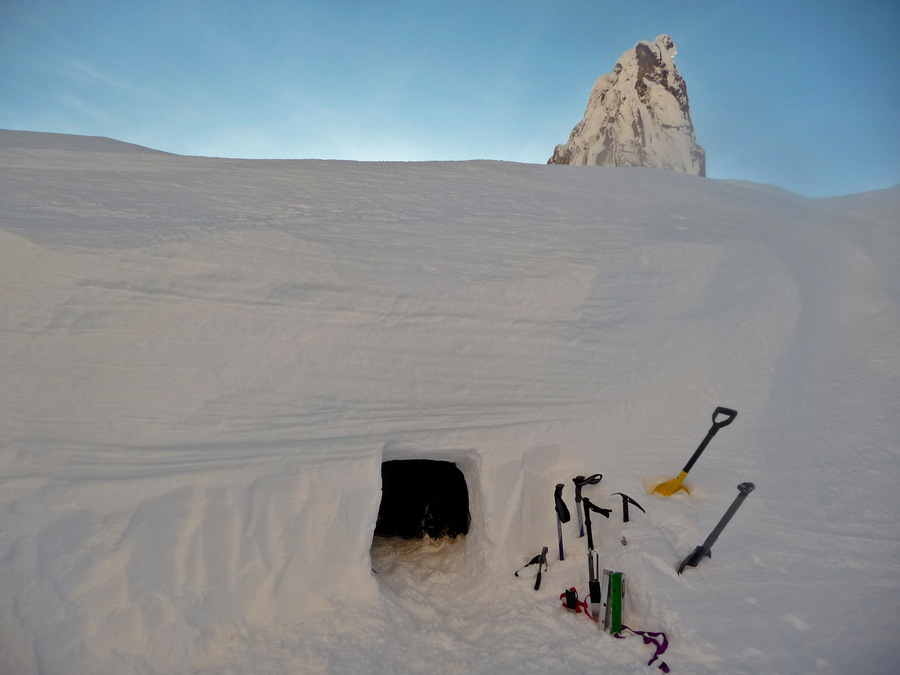
10. Mark the Cave Location
It’s easy to get lost in the snow. Make sure you mark the entrance to the snow cave and the roof area to avoid this. Ski poles with a bright-colored bandana tied to them make good markers.
Another potential issue is walking onto the roof of your snow cave and causing it to collapse. You might want to put additional markers past the chamber of your cave, so you know not to walk any closer.
11. Using the Snow Cave
- Block the entrance with snow: This will keep wind out.
- Keep your shovel in the shelter: In case you need to dig your way out.
- Make your bed: If you don’t have a sleeping pad, gather pine boughs to serve as a bed. You can sleep on top of your bag and gear for extra insulation.
- Clear ice which forms on the walls or ceiling of the snow cave: The ice reduces ventilation and can cause you to suffocate in the shelter.
- Keep gear away from the sides of the cave: Melting snow will drench it.
- Light a candle: A candle lantern like the UCO can add a surprising amount of heat to the cave.
Do Snow Caves Make Good Survival Shelters?
Once you build a snow cave, it is an excellent survival shelter. However, snow caves are NOT suitable for most winter survival situations. Here are some of the major issues with snow cave shelters:
Snow Caves Are Energy-Intensive
The main issue is that they take a lot of time and physical energy to make. In a survival situation, you probably don’t have lots of food to replace the energy burned.
You Will Get Sweaty
When building a snow cave, you should remove your insulating layers, so you are just in your base + shell layer. Even so, you will still probably end up sweaty from all the effort that goes into making a snow cave. Sweat = wet = evaporation, which can mean death in a cold-weather survival situation.
Need to Shovel to Build
It’s nearly impossible to dig a snow cave by hand without first succumbing to frostbite. I’ve heard of people digging snow caves with their knives, but these were built for fun and not in true emergency scenarios where you’d probably already be tired and hypothermic.
If you have a shovel, then hopefully, you also have a tarp. It’s often wiser to make a tarp shelter than expend energy digging a snow cave.
Only for Sub-Freezing Temperatures
If the temperature might go above 32F/0C while using the shelter, don’t make a snow cave. The warming temperatures can cause the snow cave to melt and collapse on you.
Safety Issues
Then there are the safety issues with snow caves, like collapsing and suffocation from poor ventilation. People without training aren’t likely to know how to prevent these.
The bottom line?
Knowing how to make a snow cave is a good skill to have. However, the shelter has a lot of downsides which make it impractical in most winter survival situations. Still practice snow caves, but make sure you know other survival shelters as well.
