I’m a parent who takes my young daughter backpacking in the wilderness, often far away from civilization and miles away from the nearest help.
While these experiences are wonderful for teaching resilience and survival skills, there’s still the risk of something going wrong.
Along with snake bites, bear attacks, and heavy bleeding, broken bone injuries are common in the wilderness.
Knowing how to treat a broken bone is a vital first aid skill you should know before going into the wilderness.
Here are the steps to take to make sure you are prepared. I’ve included pictures of how to use improvised splints for each type of broken bone.
1. Have an Emergency Plan in Place
Whenever you go into the wilderness, always plan for the worst.
Don’t think you need to be this cautious?
Consider that day hikers are actually more likely to need rescuing than multi-day hikers. The reason is many day hikers don’t bring basic survival gear because it’s just going to be a “short trip.”
Then something goes wrong – injury, getting lost, bad weather… — and they find themselves without adequate supplies and no one to help them.
You should:
- Let someone know about your plans before you leave. Make sure they know where you will be and when you expect to return. This person should contact emergency rescue services if you don’t make contact at the agreed-upon time.
- Check in with the ranger station. Even if you let someone know about your plans, it’s still good practice to check in with the local ranger station if you are in a local, state or national park.
- Bring an emergency communication device. Cell phones are notoriously unreliable in the wilderness. Have a reliable communication device. My dad uses the SPOT device on his multi-week thru hikes into the wilderness.
- Always bring basic survival supplies. This includes a first aid kit, water, food, fire kit, rain gear, signaling device (read 5 ways to send a distress signal), cordage, and emergency shelter.
2. Treat Bleeding
Bleeding takes precedent over a broken bone. Take these steps:
- Apply pressure to control bleeding.
- Know when to apply a tourniquet.
- Clean and bandage wound: This will prevent the wound from getting dirty during the next steps.
For open fractures – when the broken bone is sticking out of the skin – take these steps:
- Apply pressure to control bleeding.
- Once bleeding is under control, rinse the protruding bone with lots of sterile water. Do not scrub the wound or touch it.
- Do NOT bandage the bone or wound. You will do that after traction (step 5)
3. Assume the Bone is Broken
If the bone is sticking out of the skin, a limb is visibly deformed, or you can hear or feel grating around the injured area (a sign that the ends of the bone are rubbing together), then you know the bone is broken.
Likewise, if the limb is too painful for the victim to move or use, then the bone is probably broken.
However, some injuries – like sprains or torn muscles – are hard to distinguish from fractures. In wilderness situations where you can’t check injuries with an X-ray, you should assume the bone is fractured and treat is as such
Important: Move the victim as little as possible during first aid.
Movement can jostle the broken bone and result in further damage, including pinched nerves or severed blood vessels. When possible, use scissors or a knife to remove clothing around the injury site. If you are unable to remove clothing without jostling the broken bone, then it is better to leave clothing in place than risk further damage.
4. Check CSM
Injuries that cause fractures in the wilderness can also cause severe internal bleeding. The fracture itself might cause internal bleeding if broken bone severed a blood vessel. The pieces of broken bone can also damage nerves.
Before you treat the fracture, you’ll need to check for any signs of internal bleeding or nerve damage.
This is done with a CSM check: Circulation, Sensation, Movement.
How to Check CSM:
- Check the color of the limb below the fracture. Is it blue or purple? This is a sign the limb isn’t getting enough blood.
- Check the pulse below the injury. Can you feel a pulse or not? Is the pulse weak? Compare it to the uninjured side of the body if you are not sure.
- Perform a capillary refill test. This involves pressing on the fingernail or toenail below the injured limb. Hold down until the nail turns white, meaning blood has been pushed out of it. Release and see how long it takes for the nail to regain color. When circulation is adequate, the color should come back in less than 2 seconds.
- Ask the victim if they have feeling below the injury. If not, then nerve damage might have occurred.
- Can the victim wiggle fingers or toes below the fracture? If not, is it because of pain or because the victim really doesn’t have any sensation below the injury?
Any sign of internal bleeding or nerve damage is urgent: The victim needs help within hours and should be evacuated immediately. If you have an emergency beacon, now is the time to use it!
5. Perform Traction
Traction is a process which involves applying gentle pressure to the fracture to put it back in proper position. It is not the same as setting a bone. Setting a bone is about lining up the broken bone so it heals properly.
By contrast, the goal of traction is to improve circulation. Traction also helps relieve pain and makes it easier to splint the fracture.
When to Apply Traction:
- The limb is visibly deformed.
- The injury cannot be immobilized in the current position.
- If a pulse is not felt below the injury site or there are other signs of poor circulation.
Do Not Use Traction If:
- Applying traction causes significant increase in pain
- You feel resistance when moving the distal (further) part of the fracture
How to Apply Traction:
- Grasp the limb above the fracture at the site closest to the body. Hold it in the position found. If there are multiple people in your group, then have someone else perform this task.
- With your free hand, grasp the area distal to the fracture (the point furthest away from the body).
- Using gentle downward pressure, slowly put the limb back in its normal anatomical shape.
In the case of open fractures where the bone is sticking out of a wound, traction will cause the bone ends to slowly go back under the skin. Once the bone is in place, you can dress the wound.
*Also remove any jewelry, such as bracelets, around the injury site. Severe swelling can occur and jewelry can get stuck on limbs cut off circulation.
6. Check CSM Again
After applying traction, you’ll need to perform the CSM check again. If the victim does not have normal circulation or sensation below the fracture, try to determine why.
Are there any clothes that are cutting off circulation?
If so, remove them.
Is the bone still not set in the proper anatomical position?
Attempt traction again.
7. Gather Splint Supplies
If you don’t have a splint in your first aid kit, you can easily improvise a splint out of materials around you.
There are three components of an improvised splint: The actual splint, fastener, and padding. Gather all of these supplies before you start splinting the broken bone.
Here are some examples of materials you can use for an improvised splint:
- Splint: Trekking poles, ski poles, a straight tree branch about ½ inch thick, tent poles, rolled-up newspaper, bike pump, snow shoes…
- Fastener: Backpack straps, Ace bandage, paracord, bandana, triangle bandage, medical tape, duct tape, backpack straps, boot laces…
- Padding: Life jacket, sleeping pad, clothing…
Don’t underestimate how important padding is!
Tissue around broken bones will swell up a lot. If there is not enough padding, the splint will cut off circulation and can cause severe damage, not to mention a lot of pain. It’s actually more important for the splint to be padded than rigid.
You can wrap the padding around the splint. Or you can put the padding between the splint and the limb. It’s a matter of what materials you have to work with and personal choice.
8. Splint the Broken Bone
A splint works like a temporary exoskeleton. Its job is to hold the broken bone in position and immobilize it so further damage doesn’t occur.
Tip: Before applying the splint on the broken bone, practice doing it on the uninjured side. This way you will can figure out how to position the splint properly without jostling the injury and causing pain and further damage.
Below are instructions on how to apply a splint to various bones.
General Splint Instructions
- Splints should be BUFF: Big, Ugly, Fat, and Fluffy.
- Use adequate padding. Padding can be wrapped around the splint, around the limb, or put between the splint and limb.
- Use at least two splints, one for each side of the broken limb.
- Make sure the splint is long enough to include the joints above and below the injury.
- Broken arms should be splinted with the elbow bent and in a sling. Use a swathe to immobilize the arm.
- Broken knees and elbows should be splinted in the position in which they were found.
- When tying the splint and padding in place, the fastener shouldn’t be so tight it cuts off circulation.
Lower Arm Splint (Radius, Ulna or Wrist)
With broken forearms, the arm should be splinted with the elbow bent. This position makes it easier to keep the arm from moving around, especially if the victim needs to walk over tough terrain in order to get to help.
- Put a rolled-up sock or glove in the palm. This will help keep a natural position in the hand and reduce swelling.
- While the elbow is in bent position, apply padded splints to each side of the forearm. The splints should go beyond the elbow joint and beyond the fingertips.
- Tie the splints in at least three places: Above the fracture, below the fracture, and with an X over the hand.
- Check the victim’s pulse below the fracture site after applying the splint.
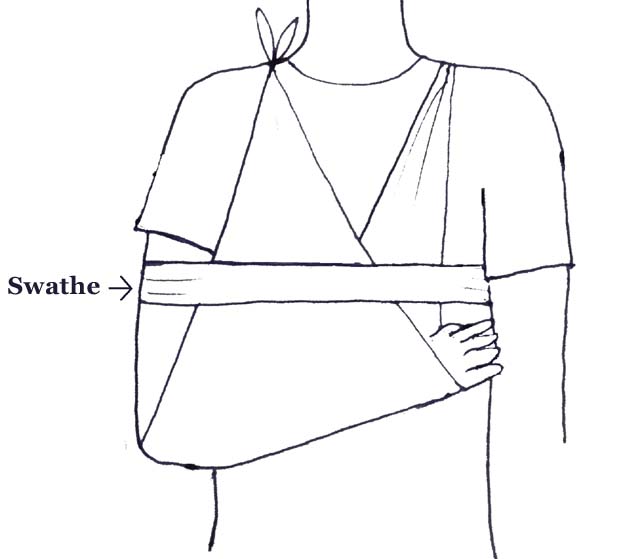
- Put the victim’s arm in a sling. The elbow should be at 80-90 degrees with the hand slightly above the elbow. This will help reduce swelling.
- Tie a long, wide piece of cloth around the upper arm and torso (swathe). This will help immobilize the entire arm.
- Encourage the victim to move their fingers to improve circulation.
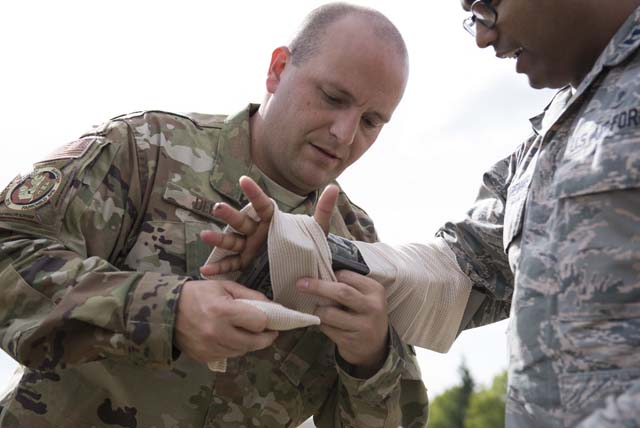
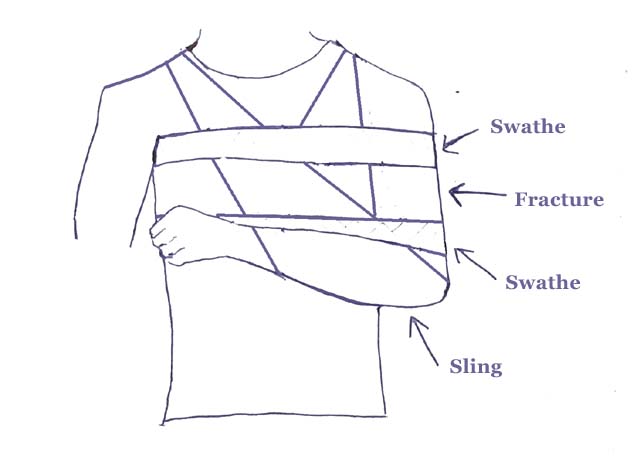
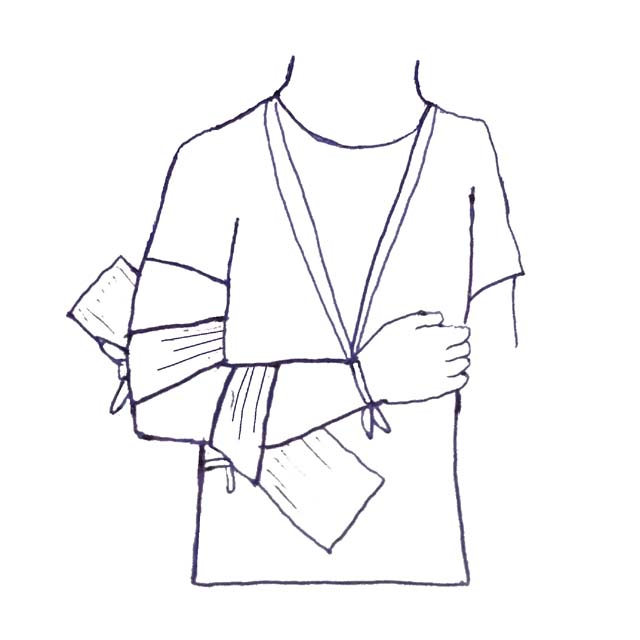
Upper Arm Splints (Humerus, Clavical, Shoulder)
For splinting to be successful, the broken bone needs to be immobilized. In the case of upper arm injuries, this means immobilizing the elbow and shoulder joints.
The best way to do this is to use a sling and swathe. With this method, you can actually skip the splint; the victim’s body is used as the rigid object to hold the fracture in place.
- Get two long pieces of cloth or bandages to use as a swathe. They should be 3-6 inches wide. You will also need a triangle bandage or triangle piece of cloth to use as a sling.
- Put the victim’s lower arm in the sling. The corner of the triangle should be supporting the elbow.
- Tie one swathe above the fracture site. The swathe goes around the entire torso.
- The other swathe goes below the fracture site.
Alternative Method: Coaptation Splint
If you are certain the humerus (upper arm) is broken, you can also use this splinting method:
- First splint the upper arm, tying the splint above and below the fracture site. You can see a picture of this splint method here.
- Put some padding under the armpit. Rolled up socks work for this. The purpose is to keep the arm in a position which allows better circulation.
- Tie a sling so the hand is positioned slightly above the elbow.
- Apply swathes to further immobilize the arm (optional).
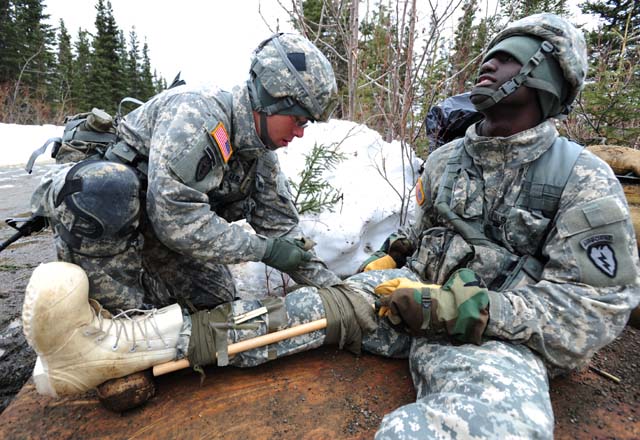
Lower Leg Splint (Tibia or Fibula)
Splinting a broken lower leg is pretty straight forward. The key thing to remember is you want to keep the ankle in a bent position.
A SAM splint works particularly well for this: you fold the SAM splint over the foot so it holds the foot upright as you secure the splint. If you don’t have a SAM splint, you can tie the ankle in position.
- The splint should be long enough to immobilize the ankle and knee.
- Use at least four ties to secure the splint and padding in place.
- Secure the ankle in a bent position using cloth or a bandage. Start by crossing the cloth on the top of the boot, then cross under the sole, and then tie on the ankle area of the boot.
- If additional support is needed, tie the injured leg to the uninjured leg.
Elbow and Knee Splints
Broken elbows and knees should be splinted in the position they were found. Do not try to straighten the joint to apply a splint. The following instructions are for splinting broken elbows but the same instructions also apply to broken knees.
Bent Elbow (A-Frame Splint)
- Get a padded splint. A wide board works best for this splint.
- Place the splint diagonally on beneath of the elbow so the ends of the splint are under the forearm and upper arm.
- Tie the splint in place at the upper arm and forearm.
- Apply a wrist sling.
*It is also possible to do this splint with two boards: one under the arm and another above. The splints get tied together using figure eight loops. The extra splint provides more support, but it is fairly difficult to tie in place.
You can see a video of how it is done here.
Straight Elbow Splint
- Use two padded splints. The splints need to be long enough to go from the victim’s upper arm to fingers.
- Place a rolled-up sock or glove in the palm. This will help keep a natural position in the hand and reduce swelling.
- Secure the splints in place with at least four ties. Two ties should be over the break site and two below. Do not tie around the elbow.
- Apply two swathes to immobilize the arm. One swathe goes above the elbow and the other below.
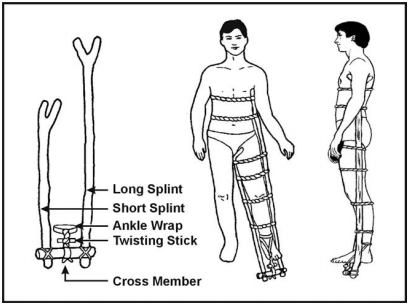
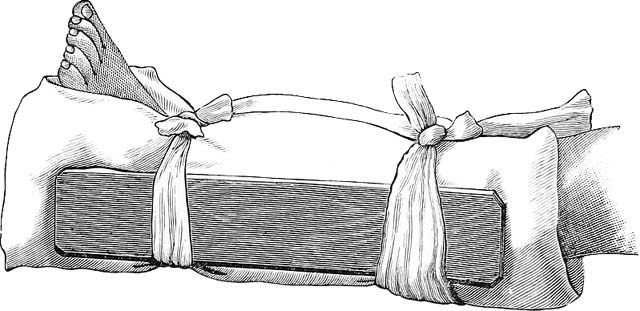
Upper Leg Splint (Femur/Thighbone)
The thighbone (femur) is the largest bone in the body. It is connected to very large, strong muscles. If the femur breaks, these muscles will contract and pull on the femur, causing the broken bone parts to overlap.
Even if you are able to straighten the bone using traction, it may still start to overlap again. To keep the femur straight, you need to apply a traction splint.
- Get two sturdy, rigid splints. One should be long enough to go from the armpit to approximately 10 inches past the foot. The other should go from the groin to 10 inches past the foot.
- Check the two splints line up at the same place past the foot.
- Apply padding and tie the splints in place. At least four ties should be used.
- Tie a smaller, sturdy stick between the ends of the two splints.
- Wrap a cloth around the ankle and twist it around the stick.
- When the broken leg is the same length as the uninjured leg, tie the ankle wrap in place.
*You can see a good example of an improvised traction splint here.
Hand fractures
Broken hand bones usually don’t seem very serious at first. Then a few hours pass and swelling sets in. If the hand wasn’t properly splinted, it can become very uncomfortable.
The swelling will make it nearly impossible to splint the broken hand after the fact.
- The hand should be splinted in its normal, functional position. This means slightly flexed like it is holding a soda can. You can place a rolled-up sock or bandage in the victim’s hand to keep it in this position.
- Consider taping broken fingers together. Put pieces of gauze between the fingers to keep them from getting sweaty.
- Place a large, wide, semi-rigid splint under the hand. It should extend past the wrist. Rolled-up newspapers work well for this. An inflated water bladder also works well.
- Secure the splint in place. You will want to wrap around the entire hand and wrist to keep it immobilized.
- Optionally, you can put the arm in a sling so the hand is slightly elevated. This will help reduce swelling and movement.
This link shows an image of an improvised hand splint made with a hydration bladder.
Ankle Splint
Broken ankles are common injuries in the wilderness. Ideally, you use a “wire ladder splint” to treat a broken ankle. This is a metal splint that can be bent into an L shape. The shape keeps the ankle in a flexed position.
You could make your own ladder splint by bending backpack frames into an L shape. In the image below, cardboard is used to make an improvised ankle splint.
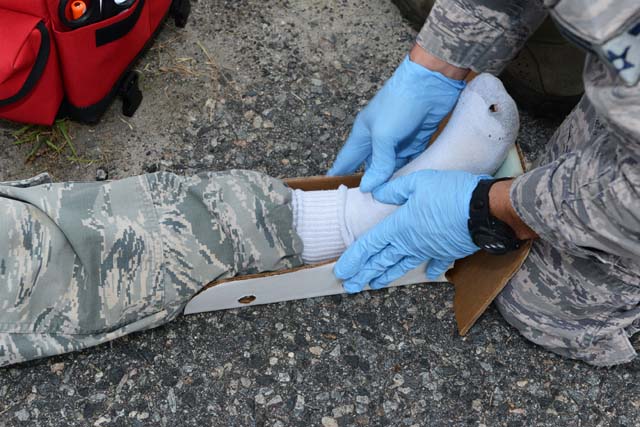
The following instructions are for if you don’t have anything which can be used as a ladder splint. In this situation, you use a “stirrup splint” instead.
- Remove the victim’s shoe. Swelling will make it too difficult to remove later.
- Fold a tarp, sleeping pad, or other long material to make a semi-rigid SAM splint.
- Bend the splint into a U shape.
- Place the foot into the U so the ankle is held in position.
- Secure the splint in place with ties. Or, if you have an Ace bandage, wrap this around the splint and ankle like you would for a sprain.
Hip Splint (Broken Pelvic Bone)
If the hip bone is broken, the victim will be in severe pain and unable to walk at all. They won’t be able to move their legs upwards and probably not able to sit up.
These injuries are very difficult to treat and it’s even more challenging to move the victim. Emergency rescue will be needed.
- Find a suitable hip splint material. It needs to be wide and long enough to go completely around the entire hip area. A folded-up tarp works well for this. A jacket also works.
- Use a cloth to tie the victim’s feet together. This helps rotate the hips into a better position which reduces pressure on the broken hip.
- Carefully slip the splint material under the patient’s legs and slide it up under the hips.
- Tie the material in place. The goal is to provide enough support to immobilize the hips without cutting off circulation.
- If carrying the patient to evacuation, carefully lift the patient onto a rigid board and secure for transportation.
*Note it can be difficult to tell the difference between a broken and a dislocated hip. If you suspect the hip is dislocated, do not attempt to return the leg to its normal position. Instead, use bulky materials like a sleeping bag to support the leg in its normal position.
9. Prevent Pressure on the Fracture
Under normal situations, a person with a broken bone would be instructed not to move. However, in wilderness situations, the victim might need to walk to get help.
Prevent pressure on the injury by improvising a crutch for broken legs and ankles. Broken arms should be immobilized with a sling.
10. Monitor the Victim
Keep checking on the victim. You’ll want to:
- Check CSM. Readjust the splint if necessary.
- Look for signs of shock, such as rapid heartbeat and pale skin.
- Keep the victim hydrated and warm.
11. Decide How to Get Help
Here is where things get very tricky with broken bones in wilderness situations, especially if you don’t have a way to call for help. How do you get the victim to help? What if you are alone?
Depending on the circumstances, you might want to:
- Self-evacuate: If the patient is able to walk or there is little chance that help will arrive quickly.
- Carry the patient to help: If there are multiple people in the group and carrying the patient won’t risk the other members’ safety.
- Make a distress signal: This can be done with smoke signals or even mirrors. It might be your only choice if you are injured and alone.
Injuries in the wilderness do happen – don’t think you are immune!
That’s why it is so important to think about these scenarios before they happen and come up with a plan. Hopefully, you will never have to enact your plan, but at least you will be ready if necessary.
https://www.airforcemedicine.af.mil/News/Photos/igphoto/2001058091/; (U.S. Air Force photo by Airman 1st Class Kathleen D. Bryant/Released)

Very interesting read, thank you very much. Definitely need to review your other sources.
Wow, Thank-you for sharing this information. I have learned a lot more about how to treat broken bones in the wilderness.