There are many good reasons you’d want to get a composting toilet: It’s better for the environment, it increases your self-sufficiency, you would be better prepared for a disaster in which the plumbing system goes down…
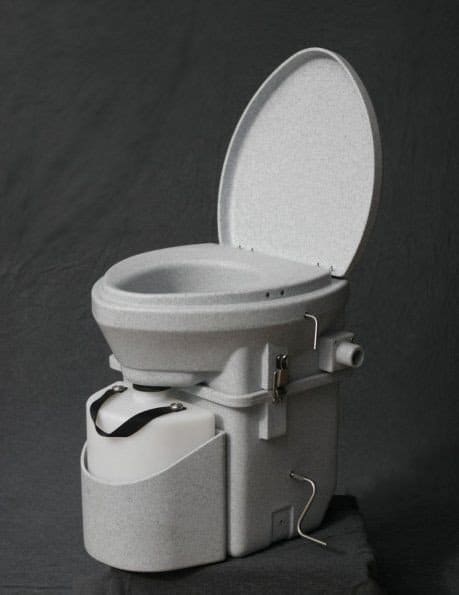
While making “humanure” is still not exactly a popular pastime, it’s slowly making its way into the mainstream. There are even several brands of composting toilets that look just like normal flush toilets and have advanced features like moisture control.
If you can afford them (they aren’t cheap!), it’s worth it to buy a composting toilet. They really simplify the process. But, for those who’d rather go the DIY approach, it’s actually very easy to make a composting toilet.
- Read our reviews of the best composting toilets here.
Simple DIY Composting Toilet Instructions
To make a composting toilet, all you need is a bucket, a way to keep urine out of the compost, and some dry substrate like sawdust or straw (hence why composting toilets are often called “sawdust toilets”). You’ll also need a compost pile for “curing” the waste.
1: Waste Buckets
You’ll need buckets for collecting the waste. 5-gallon buckets work well for this. Anything bigger will be too heavy to empty when full. Many people put a toilet seat on the bucket to make it more comfortable.
How many buckets you need depends on the number of people in your home. You’ll need at least two buckets. That way, you’ll have a waste bucket ready while you dump, clean, and air-dry the other. If you are on a boat or RV, you’ll want at least 5 buckets with lids in case you have to wait a while until you can dump the buckets.
2: Keeping Urine Out
If the compost gets too wet, anaerobic bacteria will start to grow instead of the aerobic ones you want. The anaerobic bacteria will make the compost smell nasty and it will not break down into safe fertilizer. Nitrogen in urine also hinders the composting process.
That’s why keeping urine out of your DIY composting toilet is so important.
There are two ways to do this:
- Urine diverting device: This goes below the seat of the composting toilet. It funnels urine into a separate collection chamber. You can simply dump the urine in your yard since it is sanitary.
- Separate urine bucket: This works very well, but it can be annoying for ladies to switch from one bucket to another. Also, if small children use the composting toilet, they might be unable to control their movements and could end up urinating in the solids bucket.
You can buy urine diverters like this one on Amazon to go under the toilet seat, though it is pretty pricey.
You can also make your own out of funnels or pieces of plastic with tubes connected to them to reroute the urine.
3: Carbon Substrate/Cover Material
Just like you need some carbon material for your normal compost heap, you also need it for making humanure. Each time you go #2, you add a bit of substrate to the waste bucket.
Everyone with a composting toilet seems to have their own preference as to what substrate is “best.” Some people swear by sawdust, whereas others say it doesn’t work well. Peat moss is generally great, but you will probably need to buy it.
Here are some options. Remember, it needs to be dry and high-carbon!
- Wood chips
- Peat moss
- Sawdust
- Coco coir
- Straw
- Dry leaves
- Corn husks
- Grass clippings (preferably very dry)
- Topsoil
How to Use a DIY Compost Toilet
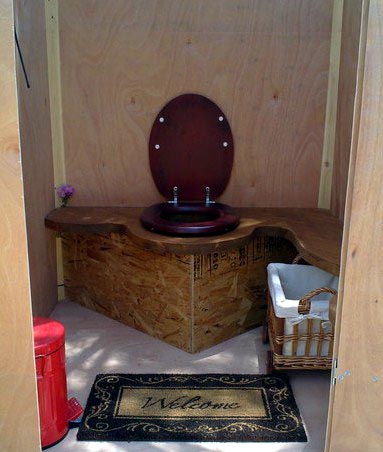
It’s pretty simple and not scary. And, when urine is kept out of the waste bucket, it doesn’t stink at all. Here’s how to use it.
- Prep bucket with substrate: Add about 1″ of substrate to the bottom of the empty bucket.
- Going pee: If you use a urine diverter for pee, you’ll need to sit on the seat. Hovering above the seat means that the diverter won’t work. You can throw toilet paper from pee into the solids. There is no need to cover the paper with substrate.
- Going #2: After finishing, add enough cover material so none of your poo is visible. Close the lid when you are done.
- Cleaning the bowl: If necessary, use a squirt bottle with some vinegar to spray the bowl clean. Don’t dump water into the bowl.
- Emptying the bucket: When the bucket is nearly full, empty it into your compost pile. More on this below.
Emptying the Waste Bucket
For human waste to be rendered safe, it must reach high temperatures and compost for a long time. You won’t be able to do this in the waste collection bucket. You’ll have to put it in a compost bin or heap to finish curing.
Here’s a simple way to do this:
- When the bucket is full, empty it into a large compost drum. A 44-gallon drum is a good size.
- Cover that drum with dry substrate like straw or peat moss when it is full.
- Leave it to compost for an entire year.
- After about 1 year, the bin contents will have decreased significantly. It should be safe to put on your plants.
There are some ways to improve this system. For example:
- Drill ½” holes in the bottom of your drum.
- Dig a hole underneath the drum and fill it with drainage material. The hole should be about ¼ the size of the drum. This will take care of any leachate coming from the drum.
- Put an insect screen on top of the drum. Cover this with a plank of corrugated metal. This allows more airflow than the drum lid but still keeps pests out.
Other curing options:
Some people use a 3-bin compost system for human manure. One bin is for filling. The second bin is for curing, and the third bin is for harvesting the finished compost.
Another option is to keep the waste in the collection bucket for initial curing. You cover it with lots of substrate and put a vented lid on it. The waste stays in the bucket for an entire year. Then it goes into the regular compost heap to finish curing.
This video shows how to dump humanure into a compost heap.
How Do You Know the Humanure Is Safe?
For human waste to be rendered into a safe substance, it must reach internal temperatures of 122F for at least one week. This will ensure that all pathogens are destroyed. There are compost thermometers that can check whether your pile is getting hot enough.
If the compost pile isn’t reaching these temperatures, you should let it cure on the heap for one year. If the temperatures are low, you’ll also need to let it cure for a second year.
Improved DIY Composting Toilets Designs
Two things make the store-bought compost toilets better than the basic DIY versions:
- Agitator to aerate the compost
- Vent fan for better aeration and moisture control
You don’t want to stir a bucket of human waste mixed with straw. However, it is actually pretty easy to make your own agitator.
You’ll need to find/make a bent piece of steel. You drill holes on each side of the bucket for the steel to go through. The steel is rotated, causing the contents inside to move around. You might want to use a double-bucket system, though, as some waste can leak through the holes you made in the bucket.
A vent can be easily added to the bucket. Just make sure that the vent comes from the top of the bucket. Otherwise, you risk some waste falling out of the bucket when you go to empty it.
You can install a fan on your compost toilet vent with some technical know-how. Recycled computer fans work well for this. They use very little electricity and don’t make much noise. A video below shows how to do this.
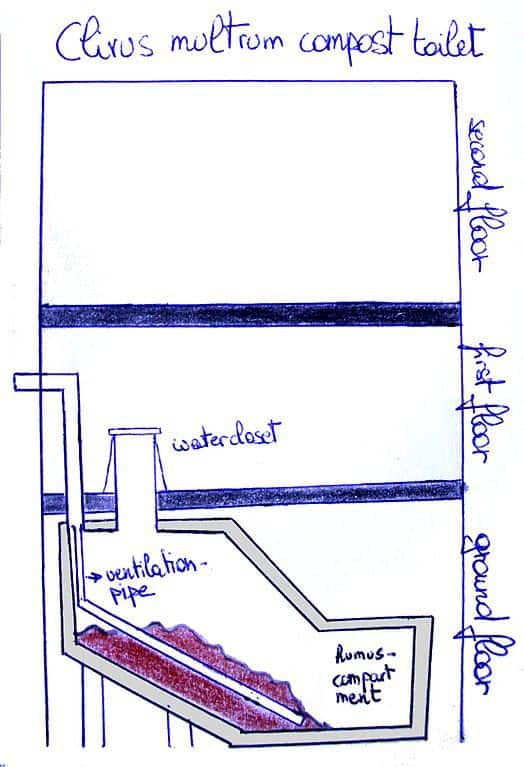
It’s also possible to make larger compost toilets where the waste is collected in a pit, such as shown below (based on a Clivus Moltrum design).
Here are some videos which show DIY composting toilets. See, they are easy to make and use!
Composting Toilet Tour

how do you set up pluming for collecting toilet
Here are some ways to get water when off grid: https://www.primalsurvivor.net/off-grid-water/