
Root cellars, long used before refrigeration, provide an ideal environment for preserving food by leveraging naturally cool, dark, and humid conditions.
What is a Root Cellar?
A root cellar is an underground “cave” that is cold, dark, and humid. This environment is perfect for storing certain types of vegetables (especially root veggies, hence the name root cellar).
Vegetables can last for months when stored in a root cellar. Usually, crops were put in the root cellar after the harvest to be eaten throughout the winter. However, using a root cellar in the summer is possible, too.
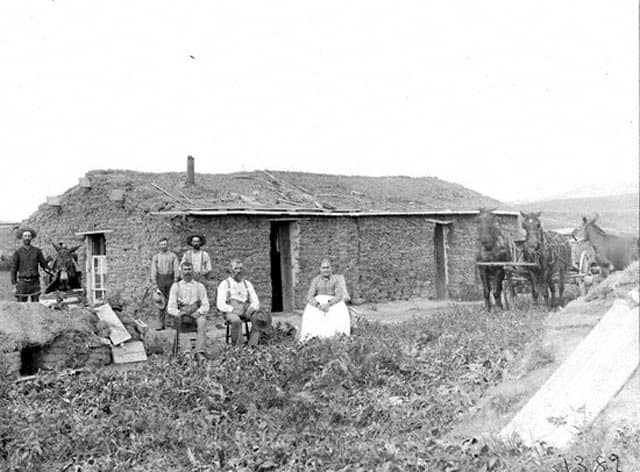
Root cellars have been used for centuries. They were an essential part of virtually every home in the 1800s in America. You can still find root cellars when you tour historic homes or drive through country back roads.
Why Would You Want One?
Root cellars are incredibly simple structures and relatively easy to make. Despite their simplicity, they effectively preserve foods without any power.
As the Food Security Network wrote,
“A root cellar will keep working through the deepest winter and the longest power failure. We overlook the miracles it offers because it is so simple and unpretentious.”
There’s no denying that people today are increasingly more reliant on the grid, and very few of us know the skills that our grandparents knew.
But there is pushback. Traditional skills like root cellaring are making a huge comeback.
Some of the reasons why root cellars have gained popularity include:
- Storage for homegrown food
- Reduce electricity costs
- Keep a stockpile of food at home
- Going off-grid
- More pantry space
- Connection to heritage
- Self sufficiency
- A place to start seeds indoors before spring planting
- Storing food until you have time for another preservation method (like canning or dehydrating)
Downsides
As great as root cellars are for storing food without electricity, they have drawbacks. For starters, they do have a bit of a learning curve. When you start with root cellaring, you’ll have to figure out which areas of the root cellar are the coldest or moistest and then figure out which foods to keep there (the temperature and humidity in a root cellar are rarely uniform).
Root cellars require maintenance, like keeping the floor moist, keeping certain vegetables wet, and controlling the temperature and humidity (such as turning on fans or opening/closing doors at certain times).
There is also the nuisance of getting food from a root cellar. Even if the root cellar is in your basement or right next to the house, you’ll have to put on shoes, go to the root cellar (possibly through cold snow), maybe climb down a ladder, and then lug the food back. Many root cellars have dirt or sand floors, so you risk tracking dirt into your home with each trip to the root cellar.
I mention these downsides of root cellars because I don’t want to romanticize them. Modern refrigeration is a great thing and makes our lives much easier. There are considerable benefits to moving towards an off-grid lifestyle by building a root cellar, but be realistic about how it will fit into your lifestyle.
Alternatives
There are other off-grid refrigeration options if you can’t build a root cellar (you are renting, can’t afford it now, or don’t want to commit…).
These methods employ the same basic ideas as root cellaring – using the ground to create a dark, cold, and humid environment – but don’t require as much space or effort.
1: Burying an Old Refrigerator
With this method, you dig a hole in the ground and lay a refrigerator into the hole horizontally. Ideally, you also add a vent to allow hot air and gases from food to exit the fridge.
The ground is naturally cool. When combined with the insulation from the refrigerator, you can store vegetables in the buried fridge for a long time.
This can also be done by burying a garbage can or other container. However, the fridge works best because it is insulated. See instructions on how to make a “ground fridge” here.
2: Cold Cellar
It is possible to use an unfinished part of your basement as a root cellar (though these are traditionally called cold cellars instead of root cellars).
These don’t work as well as dug root cellars because it is hard to control humidity and temperature. Also, because your basement is probably made from concrete, it creates a perfect place for mold to grow – and that mold will contaminate your food. This article talks about how you can solve some of the problems when making a cold cellar in your basement.
3: Earth Pits
With this method, you dig a pit into the ground. The pit needs to be lined with sand or sawdust. The vegetables sit on top of this. Then, you layer sand or sawdust on top of them, followed by a layer of dirt and a plastic sheet. You then put a door on top so you can access the food.
Storing Food in a Root Cellar
Root cellars must be kept just above freezing (32-39°F/0-4°C). The humidity levels also need to be kept well above 80%. In these conditions, most root vegetables will last several months.
However, it isn’t as simple as dumping root veggies into your cellar. Some produce requires different conditions, and all produce needs to be stored properly if it is going to last.
What Can Be Stored?
Not surprisingly, root vegetables do best in root cellars. Some of these include:
- Beets – How to preserve beets
- Parsnips
- Carrots
- Celeriac
- Horseradish
- Winter radishes
- Salsify root
Other fruits and vegetables can also be stored in root cellars but require different temperatures and humidity. So, if you put them in your 32°F/90% humidity root cellar, they will start to go bad quickly.
Top Tip
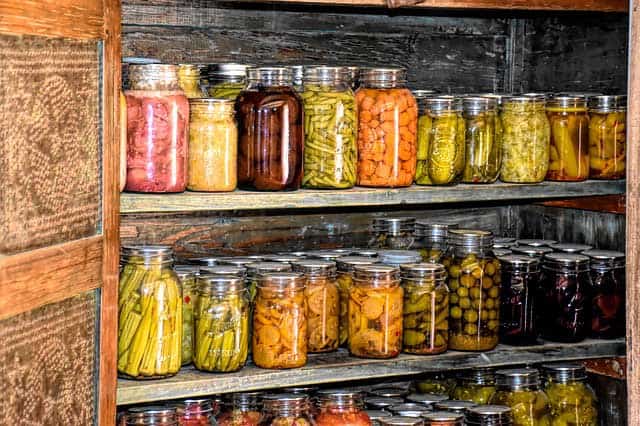
Don’t store metal cans or anything with metal lids in a root cellar for prolonged periods. The humidity will cause them to rust.
Preparing Foods for Cellaring
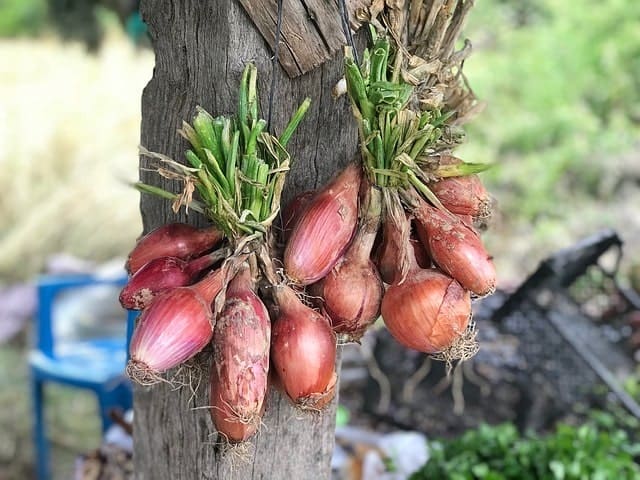
Some crops (including potatoes, garlic, sweet potatoes, beans, onions, and squash) are too wet for root cellars. To store them there, you must cure (dry) them first. This usually involves hanging them to dry out or, as with preserving potatoes, laying them out to dry with a layer of newspaper covering them.
Another thing to consider is whether the root veggie has a leafy green top (like carrots, beets, and other veggies). Even though the greens on these tops are edible, they won’t last long in a root cellar. They will start to go bad and cause the rest of the root to go bad.
You’ll have to cut the greens off the veggies, leaving about 1 inch of a stem in place. You don’t want to cut the root; it will damage and make it go bad faster.
What to do with all those green tops? I like to cook them down into veggie stock. I also like to sneak them into foods. For example, I’ll blend the greens into a puree and add this to pizza dough, bread dough, or even pancake batter (for savory pancakes, not sweet ones). If my kids can’t see the greens, they don’t complain about them. 🙂
Storage Conditions for Produce
Here’s a table with the ideal storage conditions for produce in a root cellar. As you can see, many fruits and veggies require a higher temperature and lower humidity setting.
To solve this problem, many people make a multi-room root cellar. Then, you could keep each room at the ideal conditions for certain crops. More on this later.
| Food | Temp (F) | Humidity | Shelf Life |
|---|---|---|---|
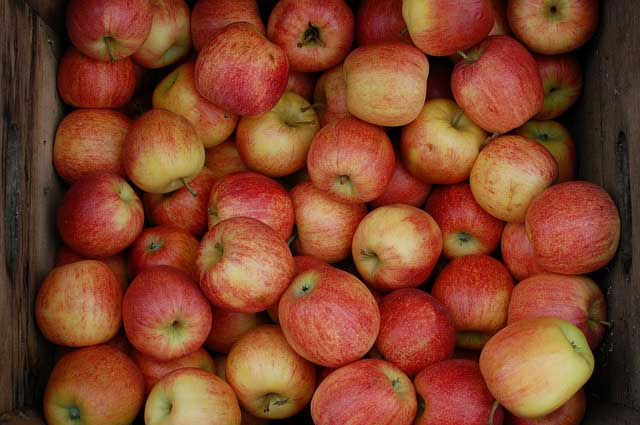
| Apples | 32-40 | 80-90% | 2-7 months |
| Beans, dry | 32-50 | 65-70% | 1 year |
| Beets | 32 | 95% | 1-3 months |
| Brussels Sprouts | 32 | 90-95% | 3-5 weeks |
| Cabbage | 32 | 90-95% | 3-4 months |
| Carrots | 32 | 90-95% | 4-6 months |
| Cauliflower | 32 | 90-95% | 2-4 weeks |
| Celeriac | 32 | 90-95% | 3-4 months |
| Celery | 32 | 90-95% | 2-3 months |
| Garlic | 32 | 65-70% | 6-7 months |
| Horseradish | 30-32 | 90-95% | 10-12 months |
| Kale | 32 | 90-95% | 10-14 days |
| Leeks | 32 | 90-95% | 1-3 months |
| Onions | 32 | 65-70% | 5-8 months |
| Parsnips | 32 | 90-95% | 2-6 months |
| Pears | 32-40 | 80-90% | 2-3 months |
| Peppers, dry | 32-50 | 60-70% | 6 months |
| Potatoes | 38-40 | 90% | 5-8 months |
| Pumpkins | 50-55 | 70-75% | 2-3 months |
| Salsify | 32 | 90-95% | 2-4 months |
| Sweet Potato | 55-60 | 85-90% | 4-6 months |
| Tomatoes, green | 55-60 | 85-90% | 2-6 weeks |
| Turnips | 32 | 90-95% | 4-5 months |
| Winter Radishes | 32 | 90-95% | 2-4 months |
| Winter Squash | 50-55 | 70-75% | 3-6 months |
Here’s another way of looking at storage conditions in a root cellar, with the produce with similar temperature and humidity requirements grouped together:
| Very Cold, Very Moist (32-40F/90-95% Humidity) | Cold and Moist 32-40F/80-90% Humidity | Cool and Dry (32-50F/60-70% Humidity) | Warmer and Humid (50-60F/85-90% Humidity) | Warmer and Dry (50-60F/60-70% Humidity) |
|---|---|---|---|---|
| Beets Brussels sprouts Carrots Cauliflower Celeriac Celery Horseradish Kale Leeks Parsnips Salsify Turnips Winter radishes | Potatoes Apples Pears Cabbage | Garlic Onions Dry beans Dry peppers | Sweet potatoes Tomatoes, green | Winter squash Pumpkin |
Pre-Cleaning Vegetables?
There is a big debate about whether veggies can be cleaned before entering your root cellar or need to remain dirty.
In general, you should NOT wash vegetables before cellaring them. The dirt on the veggies helps them retain their moisture.
However, some people like to clean them before cellaring for convenience. If you decide to wash them, you’ll need to ensure they are completely dry before storing them. After taking them out of storage, you’ll still have to clean them again, but there won’t be huge amounts of dirt to scrub off or get tracked into your home.
Filler Materials in Storage Containers (Sand, Hay, etc.)
While it’s not absolutely necessary, it’s good practice to use a filler material in root cellar storage containers.
For example, you could layer hay between the layers of carrots in their bin. Other choices of filler material are sand, sawdust, shredded newspaper, and sphagnum moss.
There are several reasons for using filler materials:
- Retain or increase moisture
- Keep out pests
- Limit rot: If one layer in the bin goes bad, the filler can prevent the other layers from going bad too
Again, this isn’t completely necessary. However, storing some vegetables in a filler material can drastically increase their shelf life.
Unfortunately, you can’t reuse the same filler materials year after year. The filler materials can become contaminated with molds and bacteria. It’s best to dispose of them (better: compost them) at the end of each season.
Ethylene Fruits and Vegetables
Have you ever picked an unripe tomato and put it on your windowsill to ripen? The reason a tomato can still ripen even after it’s been picked is ethylene.
Ethylene is a chemical that naturally occurs in many plants. It is what causes them to ripen and, subsequently, start decomposing.
Interestingly, ethylene also gets released into the air. So, if you store an ethylene-containing fruit (such as apples) next to other produce, the ethylene from the apples can cause the other produce to ripen faster.
For this reason, it is essential to store certain produce away from each other. The big ones are apples and pears: these should be kept in a separate part of your root cellar.
Not everyone has issues with ethylene, so you might be able to get away with keeping your apples or pears near your other crops. Potatoes, for example, are very susceptible to ethylene, and exposure will make them sprout. Good ventilation can help ensure the ethylene doesn’t build up.
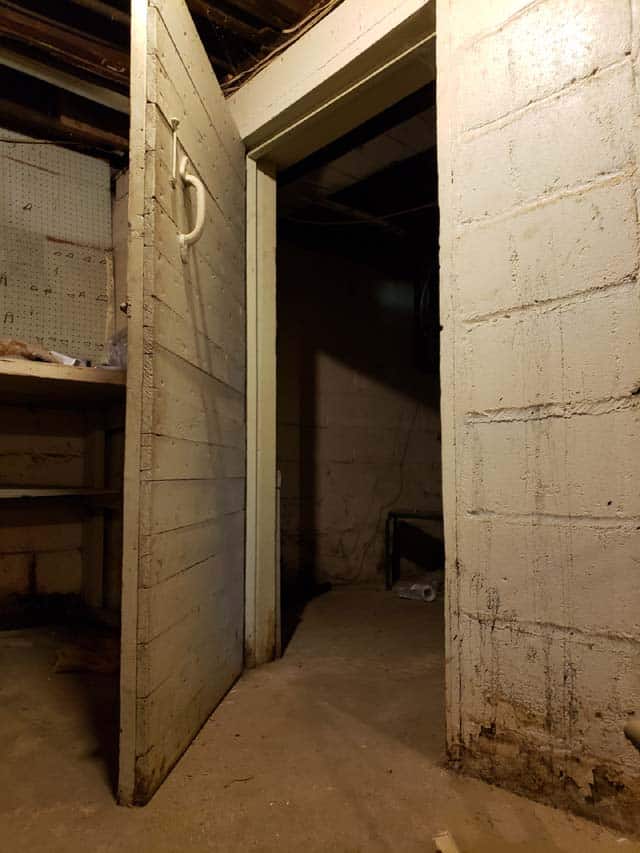
Types of Root Cellars
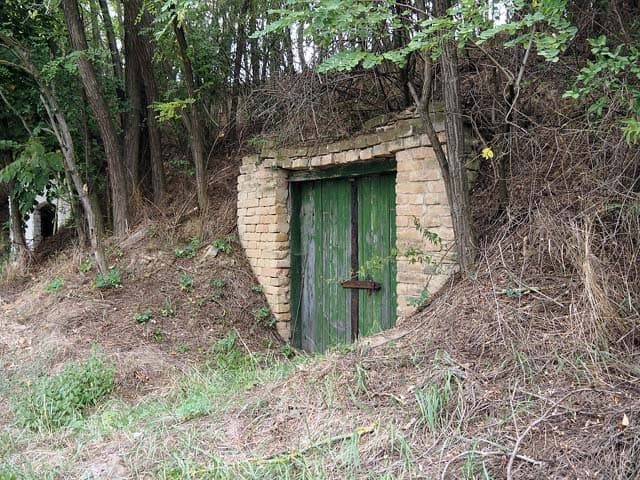
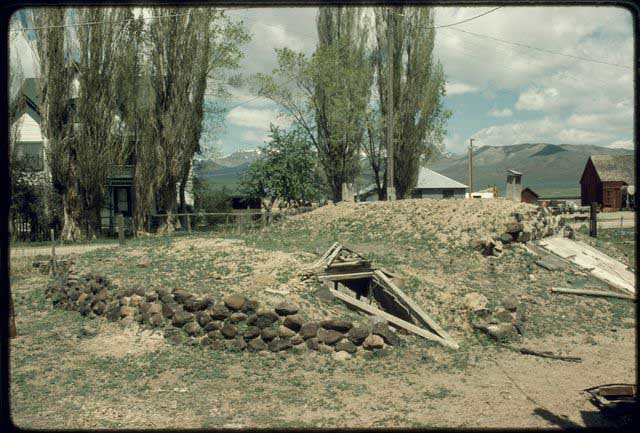
Root cellars are basically just caves in the ground. You can construct this cave in several ways, each with its pros/cons.
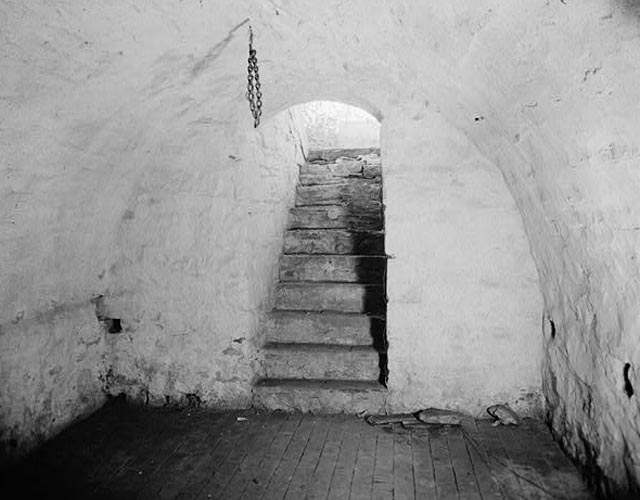
Underground
Traditionally, root cellars were built underground. Sometimes, the top of the roof was left exposed for ventilation (an A-frame root cellar). Other times, the root cellar is completely submerged underground.
The temperature and humidity levels are stable underground. The earth around the root cellar is a natural insulator and maintains the ideal conditions for storing produce.
Before digging an underground root cellar, you’ll have to know your area’s frost line. In the Northeast USA, for example, the frost line is around 18 inches into the soil. You’ll need to ensure that produce is stored below this line to ensure it doesn’t freeze but is still cold (the roof may still be above the frost line but will need to be insulated). Expect to dig at least 4 to 6 feet into the earth to get to a cool, consistent temperature.
You’ll also need to know the water table. If the water table is too high in your area, digging might be out of the question because the root cellar would flood.
Pros
 Maintains consistent temperature and humidity well
Cons
 Vertical door can be hard to find in snowy weather
- Access by steep stairs or ladder
- Backhoe rental can be expensive
- May require drainage to prevent flooding
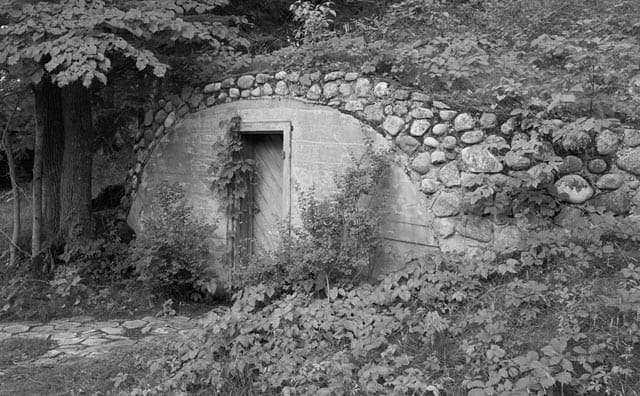
In a Hill
If you have a hill on your property, you can dig straight into the hill to make a root cellar. The construction is usually relatively simple, but you must brace the roof and walls. Depending on the size of the hill, the root cellar might need to be recessed into the ground so foods are stored below the frost line.
The best part of an in-hill root cellar is probably accessibility: you can access the root cellar easily without having to walk down a ladder. There’s no snow to shovel off of a horizontal door.
There usually aren’t drainage issues with in-hill root cellars. It’s possible to slant the root cellar floor so any water that enters runs out the door.
The downside is that not everyone has a hill on their property. Even if you do, the hill might not be in a very accessible place. Do you want to trek through snow to the edge of your property in winter to retrieve veggies each day?
Pros
- Above ground entrance
- No steep stairs or ladders
- Drainage usually isn’t a problem
- Less likely to flood
Cons
- Requires hill on property
- Might not be located close to home
- Roof needs to be braced against weight of hill
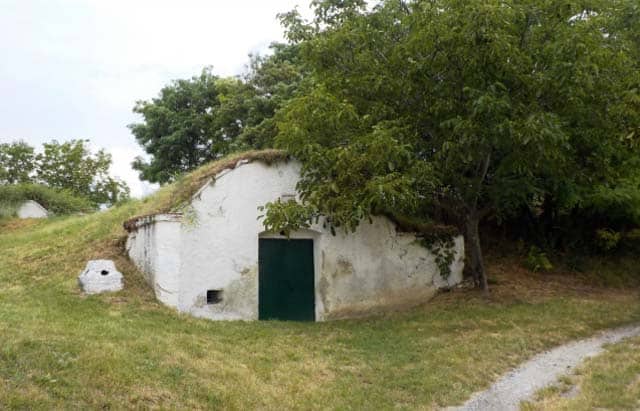
Above ground
You can still build an aboveground root cellar if you don’t have a hill on your property (or one close to your kitchen).
This usually involves making a concrete construction and putting dirt around it. Instead of concrete blocks, you can also use “earth bags” for the construction.
The main issue with these aboveground root cellars is drainage. Often, the plan will need to include a way to divert water away from the root cellar or utilize drains in the floor.
The temperature might not remain cold enough in an aboveground root cellar. Essentially, these end up being “cold rooms” instead of true root cellars.
Pros
- Can be built close to kitchen
- Usually cheap and easy to build
- Aboveground entrance
- No steep stairs or ladders
Cons
- Drainage often a problem
- Difficult to maintain cold temperature
Attached to Home
Sometimes, it might be possible to adapt part of your home into a root cellar. These include:
- The space under your porch or deck
- A part of the basement
- A part of the garage
- A room you dig next to your basement, with an access door from the basement
This makes it very convenient to access the root cellar. You won’t have to trek through snow to get your vegetables. Nor will you have to shovel snow off the door or from in front of it.
However, be cautious about adapting part of your home or anything attached to your home into a root cellar. As explained here, the difference in temperature between the root cellar and your home could result in condensation and mold problems. You’ll also have to be very careful about venting the root cellar.
Pros
- Accessible location
- Convenience
- Can be quick and easy to construct
Cons
- May result in mold issues
- Requires careful attention to venting and insulation
Planning a Root Cellar
Ready to get started? Here are some things you need to consider for building the root cellar.
Accessibility
A root cellar is useless if you don’t use it. Carefully consider which type makes the most sense for you. For example, building an underground root cellar doesn’t make sense if you cannot walk down steep steps or a ladder to get inside.
To ensure your root cellar is accessible, consider:
- Proximity to your kitchen or garden
- How you will enter it (steps, ladder, walk-in)
- If the door is blocked by snow or the entranceway becomes slippery
- Do you use wheelbarrows or carts? Can they fit through the door? Do you need a ramp?
- Whether you need an awning over the entrance
Size
It doesn’t take much space to hold all the food a typical family needs for the winter. An 8×8 foot root cellar should be adequate. Expanding to 10×10 feet would be able to hold everything a family could produce.
In some cases, you might want a larger root cellar though. For example, if you plan on using the root cellar as a storm shelter or bunker too.
To get an idea of how big your root cellar should be, try entering a similar-sized building (such as a shed). Pay attention to how high the ceiling is. You might use it less if you have to crouch to enter the root cellar.
If you plan on storing produce that requires different temperatures and humidity levels, you may want to build a multi-room root cellar. The produce that requires a higher temperature and lower humidity will be in the room closer to the door.
In multi-room root cellars, you must make the wall and door between the rooms as air-tight as possible. You’ll also need to consider the ventilation. Each area should have its own ventilation system.
Materials
The choice of materials matters, mainly because of how they will regulate humidity. If you anticipate drainage as a problem, you must choose materials that allow water to escape.
Here’s an overview of material choices for the floor, walls, roof, and shelf.
Floor
A dirt floor is the simplest and cheapest option, especially one dug into the ground or a hillside. Dirt is also great at regulating humidity. However, dirt is a poor choice if the ground is particularly wet or dry.
Gravel floors are also cheap and easy. In dry conditions, the gravel can be sprinkled with water to increase humidity. In wet conditions, the gravel can help improve drainage.
Cement floors are very popular. Cement excels at absorbing and retaining water, so it helps increase humidity in dry areas.
Some people put sand on the floor of their root cellar. It can be sprinkled with water to increase humidity. However, I think that this is a bad idea. Sand easily gets stuck to your shoes and (no matter how diligent you are about removing your shoes) always gets tracked into your home.
Top Tip
Remember that your root cellar can have two different types of floors. For example, one room can have a cement floor for high-humidity foods and the other a dirt floor for lower humidity foods.
Walls
The walls of a root cellar are retaining walls. So, while it is possible to use dirt walls, it does mean that your root cellar could easily collapse under the weight of the earth above it.
In almost all cases, using concrete blocks for the walls makes most sense. These can be quickly reinforced with rebar and are one of the least costly options.
In theory, you could make the walls out of wood. However, these will eventually rot and have to be replaced. If you don’t want to worry about your walls collapsing inwards, choosing a longer-lasting material is better.
Some people bury entire shipping containers in the ground to use as a root cellar. However, the shipping container will eventually rust and likely have drainage problems. So, unless you have an extra shipping container lying around, it doesn’t make long-term sense to use one.
Ceiling
Poured concrete is generally the best option. When properly reinforced, it is strong enough to withstand the pressure from the earth above it. Once the concrete is poured and set, you cover it with dirt.
While you may be tempted to leave the roof of your root cellar exposed (to use as a patio or to put an outbuilding on top of it), this is usually a terrible idea. Root cellars need to be several feet underground to maintain a consistent temperature and humidity. Without the dirt on top of them, they won’t function well.
If you want to build a structure on top, you’ll have to ensure the ceiling is thoroughly insulated.
Door and Shelves
You’ll need many shelves in your root cellar to make it functional. You’ll also need an air-tight door that is easy to open. Wood is usually the best material choice for both of these.
The problem with wood is that it will eventually rot. Choose a type of wood that resists rotting well, such as black locust, teak, bald cypress, or California redwood. While these are more expensive, it pays off in the long run when you don’t have to replace shelves every few years. Avoid using any treated wood.
Temperature, Humidity and Ventilation
Temperature
Temperature and humidity are critical for successful storage. The further you go into the earth, the more stable the temperature will be. However, digging deep into the earth can be a considerable expense and might result in flooding in places with high water tables.
There are other things you can do to keep temperatures low. The root cellar should be in a shady area during the day. The entrance should be on the North side. Insulation can also decrease the temperature when you can’t go deep into the earth.
Humidity
A high humid environment is needed for most vegetables. Without moisture in the air, they will start to shrivel up. You can buy a hydrometer to measure the humidity levels inside your root cellar. You can sprinkle water on the floor if the humidity is too low.
Ventilation
Ventilation is essential for maintaining temperature and humidity levels. It’s also necessary to allow gases from food to escape (such as ethylene from apples and pears).
An intake vent will allow cool air to enter the root cellar. It will be located near the floor. An outtake vent from the top will allow the warm air and gases to escape. Ideally, you should put the vents on opposite sides of the structure.
It’s easy to install intake and outtake vents in root cellars built into hills. The intake vent will originate on the top (above ground) when the root cellar is underground. However, the intake vent must travel to the floor so air only enters from below. It may be necessary to install a fan so enough air can get in.
Tips:
- Don’t put shelves directly on the walls. You need space between the shelves and walls for air to flow.
- Make sure your vents don’t get clogged or frozen in cold weather.
- If you have a multi-room root cellar, each room will need its own intake and outtake vents.
Lighting
The root cellar must be kept completely dark so food doesn’t go bad or potatoes don’t start sprouting.
Obviously, you’ll want some light so you can see your produce. You can use a headlamp if you don’t feel like bringing electricity into your root cellar.
If you do install a light, consider putting it on a timer. That way, if you forget to turn it off, the light won’t ruin your food.
Drainage
Flooding is becoming increasingly more common. So, even if you live in a place with a low water table and dry soil, you will still probably want a drainage system to protect your produce from getting waterlogged.
This can be achieved by leaving a gap between the walls and the ground. Drainage pipes are put in these gaps to funnel water away from the root cellar. The gaps are then filled with gravel to facilitate water flow.
Other systems can also work, such as leaving a thick layer of gravel on the floor, slanting the floor, or installing a drainage hole.
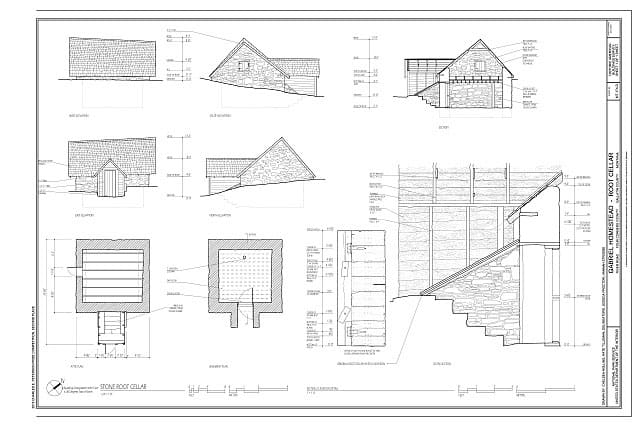
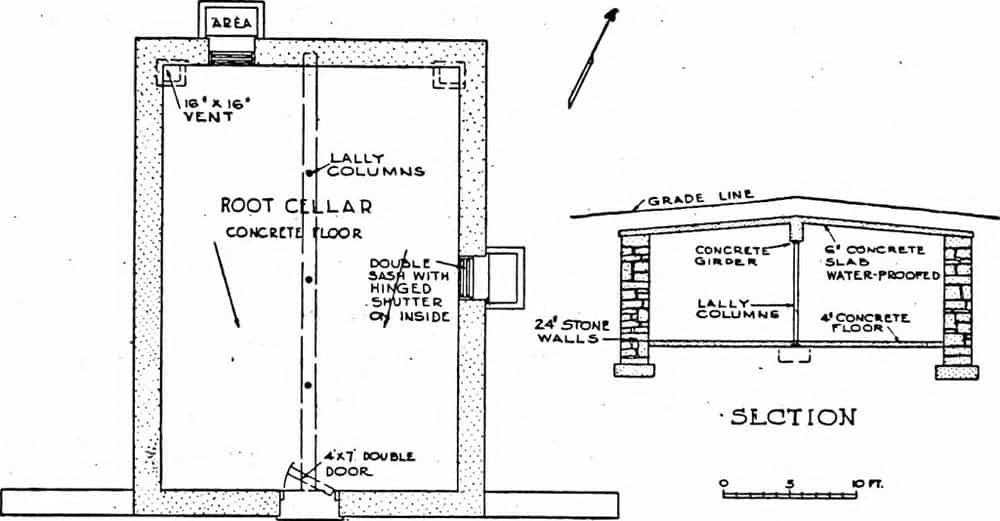
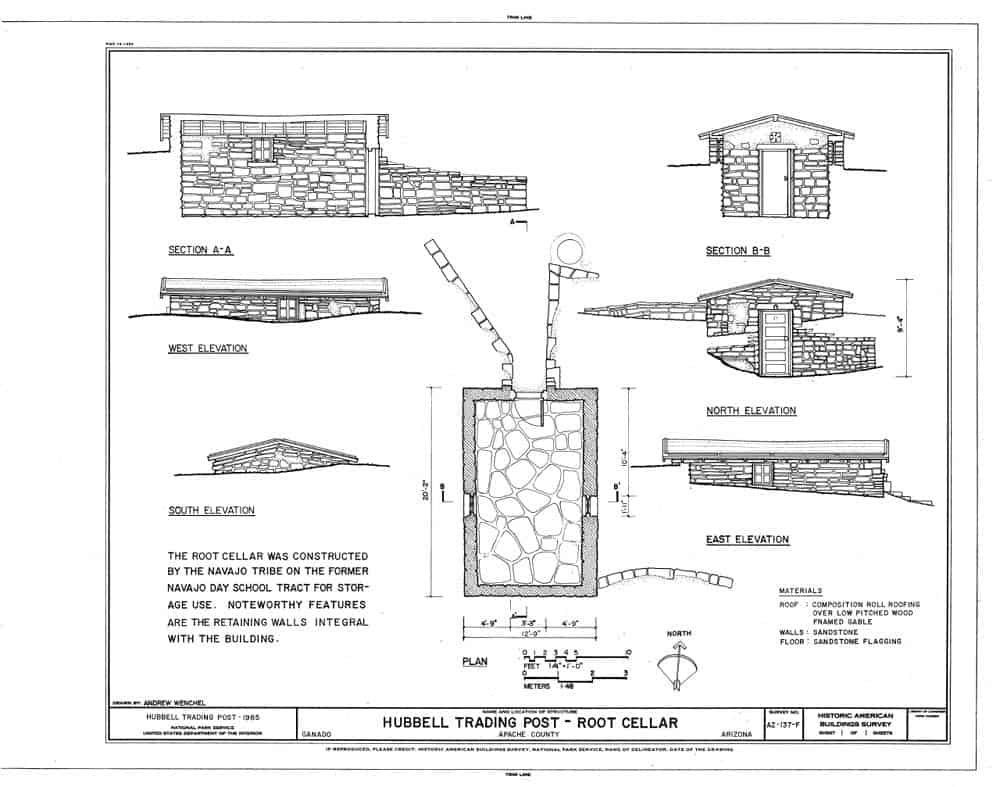
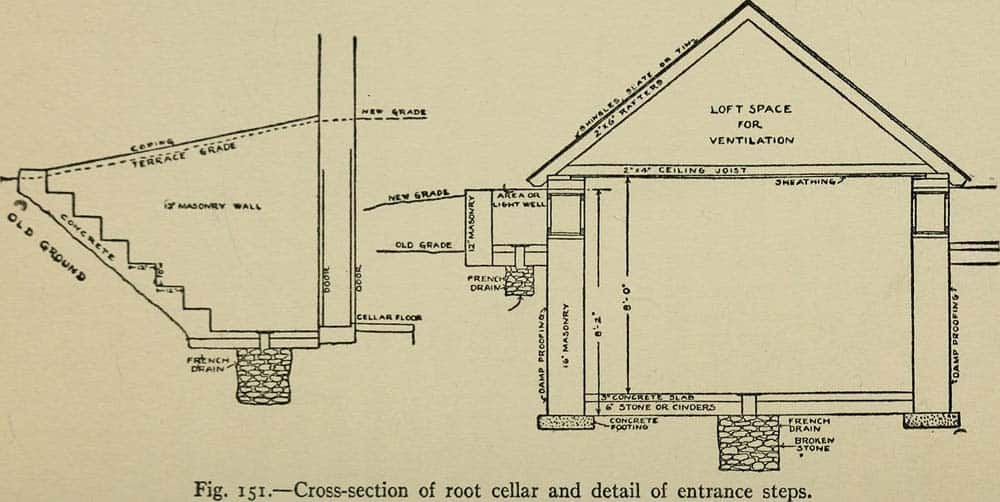
Designs and Plans
These links to root cellar designs are for inspiration only. Below, you can also see some design plans for old root cellars.
I would strongly suggest you contact an engineer before starting a build. Even if you are a capable DIY builder, you might still need expertise in planning drainage, choosing the right materials, and the depth of your root cellar.
- In-hill root cellar plan with walk-out door (PDF): 8×14 feet; concrete blocks; By Homestead-Honey
- Dug-in root cellar: By Waldsuitablebs
- Earth bag root cellar plan: With earth berm and U-shaped roof; by Omelays
- Domed earth bag root cellar plan: By Wilderness College
- Under-the-steps cold room plan: From Grit.com
Click plan for larger image.
