Potatoes are a staple food for a reason: nutritious, tasty, easily grown, and safe for long-term storage. And if the SHTF, you can’t have a much better crop to rely on to get you through lean times and allow you to flourish in your environment.
Up ahead, you can expect to read about:
- Why potatoes are a good, reliable crop to grow
- How to spot when potatoes are ready for harvest
- The best methods for safely removing those spuds from the soil
- Storage methods for your potatoes
- Problems to watch out for
Easily Grown
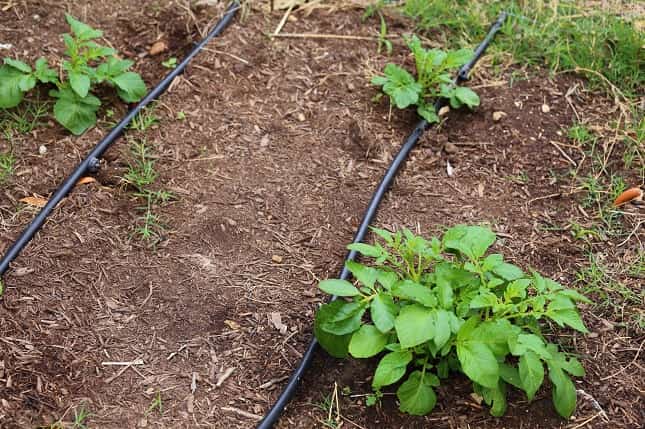
Growing potatoes is a super simple process, but like most vegetables, some practice and experience go a long way. Dig them into the ground, or throw them into containers; even a burlap sack can be a suitable container to grow potatoes in.
Potatoes can be harvested during the growing season, but it’s wisest to save a main crop for its full maturity. You can often find edible and decently-sized potatoes about sixty to seventy days after planting. Still, a full main crop typically takes closer to one hundred days to reach maturity.
Each potato variety is different, so check those tags and read reviews before you commit to any one type.
The duration of storage is an important factor too. Thinner-skinned potatoes tend to store poorly compared to thicker-skinned varieties. In order of longest shelf-life to shortest shelf-life, you’ll find russets, yellow or white, and then red potatoes.
Plant lots of potato plants to save yourself some harvesting stress. Not only will you have a larger harvest, but you’ll also be able to selectively harvest eating potatoes while growing a larger crop for your final harvest.
Harvesting Your Potatoes
Harvesting your potatoes ends with yanking them out of the ground, but the process begins weeks before you break into the soil.
Look For Potato Flowers
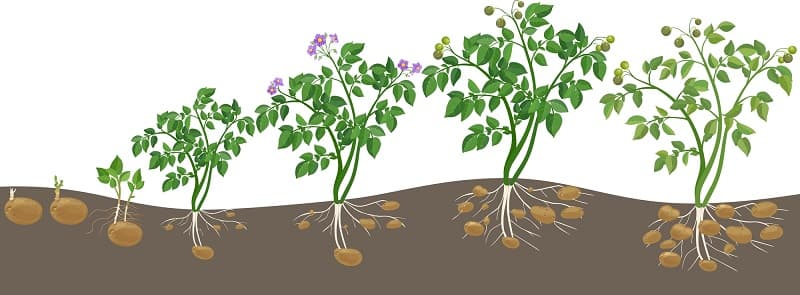
When your potato plants begin to produce flowers, mark the calendar; about two weeks after the plants produce blossoms, you can start harvesting them. Expect to collect your first harvest about fifty days after planting, but don’t harvest everything!
When you notice those flowers begin to develop, you should start to limit the water you provide the potatoes. Too much water will cause the potatoes to soak up too much moisture and develop unsightly lenticels, not necessarily a bad thing but an indicator of too-moist soil.
If your potatoes are of a variety that does not produce flowers, you can scrape away some soil from the base of the plants to look for the potatoes forming and then gauge how close your crop is to harvest. You can generally safely follow the days to harvest of your particular cultivar in the absence of flowers.
If you harvest eating potatoes to enjoy throughout the season, I recommend harvesting individual, entire plants rather than trying to pick out individual spuds from one plant (don’t worry, we’ll get to proper harvesting technique below). Potatoes are easily damaged, and a single errant bruise or nick can spoil the rest of the bunch.
The spuds you harvest during the growing season are usually smaller and more tender, but the real goal of growing potatoes should be your end-of-season main crop harvest.
Main Crop Harvesting
It is essential to wait until your main crop is finished in the season before you try to harvest them. You could get away with pulling them out early, but your patience will be rewarded if you wait.
Potatoes are usually harvested a few weeks after the first frost to ensure they’re at their best and biggest. The goal is to wait until the green vegetation above ground dies, then wait about two weeks to harvest the potatoes.
Top Tip
During this period, it is imperative not to water your potatoes; watering will only damage the potatoes underground because the vegetation is dead.
Cutting off the water is an important step for helping the potatoes harden off and begin to store their starches and minerals. Too much water can cause those spuds to rot or become too soft to harvest safely.
You can’t prevent much when it comes to rain, but often times simply avoiding any additional watering is enough.
In the past, I’ve waited until the first hard frost of the fall to start the final harvest countdown. Still, with our seasonal changes becoming increasingly erratic, I’ve taken to breaking the stems of my potato plants near or on the estimated first frost date. The Farmer’s Almanac has a convenient guide to finding your expected first frost.
How To Harvest Those Spuds
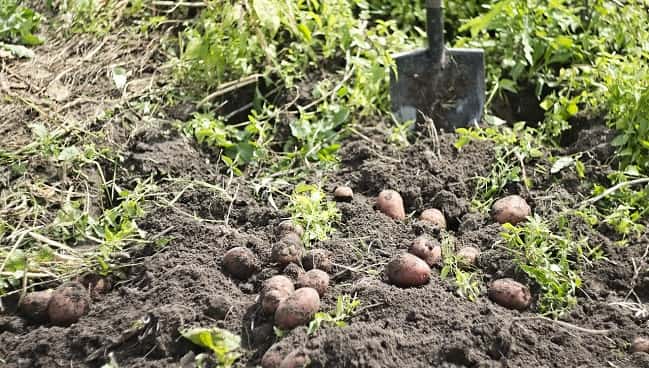
Since they’re so delicate, a gentle approach must be taken when harvesting your potatoes. It is wise to allow the soil to dry out as much as possible before harvesting to make the process easier and safer for the spuds. Many folks will recommend using a pitchfork to remove the potatoes, but I’m not a fan of this method at all.
I prefer to use a regular shovel to dig those potatoes out of the ground; I’ll break up the soil about eighteen inches in a circle around the plant, then break it apart by hand to ensure the potatoes aren’t damaged during harvest.

In a pinch, I’ve used my soil knife (Amazon Link) to break up stubborn clumps of soil much more accurately than a pitchfork or shovel can.
The process is identical for harvesting eating potatoes instead of final crop potatoes, except that eating potatoes need to be eaten within a few days of harvest because they don’t last as long as final crop spuds do.
What To Watch For
Eating potato or final crop, you’ve got a few things to watch out for when harvesting:
- Keep an eye out for potatoes with soft spots, open cuts, or other wounds. They will rot before long
- Green potatoes should be disposed of (the green color indicates a mild toxin that is best not to ingest)
- Too many lenticels (white spots around the potato) indicate they are far too saturated and will require extra curing
The Rest of the Harvesting Process
Gently clean those spuds but remember how sensitive they are to bruising. A few quick wipes is all it takes to knock the worst of the soil off of the potatoes, but don’t worry about cleaning them too thoroughly. Potatoes are always best when they’re allowed to cure with a thin coating of soil around their skin.
Place your potatoes in a cardboard box or burlap sack after they’ve been allowed to air dry.
The Curing Process
- Keep somewhere with a moderate temperature (not freezing), preferably in an area with high humidity, for ten days.
- Avoid sunlight, and don’t let them freeze.
- Check crop again after they’ve been cured for any other spuds that have been damaged, then discard them.
- After the first ten-day curing process, keep your crop in a dry environment to prevent them spoiling.
- If they begin to develop eyes, remove them.
Storing Spuds
1. Dry Storage
If you store your spuds in temps greater than 40 Fahrenheit, they will last about 3-4 months, but if you can maintain those potatoes in temperatures between 35 and 40 Fahrenheit, you’ll get 6-8 months out of them!
In cooler temperatures and after they’ve been cured, you can store potatoes in cardboard boxes or burlap bags. The goal is to allow some airflow and prevent the potatoes from sitting on a hard or impermeable surface for long.
Ever leave a store-bought potato in a bowl for too long and wonder why it turns smooshy and gooey?
Keep these veggies in a cool and dry location, away from direct light sources. Remember that exposure to light can prompt the growing process to start anew, and we don’t want that.
If you live in a warmer climate and cooler temperatures aren’t an option, you’ll need to get creative. One home gardener living in Arkansas suggests placing your spuds on a cool cement floor, one layer deep, in plastic tubs, a method she’s been successful with.
Ultimately the goal of storing any potato is to maintain it in a cool, dark, humid, and well-ventilated area. Potatoes store their longest when these conditions are optimal, and whenever these conditions are lacking, the storage lifespan of spuds will be compromised. All we can do is do our best with what we’ve got!
I wouldn’t recommend storing potatoes in the refrigerator because of the lack of air circulation. When using any of these storage methods, watch carefully for rodents and other pests who will eat up what you’ve worked hard to procure.
Pros and Cons: Dry Storage
 Easily followed method with no special equipment necessary
- Potatoes can be on-hand easily and be prepared however you wish
- Maintains fresh taste and good eating
 Most prone to environmental damage factors
- Pests could become an issue
- Improperly stored, the potatoes can become unusable
Pull your potatoes from storage a few days before use. This ensures they’re at their best taste and highest starch content.
2. Freezing
An option for potatoes you’ve freshly pulled from the ground, freezing your spuds is an option for long-term storage. It also saves the time required for curing.
In a few easy steps, when freezing, you’ll want to:
- Prepare your selected potatoes by washing them (peeling optional)
- Blanch those spuds
- Cool them in ice water
- Pack your potatoes in the appropriate containers
- Freeze
It’s about as simple as that, but let’s look at each step a bit more closely.
Selecting and Preparing
Choose fresh potatoes from the garden, and wash them up well.
The lack of a curing period is contrary to other storage methods, so if you don’t have the time or patience to allow your tubers to cure, this is the method for you.
You can peel the potatoes, but it isn’t necessary.
Blanching
A vital step when it comes to freezing pretty much any vegetable, blanching prevents particular enzymes from impacting the flavor, texture, and familiar color of a vegetable.
It also removes any remaining foreign material on the vegetable like soil or bacteria and softens the veggies up, making them better suited for storage.
Too much blanching is as bad as too little blanching, which is worse than no blanching at all. Yikes!
You might need some trial and error here until you get this step down just right.
The basic steps involved in blanching are as follows:
- Prepare one gallon of water per pound of potato
- Get the water to a vigorous, rolling boil
- Place the potatoes in the water and cover (more on this below)
- Boil for 3-5 minutes, beginning the timing as soon as the water returns to its rolling boil (if the water does not return to boiling within a minute, you put in too many potatoes for the amount of water used)
- Remove the potatoes

Now, when it comes to adding the potatoes to the water, you have a few options. A slotted spoon works to remove them from the water, or you can use a blanching basket for the work.
I also suggest cutting up your potatoes beforehand into half-inch thick pieces. These will blanch more uniformly and are easier to store in a freezer. You can also keep track of exact weights more easily if you’re into that level of organization and prep.
After the potatoes are blanched for 3 to 5 minutes, they’re ready for cooling.
Cooling
Place the potatoes in a bowl of ice water for five to ten minutes, then drain the water (removing them with a spoon could damage the chunks you’ve cut, so err towards simply draining the water).
Pack Up the Potatoes
Fill up whatever containers you’re using for the potatoes. Plastic containers work, and so do ziplock bags.
Leave about half-an-inch space of headroom between the potatoes and the top of the container. Minimize any air in the containers for better quality down the road.
Freeze
Seal it up and freeze ’em! Although they taste best if used within a year, you can freeze potatoes almost indefinitely. The colder the freezer, the better it is for this storage method.
Pros and Cons: Freezing
- Longer storage life
- No need to cure
- Zero concern for pests or rot
- Easy method for very long-term storage
- Requires access to a working freezer and electricity to power it
- Though edible these spuds won’t be as tasty as dry-stored ones
3. Canning
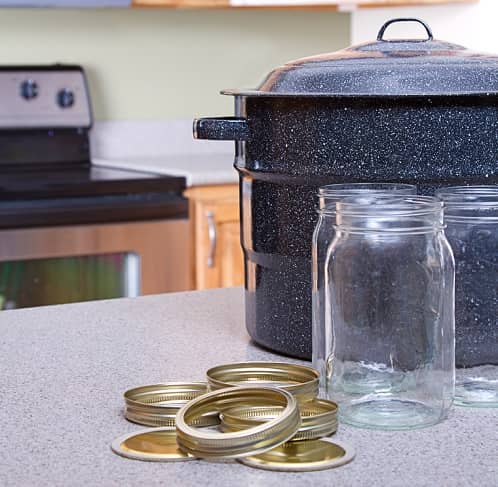
Besides knowing how to store your foods in jars (we’re going to be using the pressure can technique), you’re also going to need access to the tools and materials required for canning.
However, you get the longest storage possible with canned potatoes and preserve them in a great state.
You’ll want to use either 1- or ½ liter jars for this process.
Your order of operations is as follows:
- Prepare the potatoes
- Cook the potatoes in boiling water
- Optionally salt the potatoes
- Fill jars with potatoes
- Cover with boiling water
- Seal the jars
- Set pressure and process
Preparing the Potatoes
- Wash your potatoes and peel the skin off: Leaving the skin attached can cause problems because the bacteria that causes botulism is found in the soil potatoes are surrounded by during their growing process. Leaving the skin intact increases the risk of your stores developing botulism, so play it safe and remove the skins.
- Cut the spuds into chunks about an inch or two in size: If you’ve got small potatoes, they can be canned whole, but only if they aren’t bigger than 2 inches. Cut them smaller, and you could overcook your potatoes.
- Add to a bowl of cold water: Prevents discoloration when exposed to the air.
- Add to boiling water: You can boil whole potatoes for up to ten minutes, but a solid 2 minutes is all you need for the smaller chunks. Don’t overcook them, or you’ll have a smooshy bunch of spuds to work with.
- Drain the potatoes
Filling the Jars
You can optionally add salt to preserve flavor, but it isn’t necessary. Add it to the bottom of the jar if you opt to include salt.
Fill clean/sterilized jars with the potatoes and leave about an inch of room at the top. When pressure canning, you don’t need to sterilize the jars; the intense heat of pressure canning is enough to sterilize the jars by itself.
However, the jars do need to be hot. Run them through a cycle on the dishwasher and leave inside the hot and steamy appliance until you’re ready to use them.
Alternatively, you can pop the jars into the pressure canner while the water is warming and kill two birds with one stone.
Add Boiling Water
Use fresh and clear boiled water (i.e., not the stuff you boiled) to cover the potatoes and fill the jar, leaving the same one inch of room below the lid.
Seal the Jars
Wipe the rims clean and clear of any chunks of potato or debris, remove the air bubbles, then finally place and seal the lids. The rims should be clean; keep the lids in hot water until ready to be placed on the jars.
Pressure and Process
Once sealed and loaded into the pressure canner, you’ll have two options based on the size jar you used. Set the weighted gauge to 10 lbs/69kpa and the dial gauge to 11 lbs/76kpa for each size jar.
One-half liter jars should have a processing time of 35 minutes, and one-liter jars should have a processing time of 40 minutes.
If you live at an altitude over 1,000 feet above sea level, you’ll need to adjust your pressures when canning.
When stored in this method, you can get between three and five years of shelf life on your potatoes. Not bad!
Pros and Cons: Canning
- Very long shelf life
- Potatoes preserve much of their flavor and texture
- Easily stored
- Requires special material and proficiency with pressure canning
- Potentially can develop botulism
Save a Few Spuds for Next Year
If you save a few potatoes in long-term storage, they can be used as next year’s crop.
Keep a few covered in dirt, unwashed, and in cool storage for up to seven months.
About three to four weeks before planting season, place them in an area where they’ll get sunlight and are in a humid area. Once they start sprouting eyes, they’re good to go in the ground.
Large potatoes should be cut in half, but smaller ones (about 2 inches long) can be planted whole. Then you start the whole process over again!

I have been dry canning potatoes for years. The results speak for themselves. They aren’t mushy and water logged and they hold together very well.
Do I have to cure the potatoes if I am canning them?I can’t seem to find this answer anywhere. I planted them so I could can them. I don’t plan on eating them fresh.
No, you don’t need to cure potatoes before canning. They can be canned straight out of the ground (after washing, of course). HOWEVER, curing the potatoes first will make them harder and less likely to turn to a jelly-like mush in the jar. Yukon gold potatoes are said to be the best potatoes for canning and won’t get as mushy as others if not cured first. Hope that answers your question. 🙂