Butterfly bandages get their name because they have a narrow, non-adhesive area in the center and adhesive wider sides, making them look like a butterfly. They are also called “butterfly stitches” or “wound closure strips.”
Butterfly bandages are similar to SteriStrips, which are also used to hold wounds together to heal.


How to Use a Butterfly Bandage
For many wounds – even gaping ones that are fairly deep – it isn’t necessary to go to the emergency room for stitches. A butterfly bandage can easily treat many of these wounds at home. Many people are surprised when the doctor in an ER applies a butterfly bandage instead of giving stitches.
I learned how to use a butterfly bandage because I go wilderness camping with my young daughter. There aren’t any ERs close by!
So, if someone gets a gaping wound, I would likely use one for first aid.
When to Use
If you aren’t sure whether a wound needs stitches, it is always better to play it safe and go to the ER. But, if you know how and when to use a butterfly bandage, you can skip the hassle (and costs!) of an ER visit.
There are four main ways to close a gaping wound.
- Skin glue: This is only suitable for minor wounds that aren’t very deep. The adhesive holds the surface skin together so healing can occur below.
- Stitches: Also called sutures, this is the most common method of closing wounds. A sterile needle stitches the skin together with suture material (often silk or nylon).
- Staples: Staples with straight edges are used for deep wounds. They are often used in areas where the skin isn’t very thick, such as scalp wounds. They are faster and easier to apply than traditional stitches.
- Adhesive Bandages (including butterfly bandages and SteriStrips): Instead of stitching the skin together, adhesive bandages hold the skin on both sides of the wound together.
Adhesive bandages are NOT suitable for many types of wounds. They should NOT be used when:
- The wound is jagged
- The area of the wound is under tension (e.g., a wound on the knuckle or elbow since these wounds would be pulled each time you moved )
- The wound is very deep and goes beneath the skin into the fat or muscle tissue
- The wound continues bleeding even after pressure has been applied
- When you are worried about scarring
Likewise, if you suspect the wound is dirty or has something stuck, you should get professional treatment and not treat it at home.
Butterfly Bandage vs. Stitches
The main benefit of butterfly bandages is that they are easy to apply and don’t cause any pain (no matter how tough you are, getting stitches is no fun!). You also don’t have to worry about getting the stitches removed.
However, they aren’t as good at treating more severe wounds. Stitches can hold multiple layers of skin together. The butterfly bandage only holds the wound from the surface of the skin.
Any deep wound will probably be best treated with stitches.
Stitches are also less likely to cause scarring. If you have a wound on your face and are worried about a scar, go to the ER to get stitches!
Read:
When Is It Too Late to Get Stitches?
Many people don’t realize there is a small window of time for getting stitches. Most doctors won’t give stitches 24 hours after the wound has occurred. Some won’t do stitches as little as 12 hours after the injury.
I emphasize that if you aren’t sure if you need stitches, it’s better to go to the ER than try home treatment. By the time you realize you need stitches, it may be too late!
Doctors won’t do stitches after a certain timeframe because of infection risk. The more time passes, the more likely bacteria will have entered the wound. Closing the wound means that the bacteria will be trapped inside. An infection could occur and will have no way of escaping. The infection then could spread to other parts of your body.
That’s why if you wait a long time to go to the ER for a wound, you will probably get a butterfly bandage instead of stitches.
Some doctors will do stitches long after the wound occurs but may need to insert a drain. Or, they might do something called “debriding,” in which they remove tissue from the sides of the wound to make it fresher for stitching.
Neither of these is an enjoyable experience, so getting the wound treated properly from the get-go is better.
The bottom line?
Use butterfly bandages for minor, straight wounds. For more severe wounds, use a butterfly bandage to hold the wound together on the way to getting professional medical care.
vs. SteriStrips
SteriStrips are sometimes called “butterfly stitches” (even though they are long, thin, and look nothing like a butterfly). Butterfly bandages and SteriStrips can be used to close wounds, and the instructions for using them are the same.
So, what’s the difference?
Because of the wider shape of butterfly bandages, which grab more skin, I find them better for short wounds where you will only use one bandage.
SteriStrips are better when you have longer wounds requiring many bandages to hold close. Applying multiple SteriStrips in a row is much easier than butterfly bandages.
How to Apply a Butterfly Bandage
Step 1: Stop the flow of blood
When treating any wound, the first thing to do is stop the blood flow by applying pressure, preferably with a clean compression pad/gauze (you have this in your first aid kit, right?). You won’t determine how big/deep the wound is until the bleeding has stopped. Also, no bandage will stick when the wound is bloody.
Step 2: Clean the wound
Use clean water to flush any debris out of the wound. This may be painful, but it is crucial for preventing infection.
I keep these little bottles of sterile saline solution (Amazon Link) in my first aid kit. They make it easy to shoot clean water into wounds.
They are also great for cleaning gunk out of eyes and as nose drops for babies.
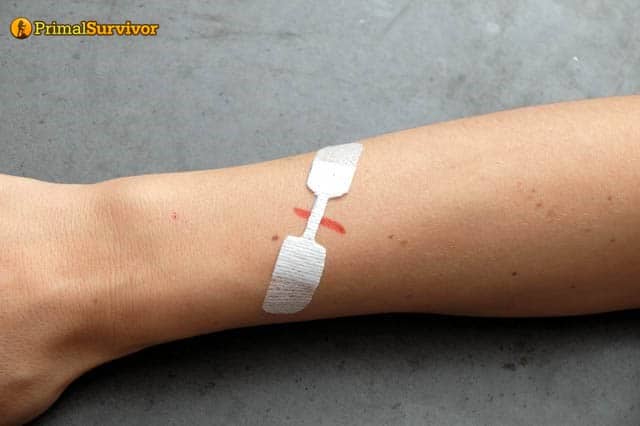
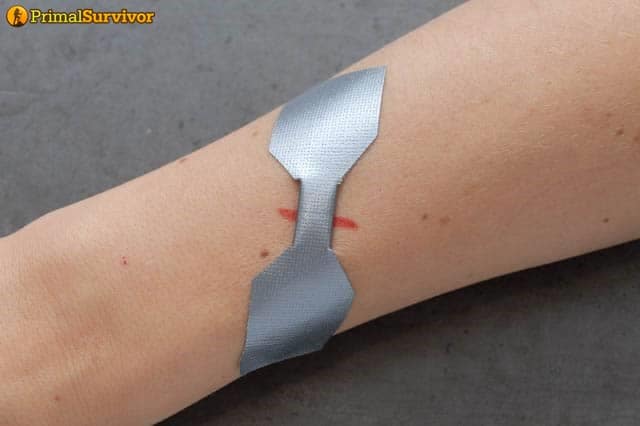
Step 3: Apply the butterfly bandage
Remove the backing from HALF of the butterfly bandage. Apply this half on one side of the wound.
While holding the skin together, STRETCH the bandage over the wound like a bridge. Then, remove the paper from the other half of the bandage and stick the bandage to the other side of the wound.
Tips:
- The trick is to stretch the butterfly bandage as you bridge it over the wound. That way, it will firmly hold the wound in place.
- You’ll need to place the first side of the butterfly bandage a bit further away from the edge of the wound than you’d think. Otherwise, you won’t be able to stretch the bandage enough to get a good hold on the wound.
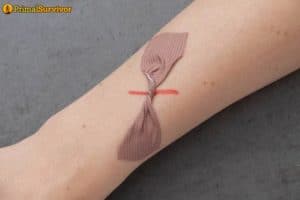
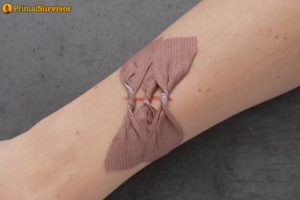
Step 4: Apply additional bandages
The first butterfly bandage should be in the middle of the wound. Even if it is a small wound, some still apply additional bandages. These they do at angles, so they make an X over the first bandage. This tactic helps grab more skin so the wound is held more securely.
If the wound is longer, you must apply additional bandages to hold the wound together. Apply the second bandage next to the first. Make sure you alternate sides (left then right of the first bandage). This ensures the tension is the same on both sides of the wound.
Step 5: Apply antibiotic gel/ointment
This will help prevent infection and improve wound healing. You will need to reapply the antibiotic ointment daily.
Step 6: Cover with band-aid or gauze (optional)
Wounds need to stay dry to heal. This can be very difficult, especially when kids are in question. One trick for keeping the wound (and bandages) dry is to put a very large band-aid or gauze over the entire area.
The band-aid helps keep both the area dry plus helps lock the butterfly bandages in place. If the site does get wet, you can just change the band-aid.
Step 7: Apply vitamin E (optional)
Wounds dry as they heal, which can make them very itchy. To prevent this, you can apply some vitamin E oil (Amazon Link) to the wound area. You can get this in capsules. But…
DO NOT APPLY VITAMIN E RIGHT AWAY.
You should wait at least a few days before applying vitamin E. Vitamin E is oily and will cause the butterfly bandage to unstick too early. It can also interfere with blood clotting.
How Long to Keep Bandages On For?
Leave the butterfly bandages in place until they fall off on their own. Ideally, they should stay put for at least one week. However, 10-14 days is generally recommended.
When to See a Doctor
- The wound continues to bleed: This is a sign that butterfly bandages aren’t suitable for the wound, and you need stitches (sooner than later!)
- The wound gets red, swollen, or oozes: You might have an infection that needs to be treated.
- Tenderness in the groin or armpit: These are also signs of infection.
DIY Butterfly Bandages
There are several methods of making butterfly bandages out of tape (duct tape, medical tape, and masking tape all work). However, I don’t recommend this for everyday situations. Tape is not sterile, and putting it near a gaping wound is not a smart idea.
Keeping sealed, sterile butterfly bandages in your first aid kit is much better. Besides, do you want to bother with cutting out a DIY bandage while you or your kids have a gaping wound?
But DIY butterfly bandages do have their place, like when…
- Backpacking and you are limited to how many first aid supplies you can bring
- Biking injuries that need to be kept closed while you ride to get stitches
- There is nothing else available
Method 1: Twisting Tape
The trick to making butterfly bandages is to get the middle area to be smaller and non-sticky. The easiest way to do this is to twist some medical tape.
First, apply the tape to one side of the wound. As you stretch and pull it to bridge the wound, twist it several times. Then, place the untwisted side of the tape on the other side of the wound.
This works best with medical tape. Duct tape is very thick, and you’ll end up with some sticky areas on the wound, which isn’t ideal for healing. And while this DIY method seems easy, it is a bit tricky. You’ll want to have assistance!
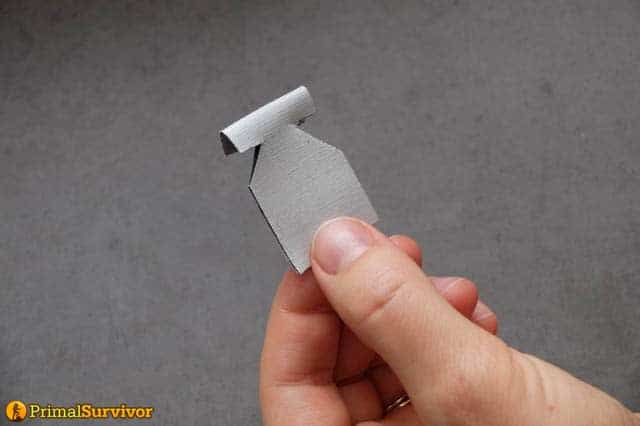
Method 2: Cut and Fold
This works better than the twisting method because you’re less likely to end up with some of the sticky area on your wound. However, it requires you to have scissors (another reason to carry a multitool) and requires a bit of time to make.
- Cut a piece of tape, ideally about 1 inch thick and about 3 inches long.
- Fold the tape in half so the sticky side is out.
- Cut little triangle notches from the tape, as shown in the image.
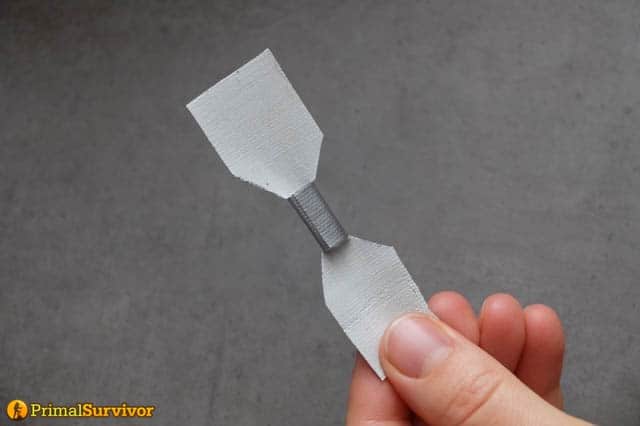
- Fold the notches together so the center of the tape isn’t sticky.
- Apply as you would a regular butterfly bandage.
Just cut some flaps in the middle of a piece of tape. Fold them down so the middle area becomes smaller and non-sticky. The central area goes over the wound.
Other Alternatives to Stitches
In the past several years, there have been some cool innovations in “non-invasive wound healing.” There are now devices that stitch up the skin without any needles.
Many hospitals are using these now, so we might even see an end to stitches at some point in the future.
The devices work like butterfly bandages but use a “zip” to close the wound. Some come in strips, so you just cut a strip as long as the wound that needs treating.
I’d still recommend going to the ER if you think you need stitches, but these devices could be great to keep in your survival medical kit or emergency preparedness kit.
They are available on Amazon.


I don’t understand how you can put on antibacterial cream and/or Vit E under the butterfly bandage(s) as the bandages are to cover the wound.
Unlike normal bandages, butterfly bandages don’t actually cover the wound. They hold it together. So you can apply the cream after the bandage. You might actually have to do it in this order: a gaping wound will bleed and wash out the cream. The butterfly bandage holds the wound together and helps keep bleeding under control.
Great article very helpful. Maybe can add section on Hydrocolloid patches over the butterfly tape which can help keep area moist and bacteria free. A bit pricey for patches but very practical as simulates artificial skin in the healing process.
I can vouch on steri strips being super effective at helping seal a huge cut, my gyno surgeon used them when I had my myomectomy as part of island style dressing for the topmost outside (skin) part and it healed so smooth, you can barely see the incision itself.
I had hesitations about steri strips but they’re that good that surgeons will sometimes use them instead of staples or surgical twine.
Yes they are excellent and very versatile. Incredibly useful in a survival scenario.
This was a really great article on a wound closing subject I needed more information on. Thanks so much. The Zip Stich looks good but their only for wounds 1 1/2 inches long, plus very pricey.
Yes it is expensive! I expect the price will come down as more competitors come to market.