
How to stitch (suture) a wound is a life-saving medical skill to know during emergencies when help is unavailable. But let’s be clear here: If you aren’t trained, you will probably do more harm than good by trying to stitch a wound yourself.
This guide is meant for non-medical professionals who want to be prepared for emergencies. It goes over the steps to stitch wounds, alternatives to stitches, and the best ways to learn to suture.
Stitching Wounds in SHTF Emergencies
We’ve all seen those movie and TV scenes where the hero saves a life with an improvised suture out of dental floss using a fishing lure for the needle.
In real life, using improvised medical equipment would cause more tissue damage. Keeping things sterile while suturing in the field is also very difficult, so the infection would likely get trapped inside the sutured wound.
Infection is ultimately what kills people, NOT wounds left open. Thus, it’s better not to stitch the wound in most cases.
Even serious wounds will heal on their own over time. That doesn’t mean you don’t treat the wound. You still want to clean and bandage it. In high-movement areas, you’ll also use suturing alternatives to keep large wounds from gaping open (more on those alternatives later).
The bottom line?
- Most wounds should NOT be sutured in the field
- Closing a wound can trap infections inside
- Learn about suturing alternatives
- Only suture a wound if you’ve had considerable experience
- Practice, practice, practice!
Side Note:
This is where Primal Survivor differs from a lot of other prepping websites. While we believe in learning as many skills as possible, we don’t think 100% self-sufficiency is possible. It takes a village!
Unless you are prepared to put in the time it takes to learn to suture, consider alternatives for emergencies – like finding out if you have a doctor (nurse, medical student, vet…) in your community whom you could turn to in times of crisis.
Suturing Alternatives
You should not attempt it if you are not experienced in suturing wounds. Instead, your best bet is to use a butterfly bandage (or Steri-Strips). Other alternatives are skin glue and staples. These suture alternatives are relatively easy to apply and are less likely to cause more damage.
The downside is that these alternatives are generally only suitable for superficial wounds. In deep wounds, a “void” may occur below the skin surface, resulting in problems like hematoma, inversion, infection, or dehiscence.
Butterfly Bandages
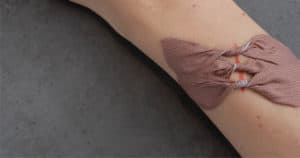
Also known as skin-closure tape, Proxi-strips, or Steri-strips, this method uses a long bandage stretched from one side of the wound over the other to hold it closed. It’s beneficial for long, straight gaping wounds, such as from a knife wound.
Butterfly bandages are sometimes used on top of subcuticular sutures (underneath the skin’s dermis) and after sutures have been removed.
Read how to use butterfly bandages, including making your own out of medical or duct tape.
Wound Closure Strips

These wound closure strips work similarly to butterfly bandages. The difference is that they contain a small piece of stainless steel. The steel wire is attached via a “spring” mechanism on each side, allowing them to pull a wound closed.
They are incredibly strong and a better option than Steri-Strips. The downside is that the closures are relatively pricey, so you might want to save them for more severe injuries in the field.
Adhesive Glues
A lot of survivalists recommend carrying superglue to close wounds. Yes, glue can make a good suture alternative in some situations (though I’d recommend an actual skin glue-like Dermabond over superglue!).
Skin glue is quick, easy, and painless to apply. The major downside is that the adhesive isn’t very strong. It only binds to the wound area’s exterior, so the wound can easily open (wound dehiscence).
Skin glue makes a good suture alternative under the following conditions:
- The wound isn’t deep
- Linear wounds
- On low-tensile/low-movement areas (not joints)
Skin Staples

Thus, staples are only a good solution when you’ve been injured but need to keep moving. You’d apply staples to the area until you could get to safety and treat it appropriately. (Sources: 1, 2)
How to Suture a Wound
These suturing instructions assume you’ve already applied basic first aid, such as stopping bleeding and cleaning the wound.
Tools/Supplies:
Suture Thread
There are many types of suture threads. The basic features to look at are:
- Size: A smaller number = bigger thread. Suture numbers like “1” or “2” are very large and used to close things like the abdominal wall. Suture numbers with a “-0” are smaller. For example, suture size 10-0 is tiny and used for corneal sutures. For most skin lacerations, suture size 4-0 is adequate.
- Braided or Non-Braided: In most cases, a non-braided suture is preferred because it is less likely to cause infection and also less likely to unravel.
- Absorbable or Non-Absorbable: Absorbable suture materials (like Monocryl) are used when the sutures will not be removed. Non-absorbable suture materials (like nylon or Prolene) are used on the skin surface where the sutures can be removed.
Needle
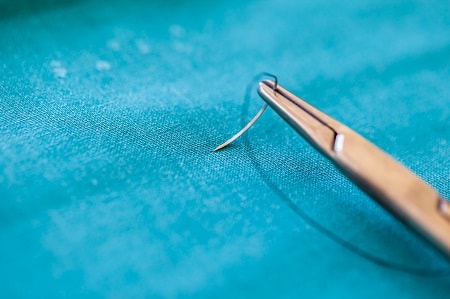
Suture needles are curved. The curve allows the needle to make a U-shape under the skin so the suture exits cleanly opposite the entry site.
According to physician Cheryl Lowry, the deputy director at the Center for Polar Medical Operations and suturing expert, if you don’t have a curve needle, you can improvise a suture needle by bending a sewing needle into an arc.
Driver
The needle driver (also called needle holder) clamps around the needle to hold it in position. It’s also crucial in tying suture knots.
Tissue Forceps
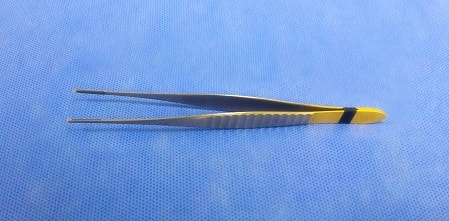
The tissue forceps gently pick up the tissues around the wound so you can position the needle correctly. They are crucial for getting the wound edges to line up correctly.
Forceps are categorized by whether they have teeth or not, the size of the teeth, and whether they lock automatically or are held closed.
For suturing skin, you will typically need Adson thumb forceps. Another type of toothed forceps called “Russian forceps” are sometimes used when suturing thick skin. (4)
Other Suturing Equipment
You will/may also need:
- Gloves
- Scissors
- Gauze
- Povidone-iodine for preparing the skin
- Dressing forceps
- Penlight/headlamp
- Anesthetic
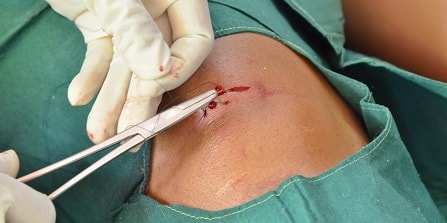
1. Decide Whether to Close the Wound
Contrary to what you may think, closing a wound is often dangerous. Closing the wound could trap bacteria inside, resulting in a nasty infection. Without access to antibiotics, patients can die a painful death this way.
Most hospitals will not suture a wound if the patient comes in less than 6-12 hours after injury.
Read: Fish Antibiotics for Humans
Suture a Wound If It Is:
- Deep: If you can see fat or muscle (which looks like raw steak), the wound should be closed.
- Jagged or gaping open
- Over a joint
- Continues to bleed after 15 minutes of direct pressure
Do NOT Suture a Wound In These Cases:
- More than 12 hours have passed: There’s too much risk that bacteria has entered the wound. Thus, closing it could cause a trapped infection. Some say not to close wounds if more than 6 hours have passed.
- The edges stay together on their own
- Puncture wounds: Usually don’t need stitches, especially as it is challenging to clean bacteria out from deep within the wound, and infection can get trapped inside the closed wound.
- The wound is hard to clean: This includes deeper, narrow wounds. Closure may trap bacteria inside.
- Animal bites: Never close a wound caused by an animal bite. It should be left open until the risk of infection has passed.
- Significant skin loss: Trying to suture together these wounds can pull on the skin and cause tearing.
- Redness or edema around the wound: Signs of infection
- Suspected underlying structure damage: Such as nerves or tendons under the skin may have been damaged. (5, 6, 7, 8, 9)
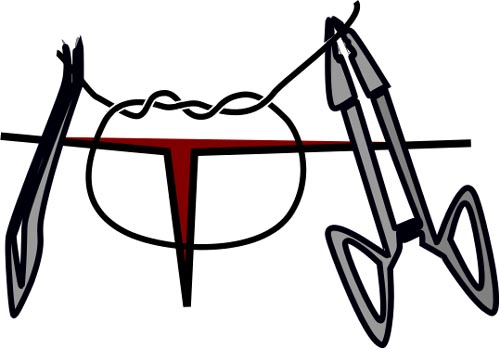
2. Edge Approximation (Lining Up Wound Edges)
The main goal of suturing a wound is to bring the sides of the wound together so healing is faster. If the edges aren’t lined up properly, it can create dead space under the sutures. Blood can pool in the dead space, leading to hematoma and possibly infection.
With straight wounds, lining up the edges is relatively simple – but not all wounds are a perfect linear shape. You’ll have to look very carefully at the wound to see which areas of skin should go together. Use your gloved fingers to gently push the skin to determine where to place the sutures.
Note: The wounds on most silicon suture kits are very neat. If you want to practice with a messy injury, Get a raw chicken breast with the skin still on. Stab through the chicken with a stick. Then, practice suturing the entry and exit points. It will not be easy!
3. Choosing the Right Suture
Medical experts will choose a suitable suture based on the type of wound, location, and thickness of the patient’s skin. As an amateur, the simple interrupted suture is the best to learn.
Interrupted sutures are individual sutures; each one gets tied off individually. While they aren’t as strong as certain continuous sutures and take longer, they are much easier to make.
Other benefits of interrupted sutures are:
- More room for error: If you mess up one suture, you only have to remove that suture and not the entire suturing.
- Easier drainage: If infection is suspected in the wound, you can remove just one or two sutures to allow drainage while keeping the other sutures in place.
4. Making the Suture
You aren’t going to learn how to suture by reading – you’ll have to watch videos and practice on a suture kit. But I will share some expert advice from doctors about how to start suturing here.
Edge Eversion
When suturing a wound, you’ll use your non-dominant hand to gently grasp the sides of the wound and push them together. The edges of the skin need to be in contact with each other. The wound edges mustn’t invert or get pushed or curled downwards when closing. Inversion slows down healing and makes a nasty scar.
Medical professionals used to believe that eversion – pushing the edges of the wound slightly upwards – reduced scarring. However, this is no longer considered to be true. In any case, if you can’t get the wound edges to line up perfectly, it’s okay to have them go upwards but NOT okay for them to curl downwards.
Choosing Where to Start Suturing
Typically, you should start interrupted sutures in the middle of the wound. The following sutures are placed symmetrically on each side until you reach the ends of the wound. However, starting at the edge of the wound, furthest away from you, is easier. With large gaping wounds, beginning in the middle might strain tissue and cause tearing.
Entering the Skin with the Needle
- The needle must be perpendicular to the wound when you enter the skin
- As you drive the needle into the skin, angle the needle down from the edge of the wound. Angling towards the other side causes a too-shallow suture.
- You will need to rotate your wrist to get the needle in/out properly
Exiting the Skin with the Needle
- The needle should exit perpendicularly
- Exit at the same distance from the wound as you entered
- You should angle the needle slightly inwards when exiting to match the angle of entry
- Never lift the tissue with the needle as you exit.
- Use tissue forceps to gently push down the tissue outside the wound as the needle exits; this allows you to get the right exit angle.
Using Forceps during Suturing
- Use forceps to support the skin as the needle enters and exits
- Choose toothed forceps when possible
- Never pinch the skin with forceps. Instead, gently lift or hook the skin.
Tying the Knot
- Tie the knot with just enough tension to hold the wound edges together.
- Simple knots are better than complex knots. The two-handed square knot is best for beginners.
- Never tie the knot directly over the wound. It should be off to the side so it does not get into the wound as it heals.
- Tension should be horizontal, not vertical, as you tie the knot.
- In deep wounds, use a buried dermal suture to reduce tension on the skin.
- Cut the tails of the knot so they don’t extend off the skin; you don’t want the suture ends carrying bacteria into the wound. The ends should still be long enough so they don’t unravel.
Best Videos for Learning Suturing
There are many videos on YouTube for learning to suture. One of the most highly recommended is the Duke Suture Skills Course by Dr. Zenn.
It starts by going over the instrument tie and then seven different types of sutures.
How to Practice Suturing
The only way to learn to suture is to practice it. Here’s what doctors say about how they learned to stitch wounds.
First, Learn to Tie Surgical Knots
Before you practice suturing with a needle and real sutures, you’ll need to learn how to tie surgical knots. You must do this out of muscle memory – meaning you don’t even have to think about it. As one doctor said, “Your sutures don’t matter if your knots suck.”
Tips:
- Don’t use suture right away. Instead, start with something more manageable – like your shoelaces. You’ll be able to see what you are doing (and any mistakes) easier. Once you’ve got the knots down perfectly on shoelaces, you can move to thinner materials such as thread or cheap dental floss.
- Practice needle control: Cut the edge of a pillowcase where it has two layers. Then, practice suturing just one layer of fabric.
- Tie knots in your downtime: Practice tying knots as you watch TV, ride in a car, or have some free time.
Below are some good videos that show you methods for perfecting your surgical knots.
- Surgical Knot Tying by Dr. Omedary: This video shows how to practice knots using a rubber band board.
- One and two-handed surgical knot tying by Christopher Morosky, UCONN Health Center: Here’s another video that covers knot-tying. It is a bit silly but good for helping anyone struggling with suture knots.
Best Suture Practice Materials
Once you’ve mastered knot-tying, you can start practicing sutures. Here are some materials to practice on so you’ll be ready for natural human skin if it ever comes to it.
Suture Practice Pads

These pads are made of composite silicon material layers designed to replicate human skin. They are reusable, so they can suture the same area again after removing the sutures.
You can buy a practice pad on Amazon.
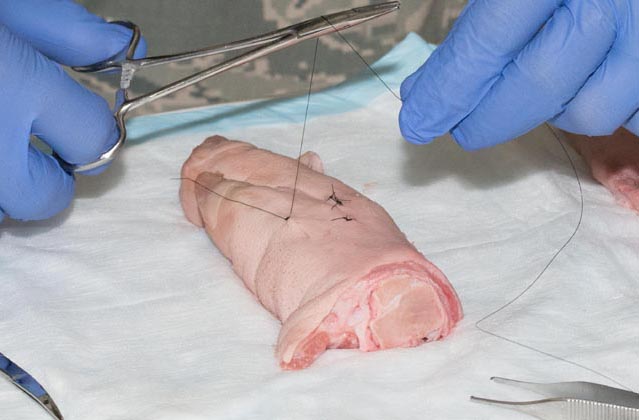
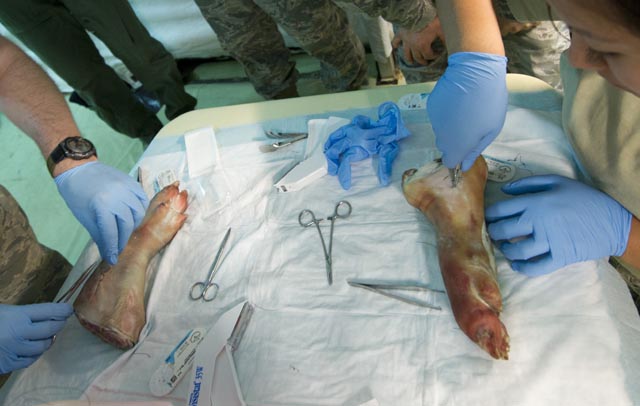
Pig Feet
The texture on pig feet is the closest you’ll get to human skin. It is what medical students and doctors recommend most frequently for practicing suturing.
Chicken with Skin
The skin on chicken is more stretchy than human skin. One medical student recommended freezing the chicken and letting it defrost halfway to approximate human skin better.
Pork Belly
Most pigskin is too thick to practice suturing – you will even break needles on it. But pork belly with the skin still on it is excellent for suturing.
Bananas
Banana peels aren’t the best approximation of human skin and tear easily. However, banana peels have two layers – a yellow layer on the outside with a thick white layer underneath. These layers feel similar to the dermal/epidermal layers in human skin.
Chicken Feet
You can use chicken feet to practice suturing human tendons. The tendons on chicken feet are very similar to those on humans.
Grapes
Use a scalpel to cut a grape and then suture it back together. Stitching the delicate grape skin will give you lots of precision.
Are you learning to stitch wounds? How do you practice? Let us know in the comments section below.

Amazing article. I appreciate the detail and common sense approach. Practice is key for any type of suture and wound closure. Thank you for the tutorial.