Before we get into how you can make DIY Meals Ready to Eat (MREs), let’s take a second to clarify what survival food is. It sure isn’t a bunch of non-perishables that you stockpile in your pantry!
While it is good practice to stockpile non-perishables, these aren’t going to help you through long-term disasters like EMP, hurricanes, or any of the other likely disasters.
Sure, you can live off canned peas for an indefinite time, but most non-perishables will go bad quickly after you open them, require lots of water to prepare, and have extensive cooking times. And good luck carrying canned food with you if you’ve got to bug out somewhere!
For a food to be considered a good survival food, it must be:
- Lightweight
- Compact in size
- Have a very long shelf life
- Have a long shelf life after it is opened
- Be easy to prepare
- Require little or no cooking time
If you are new to survival foods, I recommend reading these articles:
Read on if you are ready to start making your own MRE survival food!
Dehydrating versus Freeze-Drying
Freeze-dried foods are great for survival. The process keeps the nutrients intact, and freeze-dried foods usually taste delicious. Their only issue is that freeze-dried foods don’t shrink, so they take up a bit of space.
Recommended Reading:
Until recently, freeze-drying was an industrial process; now, however, you can freeze dry at home.
Dehydrating is your only option if you want to make your MREs out of fresh foods.
However, you can buy buckets of freeze-dried foods and combine them with other ingredients to make your own MREs.
Supplies for Making Your Own MREs:
- Dehydrator – See our guide to the best food dehydrator
- Mylar bags – See our guide to using Mylar bags
- Vacuum sealer
- Desiccant, such as Silica gel. Or you can use an oxygen absorber.


Which Foods Can You Dehydrate?
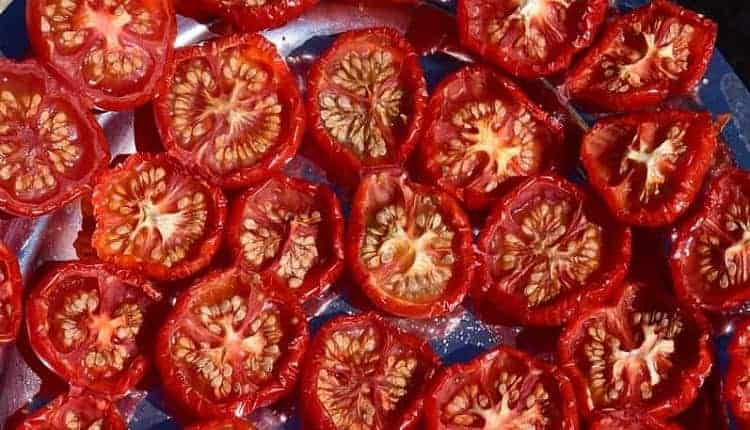
You’d be surprised at how many different types of food you can dehydrate. There are the obvious ones like fruit slices (I like dried banana best), tomatoes, and jerky, but here are some of the surprising foods you can dehydrate:
- Yogurt
- Mashed potatoes
- Pasta sauce
- Hummus
- bananas
- Dried beans
To dehydrate these foods, just dry them as you would fruit leather. See our guide to expert-level dehydrating.
Ensure they are pureed first (such as with pasta sauce or mashed potatoes). Then spread them out on parchment paper in your dehydrator.
The finished result varies.
Refried beans look a bit like cardboard when done. Yogurt becomes a crumbly paper.
Which Foods NOT to Dehydrate
You can dehydrate just about anything – but not all foods rehydrate very well.
I learned this on a backpacking trip where I made some vegetable soup to take with us. The tomatoes, kale, and onions rehydrated well – but the carrots and mushrooms remained tough little rocks, even after pre-soaking them and boiling them for a long time. We ate them anyway, but it would probably be harsh on our digestive system in a survival situation.
Here are foods you do NOT want to dehydrate:
- Avocado and high-fat foods: The fat can make them go rancid quickly, and it will destroy your entire MRE contents
- Fatty meats: for the same reason
- Cheese: You will be better off buying commercially dried cheese
- Eggs: They are weird when you try to rehydrate them and won’t work for baking or cooking needs; consider buying commercially dried eggs instead.
- Milk: This can be done, but only with low-fat milk because the fat can make it go rancid. You’d be better off buying commercially dried milk instead.
- Store-bought condiments: They have too many chemicals and additives in them that they will likely separate when you try to rehydrate
- Root vegetables: You CAN dehydrate these, but they will take a long time to rehydrate and thus aren’t suitable for use as survival foods.
*If you want to dehydrate root vegetables (beets, carrots, potatoes, turnips), you should BLEND THEM INTO A POWDER. This powder can then be put into the MREs for added nutrition or to make the base. For example, carrot powder can make a great carrot soup.
Read more about foods not to dehydrate.
More on edible wild roots.
Foods NOT to Include in Your MREs
Remember that survival food must be able to be cooked quickly and with little water. So, even though a lot of DIY MRE recipes include these foods, I am putting them on the “off-limits” list:
- Dry beans (though lentils work well because they cook so quickly)
- Pasta
- Rice
- Dried root veggies (unless ground into a powder first)
Each Homemade MRE Should Have:
As a survival food, DIY Meals Ready to Eat are meant to deliver maximum nutrition while still tasting decent (compared to survival food bars or shop-bought MREs which are all about providing calories in as dense a package as possible to keep you alive).
To ensure your MREs keep you healthy, each MRE needs to contain: carbohydrates, protein, and fruits/vegetables. (Read, are MREs good for you?)
*It is also good to include fats in your emergency food.
Fats are necessary for nutrition because they are excellent energy sources and are essential for absorbing fat-soluble vitamins.
However, since fatty foods go rancid quickly, be cautious about adding these to your DIY MREs. It is safest to buy commercially-made freeze-dried fats (such as freeze-dried cheese or freeze-dried milk) and carefully check the expiration date and storage methods before adding them to your MREs. Or keep these separate!
Read here if you want to know how long MREs last.
Carbohydrate = Energy
Examples include couscous, fast-cooking noodles (such as ramen, soup, or rice noodles), oats, and mashed potato flakes.
Protein = Strength
Examples include jerky, freeze-dried meats, lentils, dried bean paste
Vegetables and/or Fruits = Vitamins, Minerals, and Fiber
Examples include dehydrated or freeze-dried tomatoes, peppers, onions, spinach, kale, bananas, apples, raisins, and peaches.
As a general rule, try to aim for as much variety as possible, especially for fruits and veggies.
You don’t have to memorize each food’s nutritional qualities, but know that specific colors are associated with certain nutrients.
For example, bright red foods like tomatoes are rich in antioxidants which you will need to boost your immunity in survival situations.
Dark leafy greens have minerals like calcium and iron.
Example MRE Combinations:
Breakfast MRE
- Oats
- Dried apples and bananas
- Cinnamon
- Sugar
- Dried milk
Tomato and Chicken Soup MRE
- Dried tomatoes, carrots, and peppers — blended into powder
- Dried milk
- Soup noodles
- Herbs and spices
- Freeze-dried chicken bits
- Salt, pepper
Mashed Potatoes and Steak MRE
- Mashed potato flakes
- Dehydrated turnip or celery root powder
- Freeze-dried steak or dehydrated beef jerky
- Dehydrated spinach
- Salt, pepper
Couscous and Hummus MRE
*Couscous is like the Middle Eastern version of rice. It cooks in 2 minutes and without much water. Hummus is made from blended chickpeas and dehydrates well.
- Couscous
- Dehydrated hummus
- Dehydrated red peppers and tomatoes
- Dehydrated kale
- Parsley, cilantro, and sesame seeds
For inspiration, check out MREs for purchase and duplicate the flavors.

Hello,
I bought a packet of pre-cooked polenta. Seemed like a good idea to me (like the couscous) though I must say I haven’t tested it IRL yet. Any advice / opinions on that?
Simple flour (duly protected against the beasties!) is a good and extremely versatile thing to have too: one can use it for making unleavened pan bread with wild edibles or fruits in it, or Tibetan tsampa, or a delicious Mediterranean breakfast with (dried) milk, sugar, cinnamon and fruits…
It is even possible to make decent flour from anything starchy: chestnuts and oak glands for example, or chickpeas (for an exquisite French Mediterranean “panisse”).
Survival doesn’t always have to be harsh! 😉
You mean those tubes of pre-cooked polenta? I’m not sure what the shelf life is on those. If the shelf life is long, then it should be a good emergency food. My main issue would be that it takes up a lot of space (not calorie dense) because most of it is water. I’d rather stockpile cornmeal/dry polenta.
And totally agree that survival doesn’t have to be harsh! 🙂
NOTHING is disgusting when you are hungry. I know. Bin there and done that, and don’t want to do it no more. There isnt a MRE that tastes bad, or a 30 year old can from a C rat.
If you think for a minute that bad tasting food is hard on you, just skip the meals for the next three days and try them again. Bet they taste better, maybe even good.
True, your favorite foods are uplifting and attitude improves in measurable ways. But when the chips don’t fall your way, having prepared the best you can manage may just make the difference between seeing the flowers instead of the roots.
Good article, and great comments. For those of us who cannot cook “on the fly” from what’s available, I’ve always wrestled with the belief that we should eat what we are used to eating, or close to it. And then figure out how to store/prep those ingredients for a grid down situation. I fully understand that what we eat now may not/will not be available in the future, so the immediate challenge is creating a variety of recipes that we _will_ eat, and then figure out how to prep those foods for the future. So I’m focusing on prepping what we eat now, or close to it. At the same time, I’m know that we can’t have bacon and eggs every morning, and will be forced to substitute oatmeal and whatever else is available. If we’re still around after 90 days, I see the real challenge is meal planning from 3-12 months and then the second, third and fourth years. A bit daunting, but one step at a time.
Question for all. Has anyone tried removing food from a can, like chili or stew, into a bag and vacuum sealing it? Does anyone know, if that would extend the shelf life?
Thank you for your time
That would immediately shorten the shelf life. Canned foods last pretty much forever. Once you remove wet foods from the can, they are going to go bad in a matter of days. Vacuum sealing won’t help. Using O2 absorbers with wet foods would potentially cause botulism poisoning.
I can remember when I was a kid and my Dad pulled out a bunch of stored MRE’s. Inside the pouch was a bag, I think it was green if I remember correctly (this was about 47 years ago so maybe I’m wrong about the color) but my dad would put the food in a little tray that was included and added water to rehydrate the food. I’m not sure, but I think the water also activated the heating bag because the food was hot without cooking. I don’t know if the food was dehydrated or freeze dried as I was only 5 or 6 at the time but that’s about all of what I remember about MRE’s.
How to store coffee and cinnamon in Mylar bags
These posts should help: https://www.primalsurvivor.net/long-term-coffee-storage/, https://www.primalsurvivor.net/store-spices/
How long would dehydrated fruits or meats last if vacuum sealed with the machine you suggest? I want to prep more with dried out food as, as you mention freeze dried is just too much money.
Fruits can last a very long time so long as moisture can’t get to them and they are VERY dry. This article has some guidelines for how long they can last if stored completely without oxygen (vacuum sealed they won’t last as long):
https://www.primalsurvivor.net/mylar-bags-food-storage/.
Dry meats are much trickier because they contain lots of fat. Fat eventually goes rancid, and it goes rancid fairly quickly in high temperatures. I wouldn’t try to store dry meat long term for this reason unless you can keep it very cool.
Decent article, but more detail and ideas would help. Here are notes from my own efforts in this area:
Instant oatmeal and a packet of powdered milk or milk substitute (coconut milk powder is my fave) will make a quick, easy breakfast. I invested in the really good ones with fruit and nuts for more balanced nutrition.
Potato flakes and instant rice rehydrate easily and are cheap enough to make it worth it to buy rather than dry them yourself.
Canned tuna, salmon and chicken in pouches rather than cans are good protein, and the pouches cut the weight and save on space. They add a little more weight than dry meat, but don’t need to be rehydrated or even heated.
Invest in a vacuum sealer, it’s worth it.
Remember that dried foods will require more water, both to rehydrate the food and to hydrate yourself (dry foods will suck the water out of you while digesting, so you need to drink more water when you eat them). Sometimes it’s worth it to simply get wet foods. I included pouches of squeeze-fruit in some of our meals and they work great. I do NOT recommend fruit cups, though, because they can open accidentally and that’s a mess no one needs.
I also use pouches of anything I can find. Instant rice is a great idea. Also use the instant potatoes and milk. I use heavier items for my car mres. Dehydrated food is still very heavy. I would rather use freeze dried food mixed with anything in pouches.
Can you dehydrate in a low temp oven instead? 170°?
From Diane (our resident dehydrating expert!):
I personally have never tried dehydrating in an oven. It seems like it would be a waste of energy and cause the house to be hot as heck. Also, I’m assuming the racks on the top and bottom would block heat to the racks in the middle — so you’d have to bend into the hot oven a few times to rotate the racks. I prefer the “set it and forget it” method with the dehydrator. I literally just turn it on before going to bed and have dehydrated food in the morning (though sometimes the top tray does need a bit more dehydrating since I’ve got a vertical-flow dehydrator).
However, I have heard that it is possible to dehydrate in an oven. But, considering that a decent dehydrator doesn’t cost that much, I don’t know why you’d bother. Maybe try it in the oven one or two times and then decide whether you want to invest in a dehydrator (you really don’t need an expensive one, or you can just buy one used). As for choosing a dehydrator, we’ve got a post on that: https://www.primalsurvivor.net/best-food-dehydrators/
If you want to learn more details about making your own MREs/dehydrated meals, I suggest you read this post on dehydrating. https://www.primalsurvivor.net/dehydrating-food/ It goes into a lot of detail! The only thing that this post doesn’t talk about is how to package the foods in Mylar bags for long-term storage. That post is coming soon. 🙂
Update: Storing food in Mylar bags
I’ve used my oven to dehydrate foods with great success. My dehydrator uses racks that won’t allow for small items, so I use the oven for those. As you said, setting the oven to the lowest temp works for some things. But keep an eye on it to avoid burning the food. I’ll usually set a timer so I have the oven on for 20 minutes, then off for an hour. I alternate like this throughout the day as I work on other things until the food is done. It takes a little more effort to watch it, but it works in a pinch.
This article was how to make an MRE. The second you used the word dehydrate, this no longer became an MRE. An MRE is by definition a meal ready to eat. Edible right out of the bag. Not a meal ready to be rehydrated. Nothing you have listed on this whole page can be considered MRE
Yeah, there is a lot of confusion about emergency food terminology. Often “camping meals” or “instant meals” are called MREs. The Wikipedia definition (which is what we used here) is this: “The Meal, Ready-to-Eat – commonly known as the MRE – is a self-contained, individual field ration in lightweight packaging bought by the United States military for its service members for use in combat or other field conditions where organized food facilities are not available.”
Frankly, a lot of those military MREs are downright disgusting. If you want something tastier but still lightweight enough to carry in your BOB and eat without having to cook, dehydrating is a good option. Most military MREs do use freeze-dried ingredients (not dehydrated), but freeze dryers are way out of most people’s budgets!
If you are interested this database gives info on military MRE nutrition: https://www.hprc-online.org/nutrition/comrad#1
well there is a method to freeze dry using a regular freezer and vacuum sealer but it takes a couple weeks to successfully freeze dry something though a freeze dryer can achieve the same result in 24 hours. the key is not to use a freezer that you use regularly. use a freezer just for that purpose and once its in not to open it till its done. then you must then you must test food to see if its done by taking one out and let it defrost. if it defrosts and maintains its same color then its ready and then you vacuum seal it and its ready for storage.
Not all in items in MREs are hydrated. Just because a food is dehydrated, doesn’t mean you can’t eat it right out of its package. Example: mixed fruit in military MREs.
I have a particular pet peeve for nitpicking over definitions – it isn’t helpful plus this article is clear enough anyway without needing any “clarifications” from you.
MREs have coffee or orange juice powder, and some even have a self-heating packet for warming up liquids – if those don’t need “rehydrating” then by God I’ll be darned!
Brandon’s getting loads of abuse for stating a fact, MRE’s main meals and deserts are generally hydrated rations (give me some examples of where they are not). All the rest of the Ration pack contents are additions.
All Brandon was doing I suppose, like me, was looking for a site that demonstrates how we can make hydrated MREs (Meals, ready to eat) not dried beans or fruit.
I saw somewhere that if you’ve made your meal, (thick soup, curry, hash or the like), you can put it in a food safe sealable bag and boil it again and seal it straight away. I’m not that confident about doing that and was looking for support (probably like Brandon). For example. Will standard food safe sealable bags be ok or do they need to be the Aluminium plastic Mylar type bags?
Thanks for looking.
I think Brandon could have worded it better. The idea that an MRE is still an MRE if you have to add water is reasonable. Any situation where you will need an MRE is also a situation where you will need to source clean, potable water. If you need 2-4 liters per day, you can probably afford 1-3 cups of water for your dehydrated food.
That said, the trick to making hydrated MREs is spoilage prevention. That means preservatives (salt or sugar to reduce water activity), heat (to kill off bacteria), and oxygen absorbers (anaerobic environment). Those three together will help improve the shelf life and safety of your MRE. A plastic bag would be fine, short term. Most zippered plastic bags do not have the complete seal and durability to keep out oxygen (and therefore bacteria as well). You might be able to get away with vacuum sealing a sterilized bag with sterilized, hydrated food and then sealing that in another bag with an oxygen absorber, but I recommend mylar bags so you can add very hot liquid meals that are more of a sauce consistency and loaded with sugar and/or salt.
Anyone whom has lived off MREs for an extended period of time knows that hydrated MREs will do you in if you are not physically active. That is why I prefer dehydrated MREs where you add water. They can be healthier, lighter, and more nutritious while still lasting as long or longer. You can even get a portable packet of olive oil to safely boost the fat content. You can also fit more servings of dehydrated meals in a 1 gallon bag than hydrated meals so there is more servings for more individuals or more food safety for yourself.
It would be helpful if there were some guidelines for amounts or ratios of ingredients, at least to start. I find pureed roasted pumpkin dehydrates very well and I make it into a powder with the VitaMix. It’s great added to soups, stews and chili. I’ve been experimenting with a cup o’ soup type recipe because the pumpkin flavor can be overwhelming and I haven’t found the right balance yet (pumpkin puree, powdered milk, a little sage and salt, a pinch of sugar. – add hot water and let sit to thicken.) I think a more equal ratio of pumpkin to milk will work out better (1T. pumpkin to 1t. milk is what I started with and that’s when I realized I needed to cut way back on the pumpkin.)
Yeah there is some trial and error involved in making these. That said this post could be more detailed, will look at updating it. Thanks for your comment.