When asked why they haven’t started a food garden yet, a lot of preppers say that they don’t have the space. Or, they say that they don’t have the money to build a garden bed.
A pallet garden takes care of both of those problems!
Making one is really easy, it can be done for free or dirt cheap, and doesn’t require any special skills.
Basically, you just need to be strong enough to lug the pallet to wherever you want to put it.
Depending on what you plant in your garden, it could feed your family for months throughout a disaster situation.
Step 1: Choosing Your Pallet
Each year, over 400 million pallets are produced in the USA alone.
A lot of these end up in landfills. So, it really isn’t that difficult to find pallets to use for projects like this.
I’ve found a lot laying in ditches off the road. You can also go to grocery stores and ask them if you can have their old pallets. I’ve heard it is better to ask smaller companies since they don’t always have deals to recycle the pallets.
Ask at hardware stores, tile and ceramic showrooms, garden nurseries… All of these places (and many more) frequently use pallets.
Important:
Since you are going to be using your pallet for food, you want to make sure that it doesn’t contain any toxic chemicals. Look for the HT stamp on the pallet. This means it has been Heat Treated as opposed to Chemical Treated or Pressure Treated.
Since it is so easy to find pallets, you can be picky. Avoid ones which are broken or cracked. Make sure it isn’t too warped either because it won’t stand up as nicely.
Step 2: Prepping Your Pallet
Once you’ve got your pallet, check it over for stray nails. Remove any which are sticking out. Seriously, take some time doing this! The last thing you want is to get stabbed by a dirty nail while digging potatoes out!
Depending on where you want to put your pallet, it might be worth going over it with some sand paper and coating it with a (non toxic) paint.
Step 3: Plant Your Garden
There are a few different ways to make your pallet garden. I prefer the third method which combines straw bale gardening with the pallet garden. I’m going to go over all three methods though and let you decide.
Pallet Garden Method 1:
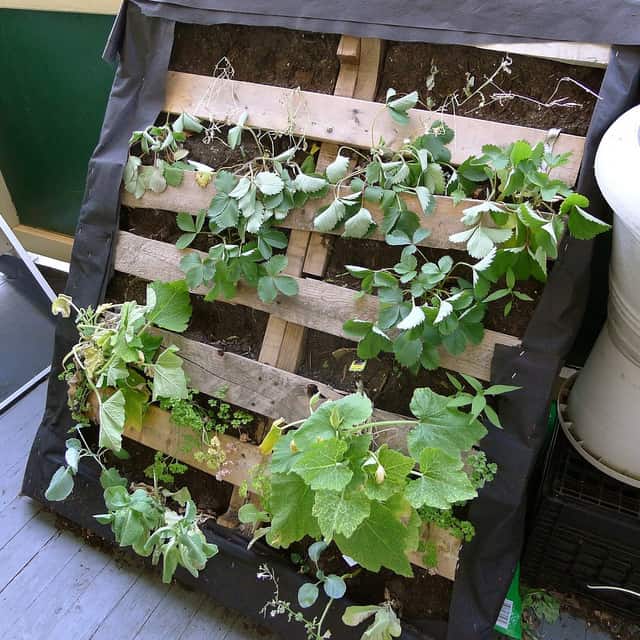
The simplest way is to use landscape fabric (which is basically tarp).
Just staple the landscape fabric on the back side of the pallet (you get to decide which is the front and back), the bottom, and the sides.
When you are done, one side and the top will be left open. For extra reinforcement (to keep dirt from falling everywhere if the landscape fabric breaks), you can nail a piece of plywood to the back of the pallet.
Once you’ve done this, lay the pallet flat on the ground. Start packing it with dirt. Then pack in some plants to grow.
The issues with this method of making a pallet garden are:
- It is really heavy
- You should start with plants, not seeds. Otherwise, dirt will fall everywhere until the roots start to take hold.
To prevent dirt from falling everywhere, you can put your pallet on an angle instead of completely vertical.
Pallet Garden Method 2:
A variation of the pallet garden, is to staple landscaping fabric in pieces to each “rung” of the pallet. Basically, you are creating pockets out of the slabs of wood on the pallet.
I like this method because you can actually grow things from seed without worrying about all your dirt spilling everywhere.
However, the issue is that you have a lot of unused space. The goal here is to feed your family, so every bit of space matters!
Method 3: Pallet Garden with Straw
You might have heard about straw bale gardening. The idea is that you get a big straw bale, put it wherever you have space outside, poke some holes in the straw, fill the holes with dirt, and put your plants inside. You can read more about how straw bale planting is done here.
Straw bale gardens are great because the roots of the plant will take hold in the straw. The straw retains moisture, so is great for plants. As the straw decomposes, it turns into compost for your plants.
The only annoying thing is that you should condition the straw first.
What do I mean by condition?
Well, as soon as the water hits the straw, it will start to decompose – and heat up in the process. To prevent a surge of heat (which could kill your plants), you should water your straw for one week before using it in your garden.
To use straw with your pallet, first staple landscape fabric to the back and bottom.
Starting with your pallet mounted standing up (with the other methods, the pallet needs to be lying down when you plant it), stuff a layer of straw into the bottom of the pallet. Then add a layer of dirt.
Repeat, making sure the dirt is the in area where the gaps between the pieces of wood are. When you are done, then plant your seeds. Keep it watered and enjoy your bounty!
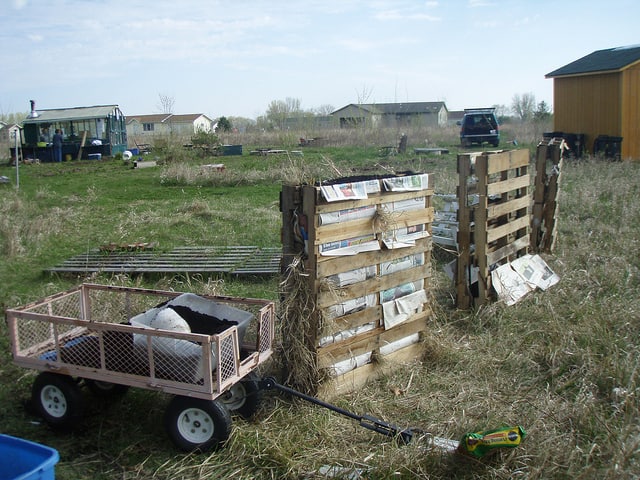
I found this cool variation of the straw pallet garden online. Take a look at the picture above and you will see that they used TWO pallets set up vertically.
There is a gap between the pallets which is filled with straw. To keep dirt from falling out while the seeds took root, they put layers of newspaper on the “rungs” of the pallet.
It isn’t the prettiest pallet garden, but it sure works well for a garden that will feed your family.
