There are a lot of types of bandages but they all serve the same purpose: to help keep a wound clean so it can heal faster.
Ideally, you should always have a supply of sterile bandages in your first aid kit (I even keep a few in my wallet for small injuries on the go). But, if you are out of bandages, it’s actually pretty easy to make your own bandages.
Some commonly-recommended materials, like tissues, toilet paper and duct tape, do NOT work well for bandages and could cause infection.
So, here’s what you need to know to make your own bandage at home with improvised materials.
Step 1: Stop the Bleeding
Before you worry about bandaging the wound, you need stop the bleeding. Elevate the wound above the heart and apply pressure. Ideally you would apply pressure with a clean compress, such as a heavy gauze pad.
However, at this stage, stopping the bleeding is more important than cleanliness. In a pinch, use any absorbent material will do. Towels, t-shirts, or even socks work.
Avoid using paper towels or toilet paper because these disintegrate easily and can get into the wound. But, again, the main goal is to stop the bleeding. In an emergency, grab whatever materials are nearby and apply pressure.
If direct pressure doesn’t stop the bleeding, apply a tourniquet.
Step 2: Prepare the Wound
Before applying the bandage, you’ll need to:
- Wash your hands.
- Clean the wound.
- Apply antiseptic ointment or Vaseline to the wound. This aids healing, keeps the wound moist and prevents the dressing from sticking to the wound.
Step 3: Apply a Wound Dressing
Bandages are made out of two parts: a dressing and the bandage.
The dressing goes directly against the wound and the bandage is what holds the dressing in place. With adhesive bandages (aka Band-Aids), the dressing is the white area in the middle of the sticky strips.

Applying the dressing is easy. Simply put the middle of the dressing over the wound. The dressing should be large enough to cover the entire wound plus some of the healthy tissue surrounding the wound.
See here for more on the different types of bandages.
How to Improvise a Wound Dressing
Because the dressing touches the wound, it must be:
- Sterile (or at least very clean)
- Non-adhesive
- Thick enough to absorb blood
- Larger than the wound
- Lint-free
Ideally, the dressing material is also white so you can see any signs of infection on it better.
Some good improvised wound dressings are:
- Linen fabric, such as from pillow cases or bed sheets, folded several times
- Cotton fabric, folded several times
- Feminine hygiene pad
- Makeup removal pad
- Tea bags
*Plastic cling wrap works great as a temporary bandage for burn wounds. It keeps the wound clean until you can get proper bandages. Read about how to treat burns here.
Do NOT Use Tissues or Toilet Paper for Making Bandages
A lot of people recommend using tissue or TP for making your own bandage. This is a very bad idea because these materials disintegrate when they get wet, causing fibers to get in the wound. It is very difficult to remove these fibers from the wound and they could even lead to an infection.
Also Do NOT Use Cotton Balls for Bandages
Cotton balls are very fibrous. You can sometimes get away with using cotton balls on small wounds. But, if the wound is large, little cotton fibers can end up deep in the wound. This can irritate the wound and lead to infection. Cleaning out all those little cotton ball threads is not a pleasant experience!
What about Plants Leaves as Improvised Bandages?
Contrary to what you’ll read on some wilderness medicine websites, it’s not smart to use plant leaves for bandaging wounds. Leaves are often very dirty. Even if the leaf looks clean, it contains numerous types of microorganisms which could get into the wound and cause infection.
For small wounds, I have used mullein leaves as an improvised Band-Aid. The leaves are very soft and absorbent so work well to control bleeding (they are also great as a toilet paper alternative). However, I would never use this on a large wound unless I was really desperate because the risk of infection is too great.
Sterilizing Improvised Wound Dressings
For small wounds, you can often skip this step so long as the dressing is very clean. If the wound is very large or at risk of infection though, then you’ll want to make sure the dressing is sterile. The easiest way to sterilize a dressing is to iron it.
First iron the ironing board to sterilize it. Then dampen the dressing material with filtered water. With the iron at high heat, iron each side of the dressing at least three times. The iron should be on its highest setting
You can also sterilize bandage dressings by putting them in tinfoil and baking them in the oven at 300F for 30 minutes. Wait until it has cooled to apply.
What about sterilizing dressings in the field?
Here is where things get tricky. Let’s say that you get injured while camping and don’t have any clean materials to use as a bandage. Bandaging the wound with a dirty piece of t-shirt could lead to infection. But leaving the wound uncovered could also lead to infection.
Because of these issues, it’s really important that you always bring clean bandages with you when going into the field. Make sure you have a first aid kit with items in your bug out bag first aid kit.
Sterilizing Bandages with Boiling
You can sterilize wound dressings by boiling them. This is what army doctors do when gauze is scarce during wartime. However, it takes a long time for bandages to dry. Applying wet bandages to a wound is a terrible idea as it creates a breeding ground for infection.
Thus, the only time boiling bandages makes sense is if you already have some sterile gauze on hand. You’d first use the sterile gauze to dress the wound. Then you’d boil some strips of cloth and carefully hang them to dry. When it came time to change the dressing, you’d use these now-sterile cloths. The original gauze could even be reused if you washed and boiled it.
Step 4: Apply the Bandage
The bandage is what holds the wound in place. Bandages also can apply pressure to the wound to help control bleeding.
Because the bandage doesn’t come in direct contact with the wound, it doesn’t have to be sterile. However, it does need to be large enough to cover the dressing and hold it in place.
Depending on the wound type and location, you might need a bandage which is stretchy and can provide compression. For example, tape bandages don’t work well over joints and can even cause the wound to reopen.
The best improvised bandages are:
- Adhesive tape: Just tape the dressing in place
- Long strips of fabric: Wrap around the dressing
- Bandana: Cross over the dressing and tie in place
- Socks with the toe area cut off: Put over dressing on arms or legs
Improvised Tape Bandages:
Medical tape is used to tape dressings directly onto the skin. This is the easiest way to make a bandage on parts of the body which don’t move. Unfortunately, tape bandages don’t work well on joints because they can pull on the skin and cause the wound to open again.
- What to use: Clear packing tape, masking tape, painter’s tape
- Injuries to: Arms, legs, torso, chest (do not use over joints)
- How to apply: Simply tape the edges of the dressing down. Don’t put tape completely over the dressing; you want the wound to “breathe” at bit.
Can You Use Duct Tape to Bandage a Wound?
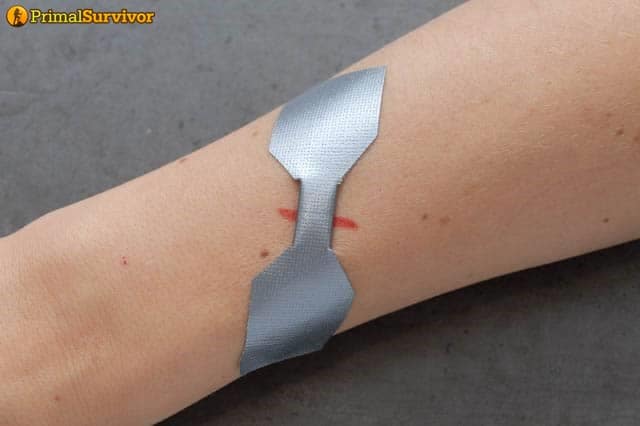
A lot of people recommend duct tape for making bandages. While it certainly works for holding the dressing in place, the problem is that it works too well. When you go to change the bandage, the duct tape pulls on the skin. The pulling action can cause the wound to reopen and start bleeding again.
I wouldn’t recommend duct tape for bandaging unless you really didn’t have anything else. The one exception is if you are making DIY butterfly bandages. This type of bandage is used on narrow gaping wounds (such as knife wounds). No dressing is needed: the bandage simply holds both sides of the wound together. See how to make a butterfly bandage here.
Improvised Gauze Roller Bandages:
Roller bandages are long strips of fabric (usually gauze). Because they wrap around the injured area multiple times, they are great at holding dressings in place, especially on areas like joints.
- What to use: Long strips of breathable fabric, such as linen
- Injuries to: Arms, legs, hands, feet, shoulders or joints
- How to apply: Start with an “anchor wrap” around the dressing. Then continue wrapping the dressing. Depending on the location, you might use circular, spiral, recurrent, figure-8 or reverse spiral bandaging methods (see this guide for images).
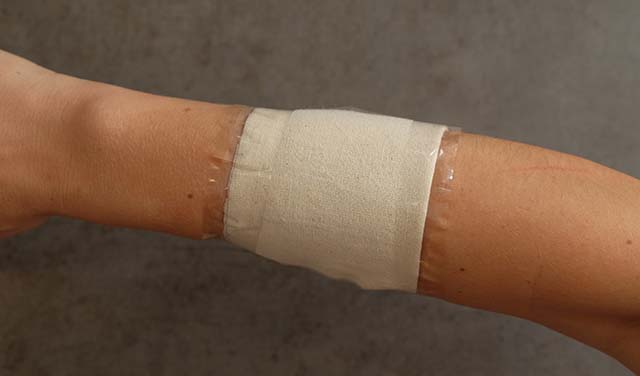
Improvised Elastic Compression Bandage:
Like gauze roller bandages, elastic bandages are also long strips of fabric. The difference is that they are made from a stretchy material. The stretch allows you to apply pressure to the wound to control bleeding. Pressure also helps support tissues, such as in sprains or fractures. The image shows an elastic bandage with figure-8 wrapping on a hand injury. It does a great job of holding dressings in place, immobilizing fingers and stabilizing the wrist.
- What to use: Long strips of stretchy fabric, such as cotton t-shirts
- Injuries to: Arms, legs, hands, feet, shoulders or joints
- How to apply: Apply like you would apply a gauze roller bandage, but with pressure to wound.
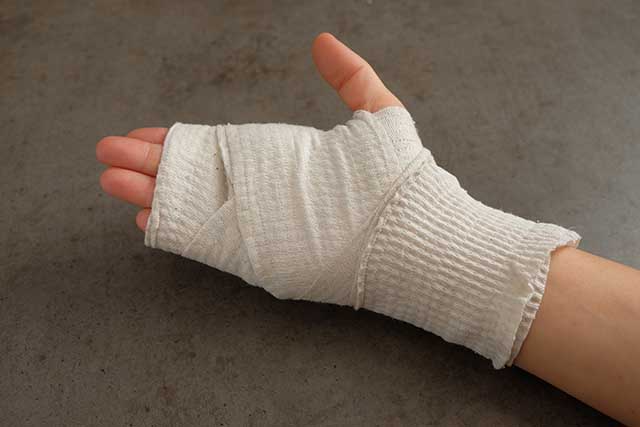
Improvised Tubular Bandages:
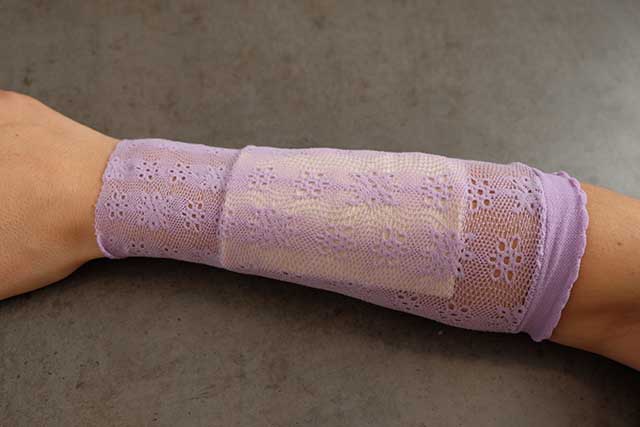
Tubular bandages apply pressure all around the wound area, so are particularly good for controlling pressure. They also do a decent job of holding dressings in place, especially in areas like joints which move around a lot. In the image, I used my daughter’s stocking because the small size applied good compression (yes, it make me look like Madonna from the 80s!).
- What to use: Sock with the toe area cut off
- Injuries to: Wounds on the forearm, lower legs, knees, elbows, ankle, or wrist
- How to apply: If possible, tape the dressing down first. Stretch the bandage open and put it above the injured area. Then carefully pull the improvised bandage over the dressing.
Improvised Triangle Bandages:

Triangle bandages are useful for certain injuries which would be hard to wrap with other types of bandages. They are tied in place, so the knot can be used to apply pressure to wounds to control bleeding.
- What to use: Fabric cut into a triangle
- Injuries to: Hands, eyes, head injuries or when you need to apply pressure
- How to apply: Center over the dressing, cross the edges around the limb/injured area, and tie in place. See how to use a triangle bandage here.
Do you have any other suggestions for making your own wound dressings or bandages? Let us know in the comments.

This helped! Thank you!