Ready to create an emergency water cache?
Storing water in 55-gallon drums is an excellent choice, but starting the work can be daunting. Many people get thrown off by logistics, water preservation issues, and the sheer amount of planning required.
The good news is, creating a water reserve doesn’t have to be a monumental task. I’m here to break down everything you need to know about storing water in 55-gallon drums, including tips for convenient storage and how to maximize the shelf life of your supply.
Start With the Right Drums
You can’t store water safely without the proper container. There are a few ways to obtain 55-gallon drums and several things to focus on when choosing them.
Used Drums
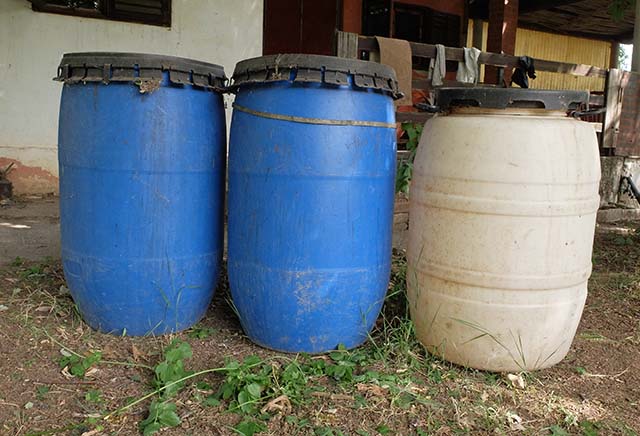
Ideally, we could all afford to buy shiny, new 55-gallon drums straight from the retailer. But these containers can cost hundreds of dollars, and shelling out that kind of cash isn’t an option for many people.
Luckily, you can often find free drums or buy them at a discounted price online. Search Facebook Marketplace for used drums in your area — I’ve found them for under $10 apiece!
When sourcing secondhand drums, you must apply a skeptical eye. Always determine what the container was initially used for by asking the seller or checking the side of the drum. There should be a sticker indicating its purpose and what was inside.
Storing water in drums previously used for chemical or fuel storage is never a good idea. However, you’ll be safe with food-grade drums used for edibles. Inspect the drums thoroughly before purchasing them.
Avoid those with extensive scratching or dents, and always choose the cleanest-looking ones in the bunch. Even if they cost a few dollars more, you’ll save yourself a ton of work later.
New Drums
You can buy dedicated water storage tanks if you’d rather start with a blank slate. Make sure to choose those made of food-grade, BPA-free materials. They preserve water’s freshness and may keep your supply safe for longer.
The WaterPrepared storage tank is an excellent option if you’re buying new. I have this tank and would recommend it to anyone. It comes pre-fitted with everything you need, featuring UV-resistant plastic for safe outdoor storage and a stackable design to save floor space in your home.
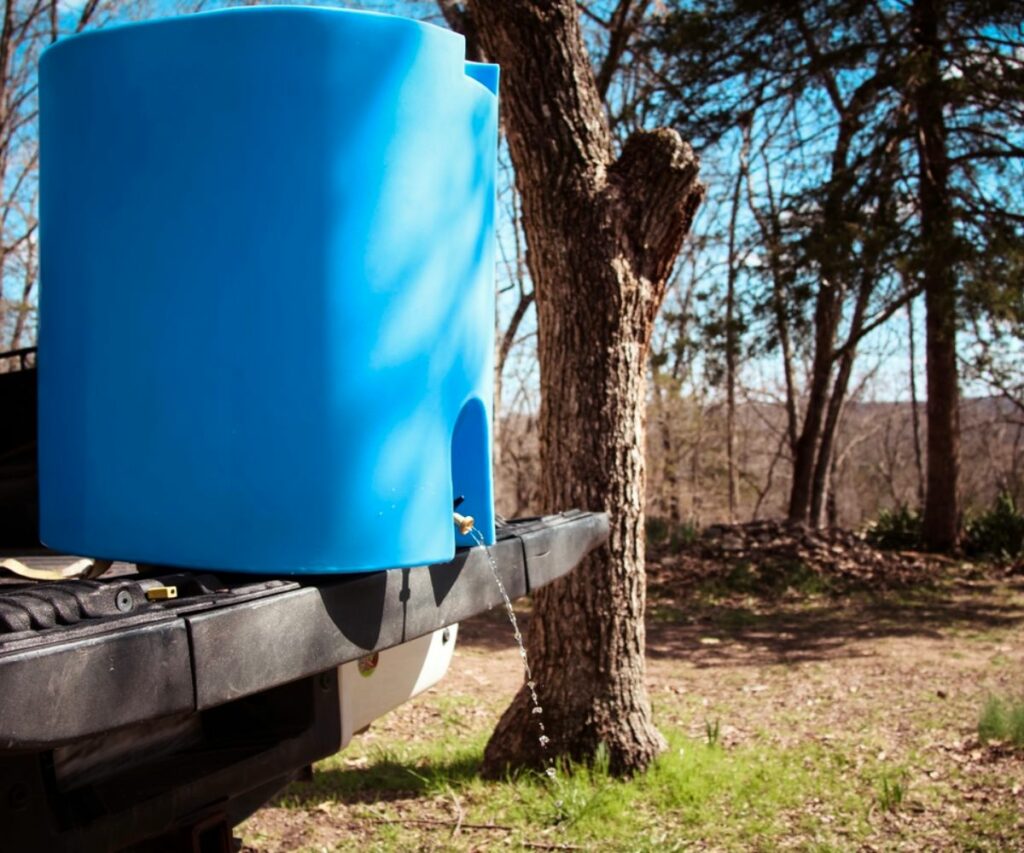
Add Necessary Hardware
Many 55-gallon drums come with bungs on the top to fill the tank and pump out the liquid, while others have removable lids. A few even feature more extensive hardware like taps and spigots for easy water access, but this isn’t always the case. Especially when working with secondhand containers, you might need to install your own fittings.
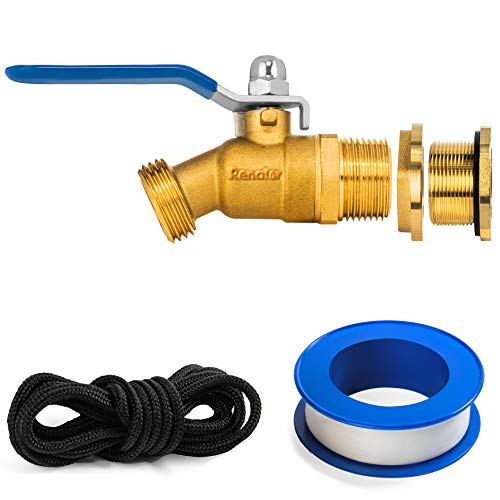
Luckily, you can retrofit a drum easily enough. Installing aftermarket hardware is actually an excellent idea because it gives you more control over your situation. Just head online and pick up an inexpensive add-on kit, like the Renator brass spigot kit, which contains everything you need to install a spigot for less than $20.
Clean Your Drums
It’s vital to clean drums before you fill them, especially when working with used products. Secondhand drums may have held liquids such as oils or syrups, and their remnants could contaminate your water during storage.
Removing Grime
You’ll need to employ some friendly household helpers to beat the scuzz. You can use premixed cleaners or make your own DIY solution. Here are my favorites for different purposes:
- Baking soda and vinegar: This is the best solution for drums with lingering odors since baking soda can neutralize the smell. You’ll need one half-gallon of vinegar and one 16-ounce box of baking soda.
- Dish soap: This is the best solution for lifting and removing oils. You should really only use dish soap for oily drums because the suds are difficult to rinse away thoroughly. You’ll need around 10 ounces of dish soap.
- Chlorine bleach: This is the best solution for old, stained barrels that might have some bacterial growth. While bleach isn’t amazing at lifting away grime on its own, it does remove stains and kill bacteria, algae, and mold. You’ll need four tablespoons of liquid or powder bleach.
First, fill your drum about a third full. Ensure you can still maneuver it around a bit, then add your cleaning products. If your barrel has a removable top, you can reach inside and scrub it until you remove all the scum and remaining odors. If it has bungs, you might not be able to fit your hands in, so you’ll need to shake and roll it around.
If the grime is persistent, use a long-handled scrub brush to reach inside the drum and scrub the sides and top. You can also add more water and leave the cleaning solution to soak overnight, helping to loosen up the debris. Even after this, repeat the process until no more visible gunk remains.
Don’t forget to wash the lid or bungs, too! Depending on what they’re made of, you might be able to put them in the dishwasher. If not, just scrub them by hand with water and your chosen solution until they’re clean.
Disinfecting
Even when a tank looks clean, microorganisms could still linger inside. Disinfection will kill bacteria and ensure your water is actually safe. There’s no need to get fancy here. You can disinfect the drum with regular unscented household or laundry bleach — just make sure it contains between five and nine percent sodium hypochlorite.
Fill the drum with three gallons of water, then add about three cups of bleach. Replace the bungs or lid cover and close tightly, then roll the drum on its side until the entire inner surface has been coated with the bleach solution.
Leave the barrel alone for about half an hour so the bleach can kill all the bacteria. Afterward, open the bungs or spigots and drain the water out. Leave the container in a sunny area to dry. It is not necessary to rinse it again.
Set Your Storage Location
Your storage location will affect the water’s quality and your ability to preserve it over time. You can store emergency water safely by arranging your drums in a cool, dark, and dry area. This can be outside or inside, but it’s essential to consider the dimensions of your drums and the layout of your home when picking out a place for your water.
An indoor, air-controlled storage location is ideal since the temperature remains relatively stable, and damage from weather or animals isn’t an issue. However, water rotation will be more difficult, and you could wind up conceding living space to your drums.
An outside storage location can keep your drums out of the way, but the weather can wreak havoc on your supply. Water can freeze in winter, while hot summer temperatures promote bacterial growth. UV light also causes the plastic to break down over time. This is an even bigger issue with used water tanks since they likely have already degraded somewhat.
Here are some tips for storing your water to keep it fresher for longer:
- Do not store your water drums in direct sunlight or expose them to rain. Cover the drums with a thick tarp or put them under an open carport if stored outside.
- Do not store drums in dank, wet, musty, or moldy areas.
- Always elevate water drums instead of storing them on the floor or ground.
- Store drums near a floor drain for easier rotation, or have a hose on hand to empty them without damaging your floor.
- Leave head space in the tank so the water can expand and contract with temperature changes. This will help prevent it from freezing outdoors.
- Take precautions so household pets, children, and animals don’t disturb your tanks. You could set them in an enclosure or behind a locked door.
Fill Your Drums the Smart Way

When you’ve got your location picked out, you can finally fill those puppies up. It’s always better to place your barrels where you want them before adding water. A 55-gallon drum weighs around 460 pounds when full, and you don’t want to be lugging them around and adjusting them if you can save yourself the effort.
To reduce your chances of contamination, use a potable water hose to fill your tank rather than a regular garden hose. I like the Camco TastePURE hose because it’s made of BPA-free material and is NSF certified for drinking water.
Treat Your Water
Before replacing the bungs and sealing up your drums, consider whether you should treat the water. Treatments will prevent bacteria and algae from growing inside the tank, preserving your supply and keeping it potable.
Treatments sure sound great, but do you really need them? It depends. People usually treat untested water like you’d draw from a well or stream. Since you cannot know the starting quality, treatments make a lot of sense. Many people choose not to treat water from a municipal supply since the city already tests it and holds it to a certain standard.
I would urge anyone to treat water before storing it. Even if you aren’t planning to drink it or you have a fantastic water filter, unexpected circumstances come up. Treatments can minimize safety issues, allowing you to drink water straight from the drum with less risk.
There are a few ways to treat water. You can choose the best method based on your preferences and the materials you have on hand:
- Bleach: It’s popular to purify water with bleach. To treat a 55-gallon drum, simply add two tablespoons of unscented household bleach.
- Sodium hypochlorite: Bleach gets its power from sodium hypochlorite, a very concentrated disinfectant often used as a pool shock. You can use it to purify water, but concentrations vary. You’ll need to check the info on your chosen product to determine the ratio.
- Water preservers: If you don’t want to mess around with chemistry, you can treat with premade water preservation drops or tablets.
Rotate Your Water
You don’t want to open up a drum and discover an ecosystem of plant matter living joyfully inside. Replacing the water in your drums prevents bacteria and algae growth, keeping your supply fresh, pure, and clean. The CDC recommends rotating your water every six months, and it’s best to adhere to that standard if possible.
However, it can be an arduous task to rotate water. If you use water treatments and keep water stored in optimal conditions, you could get away with rotating it minimally. Some people never rotate it at all, but it’s wise to stay on the safe side here. Try not to wait longer than a year at most.
Now that you know all about storing water in 55-gallon drums, you can start creating your cache today. Once you have fresh, clean water available for emergencies, you’ll be one step closer to total disaster preparedness.

This is a very informative article! Thanks for sharing the detailed steps on storing water in 55-gallon drums.