
If I ever get lost or have to Bug Out in the wilderness, I hope it will be near a stream, lake, or another water source.
I’d be fine since I know how to purify water and have a camping filter (the Sawyer mini) in my survival backpack.
But what if you were to find yourself stranded somewhere without an obvious water source — What would you do?
Don’t worry – there is plenty of water around you. Even in desert survival situations, there is still lots of water available. It is all about knowing how to find and access it. Here are some great hacks for doing just that.
Solar Still
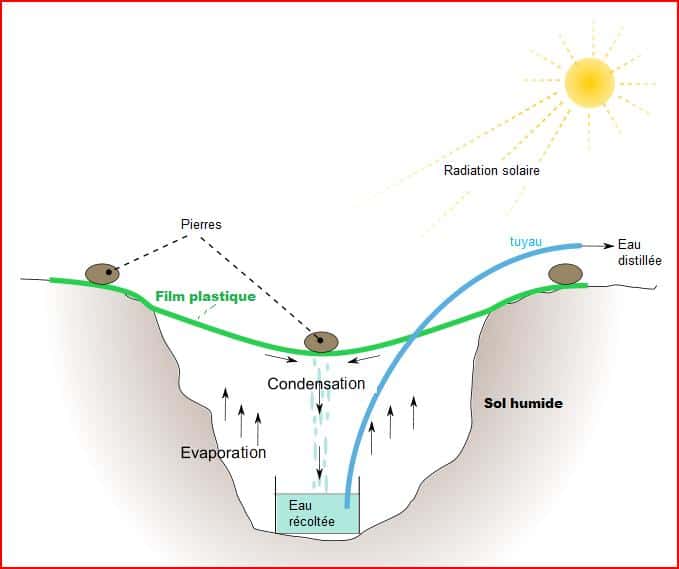
Solar stills, also known as “condensation traps,” have been used in the Andes Mountains since before the Incans.
It is a very cheap and straightforward distillation system.
Solar stills are also useful in desert survival situations where water is scarce. You won’t find trees with leaves that can be used for transpiration. The few plants you find – such as cacti – trap the water inside with waxy exteriors.
How to Make a Solar Still
- Dig a 3-foot deep pit: Smaller holes will work, but not as much water will be harvested in small holes. Soil deeper in the ground will also be moister and give off more water. One more reason to include a shovel in your survival supplies!
- Put anything with moisture into the pit: Chopped up pieces of cacti work. I’ve even heard of people urinating into their solar still.
- Place collection bowel at center: This is where the clean, solar-distilled water will drip.
- Cover pit with clear tarp: A clear plastic bag or survival poncho might also work in a desperate situation. Secure the tarp in place.
- Put a small rock on the middle of the tarp: The purpose of this rock is to angle the plastic downwards so the water drips towards the collection bowel.
- Wait! It will take time for the water to evaporate from within the solar still. And don’t expect lots of water. You’ll be lucky to get a few spoons’ worth. In a survival situation though, that water could save your life.
The great thing about solar stills is that their water is clean of bacteria, parasites, viruses, and even most chemicals. Except in situations where heavy chemical contamination has occurred, water from a solar still is safe to drink.
Read about more ways to make a DIY solar still.
Solar Stills At Sea
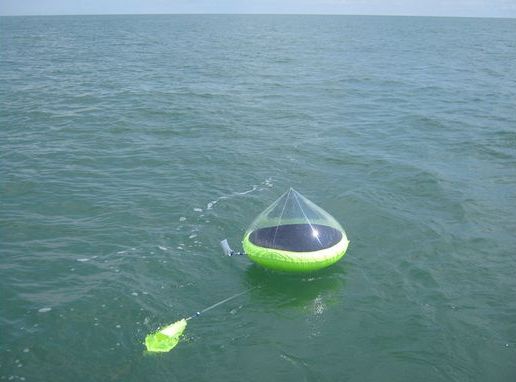
Distillation is the only way to make salt water safe to drink.
In this method, saltwater inside the raft evaporates and condenses on the plastic. The shape of the dome then causes the condensed water droplets to drip into a collection area.
Also see: Can you boil salt water to make it drinkable?
Rainwater Collection
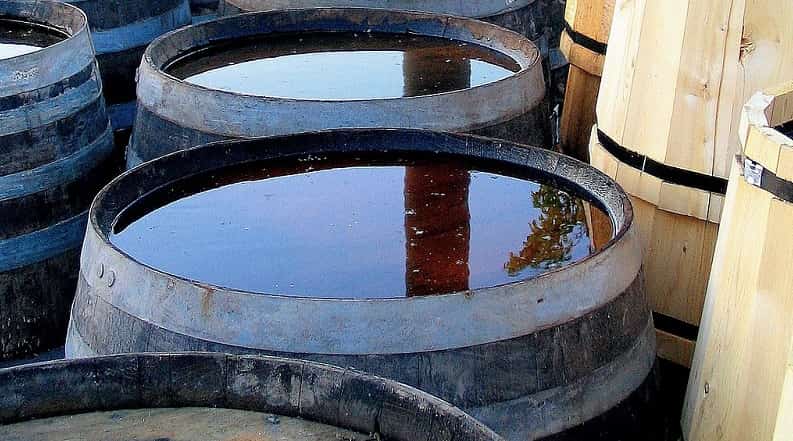
Collecting rainwater is not as simple as putting your water bottles outside in the rain so they can fill up.
Yes, it is an option, but it is very ineffective.
Rain is usually measured in inches and refers to the amount of rain that fell over a certain period (usually during a shower or a 24-hour period).
It doesn’t matter how big the rain gauge is. You could use a 1 square foot pan, a coffee cup, or an Olympic pool. The depth of the water which hits the surface would be the same.
However, surface area matters when collecting rainwater.
The larger your surface area is, the more water you can collect. One inch of rain in a plastic bottle is still less than one inch of rain that would hit a rooftop. Use our rainwater collection calculator for a more detailed calculation.
If you wanted to fill a water bottle by leaving it out in the rain, it would have to be a huge storm that lasted all day.
The simplest way to collect rainwater is to utilize your roof. You just put a bucket under your gutters. You can then treat the water and use it.
Read More About Rainwater Harvesting
Using a Tarp to Collect Rainwater
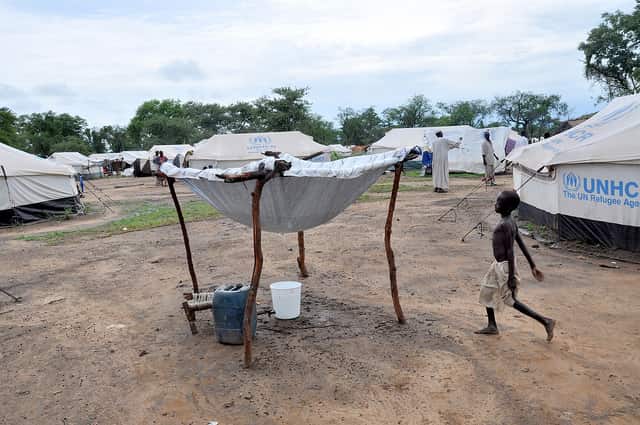
If you cannot collect water from your roof (such as when you are out in the wilderness), you will hopefully have a survival tarp on hand.
A tarp has many survival uses, including collecting large amounts of water, even during short rains.
In the images, you can see how people in Sudan and India use tarps to collect rainwater.
There are two different configurations used:
- Above – shows a tarp with a hole in the middle so rainwater can drip to the center.
- Below – funnels the water down a side

Both methods are much more effective than simply leaving buckets out in the rain.
You can also improvise tarps out of rain jackets and plastic bags for rainwater collection.
Transpiration Method of Harvesting Water
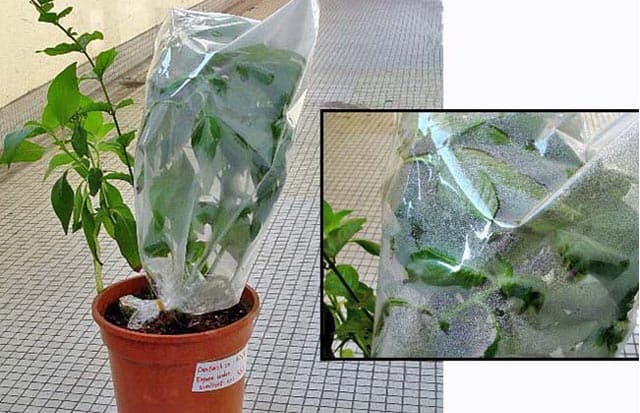
Transpiration is the process during which plants absorb water through their roots and evaporate it through their leaves into the air.
The moisture can be collected and used for drinking water.
You’d actually be surprised how much moisture plants can let off. According to the USGS, an acre of corn can give off 3,000 to 4,000 gallons of water per day!
Required Tools:
- Plastic bags: Preferably clear and sturdy. This is one situation where you’ll be happy that there is so much trash all over the planet!
- Small stones: For weighing the bags
- Rope: Or anything that can be used for tying the bags in place
Steps:
- Find trees or plants, preferably with large leaves.
- Put a small stone in a plastic bag.
- Tie the bag around the plant, getting as many leaves around it as possible.
- Repeat! Each bag will only give you a few spoons of water, so you’ll have to do this to lots of trees to harvest enough water for survival.
- Let the tied bags sit for all of the daylight. Collect the water and drink it.
Notes:
- Transpiration works best in hot, sunny weather.
- Water transpired from plants is pure of bacteria, viruses, parasites, and many chemicals. It is still always smart to treat the water first.
Dew Collection
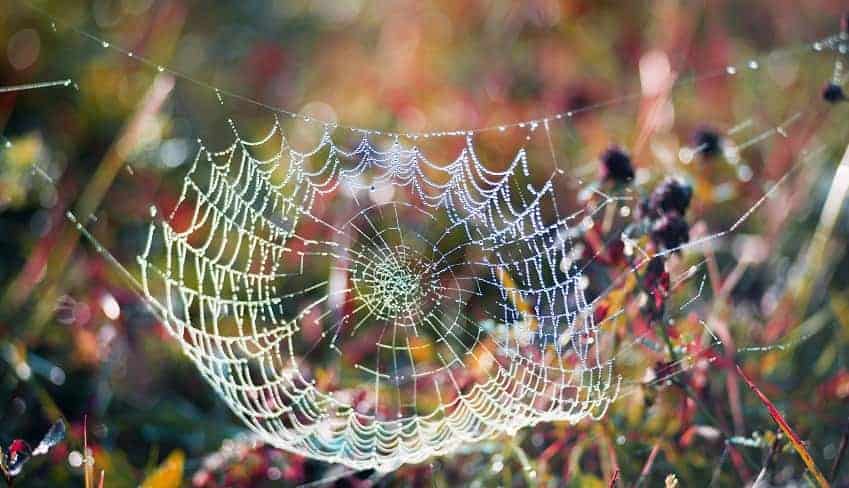
This water collection method is good for wet mornings in forests and mountains.
During the night, the air cools down.
In the morning, there is lots of dew on plants – but it quickly evaporates as the sun gains strength.
An easy way to collect the dew is to tie a cloth around your ankles and walk through dew-filled growth.
The dew will absorb into the cloth; then, you can wring out the cloth into your water bottle.
Drag a Piece of Cloth
There is a lot of moisture on plants in the woods, especially in the early morning and at night when dew is present.
One way to collect this water is to drag a cloth (such as from a torn shirt) behind you as you walk. The cloth will absorb the water, and then you can wring it out into your water filter.
Follow Ants
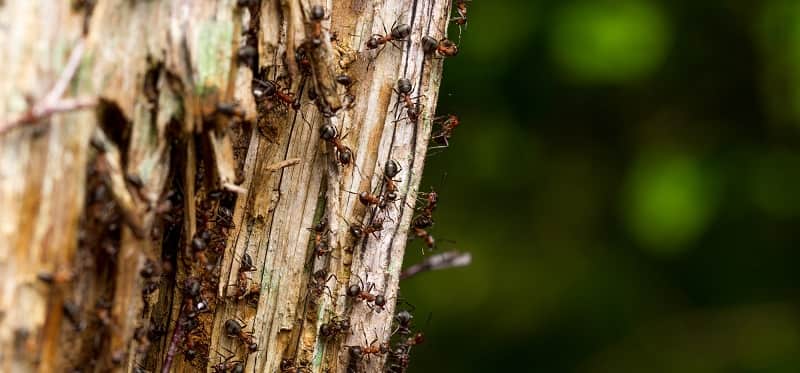
Have you ever seen a train of ants going up and down a tree trunk?
The likely reason is that there is a water source in the tree.
You will notice that the train of ants goes to a crotch in the tree trunk. Climb up there and put a straw inside (or dip a piece of cloth). You will find water!
Fish Flesh
If you are ever lost at sea, you will have the misery of being surrounded by water while being tortured with thirst.
But, if you can catch a fish, you can probably get water from their flesh. Chop up the fish into small pieces, put the pieces onto a cloth, and then squeeze the cloth. Water will drip out from the cloth.
Dig for Water (Seep)
If you dig deep enough, you will hit water. But, if you are thirsty and in a survival situation, it isn’t exactly the smartest idea to sweat up a storm while digging a well. Only dig for water if there is a good sign that ample water is under the ground.
Where should you dig?
If you are on a snow-capped mountain with a lot of vegetation, there is probably water. The same goes for forests with thick vegetation.
Look for areas with large clusters of green plants and dig there. Dry riverbeds and streambeds are also good places to dig a seep.
Start by digging a hole about 3 feet wide and ½ foot deep. Is the dirt turning into wet mud? If so, then this is a good place.
Continue digging, pulling out the mud. Keep digging until the hole is a couple feet deep (or until you get too tired to dig further).
Scoop out more of the dirty mud. Line the outside of the hole with rocks, as you would with a well. Congratulations, now you have a seep!
Water will flow into the seep. The rocks you used to line the seep will keep out most of the dirt, so you get water instead of mud. You will still need to filter the water, though.
Carrying a survival shovel for jobs like this is a good idea.
Fog Collection
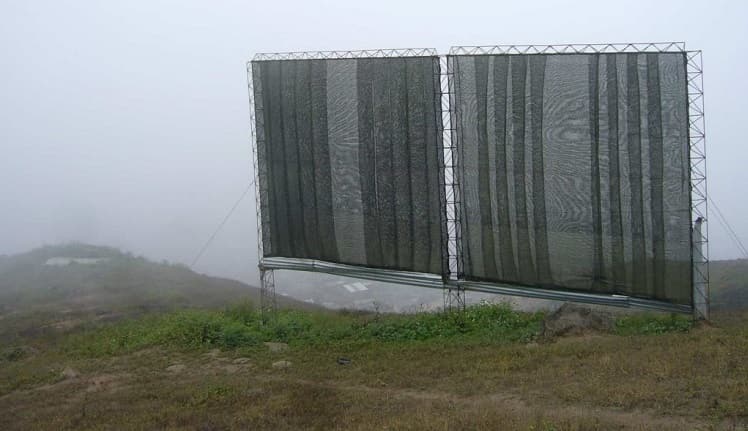
Backpackers know about the thick fog on mountaintops in the early mornings and overcast days.
The fog is comprised of many little droplets of water that haven’t condensed enough to turn into rain. Recently, innovators have figured out how to capture this fog and turn it into drinking water.
The Canadian company FogQuest and other non-profits have started projects using fog nets to bring drinking water to remote areas in the Andes Mountains, Ethiopia, Nepal, and other high-altitude, windy places.
You hang the mesh nets in a windy, foggy area. The nets collect the water and funnel it towards a collection trough.
Fog harvesting is still fairly new, so I haven’t found any information about what type of net and material works best. However, it is worth remembering – especially if you plan on bugging out in high altitudes.
Find Water
There are a bunch of tricks you can use to find water sources in nature. Here are some of them:
- Bring a map: Duh! Then just navigate to the nearest water source.
- Travel parallel to a mountainside: Mountains typically have some streams going down them. If you continue traveling parallel to the mountain, you will eventually hit water or a pond.
- Look for bees: Bees never go far from water. If you see bees, that means that there is a water source within a 3-5 mile radius. If you can locate the beehive, then sit for a while and watch the bees. See which direction most are going and head there.
- Look for finches: Finches are another animal that won’t go far from water. If you see finches, then you are near water.
Do you know any other tricks for finding water in the wild? Let us know in the comments section.

Hello Diana,
You mean „collection bowl“, not a bowel….
But thanks for your good work otherwise.
Best regards
Wolf
Like the site owner Said the Ground is a Good Indicator of water …if i was to Walk in the Desert & there a Green patch Yet the rest of the ground all around is desert Colored Dig Right on that Green Area if its a Dried Creek thats even Better & you see green Dig there. Flies are a good Sign of Water too
For building a DIY fog catching device, the plastic netting in which they sell potatoes and oranges works quite well. 😉
Here’s a fun little science project to try out different types of mesh materials: https://www.sciencebuddies.org/science-fair-projects/project-ideas/EnvSci_p068/environmental-science/fog-catcher-mesh-material
For a map of springs that may be local to your area:
findaspring DOT org
Click on “Map of Springs” in the upper left.
i have a question, more than a comment. when i was young, my grandfather worked with some guys on a well rig putting in wells. one day while in the garden with him..he gave me a a limb he broke off , i think he said a peach tree..it was shaped like a Y…and he told me he had let it get a little dried out and then he had me take it and hold it out in front of me with both hands and walk very slowly and steady..and watch the branch he said…it will show you where the water is!!..i didn’t believe it at first until, sure enough after 5 minutes or so, slowly using the limb as a water detector..the limb began to ever so slowly begin to bend down toward the ground..Gramps said there!..there’s water at that spot!!..IVE ALWAYS WONDERED IS THIS FOR REAL? OR MY GRANDPA PLAYING GAMES ON A KIDS MIND….LOL
As far as I am aware there is no science to backup the use of dowsing as being any more effective than random chance.
As a contractor,I have observed many places around around my job sites that contain water well after the water stops flowing. P traps under every sink and shower, toilet tanks, saggy gutters and garden hoses. Also water supply lines throughout the house or business can be drained( preferably at its lowest point on the property)
This article is more about wilderness situations but these ideas are great for a more urban environment.
What a great tip. Thanks Matthew.
When travelling through the wilderness watch for game trails. Follow any game trail until it intersects with another, this intersection will form an “arrow” pointing toward a water source. Follow the more heavily used trail, if obvious, in the direction the arrow is pointing. (Example: If the intersection of the trails were represented with the letter “y” you’d follow the long leg of the “y”)