A solar still, also called a solar distiller, uses the sun’s energy to treat contaminated or salt water.
It can also be used to get water out of materials such as plants. While I’d much rather have a good water filter, knowing how to make a solar still might provide you with enough water to keep you alive.
Here I will go over 4 different ways to make solar stills, from very easy plastic bottle solar stills to ones you can make at home.
Also read: How to filter water in the wild
How Does a Solar Still Work?
Solar distillers work by using heat from sunlight to evaporate water. Impurities are left behind as the water evaporates. The evaporated water then condenses on a surface and drips into a collection container.
What Do Solar Stills Treat?
Solar stills can treat the following impurities in water:
- Salt
- Minerals
- Bacteria
- Viruses
- Parasites
- Heavy metals
- Some chemicals
It’s important to note that distillation does NOT remove impurities that evaporate easily, such as benzene and many chemicals. Solar stills also shouldn’t be used to extract water from toxic plants as the toxins may evaporate.
Also read: The 9 Water Treatment Methods
Do Solar Stills Work?
Yes, solar stills work and can be used in emergencies to get safe drinking water. Many lifeboats are equipped with solar stills specifically for this purpose.
However, solar stills have a lot of limitations. First, the sunlight must be bright for a solar still to work. Even then, solar stills usually only produce a minimal amount of water per day – such as a spoonful or two. You’d likely need multiple solar stills to get even a cupful of water.
Method 1: Plastic Water Bottle Solar Still
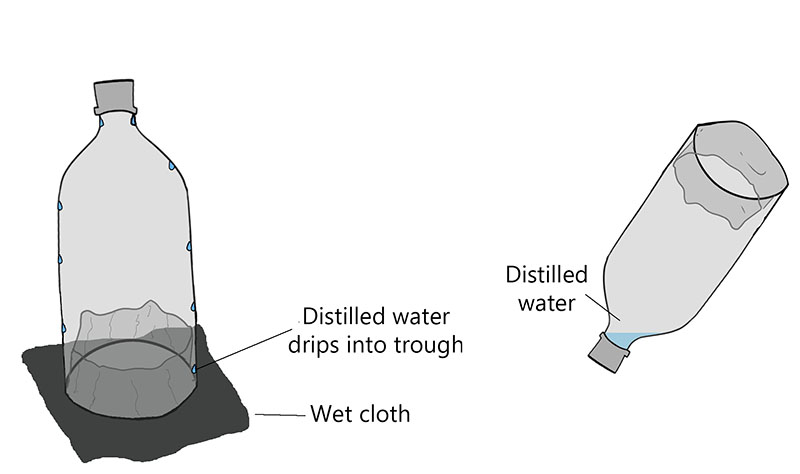
This is the easiest way to make a solar still. All you need is 1 plastic bottle (easy to find pretty much anywhere because of all the litter around!) and a way to cut the bottle (another reason to always carry a good survival knife or multitool).
Instructions:
- Cut the bottom off of the bottom of the plastic bottle. You can discard it or save it to use as a cup.
- Fold the bottom 1-2 inches of the bottle inwards. If you have trouble getting the plastic to fold, you can use a lighter to soften the plastic. This creates a “trough” where condensation will collect.
- Put the bottle over a water source. Some options include:
- Pile of non-toxic plants that you cut up
- Cloth soaked in dirty/salty water
- Puddle or mud (don’t let the trough get filled with dirty water)
- Wait for water to collect in the trough.
- Carefully tilt the bottle so the condensation collects near the lid of the bottle.
- Open the bottle to drink the water or pour it into a collection container.
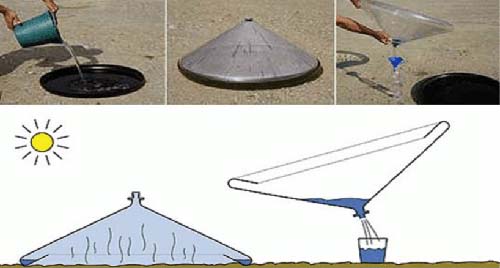
Note: There is something called a “Watercone,” which has a very similar design. See the image below.
Method 2: Two-Bottle Solar Still
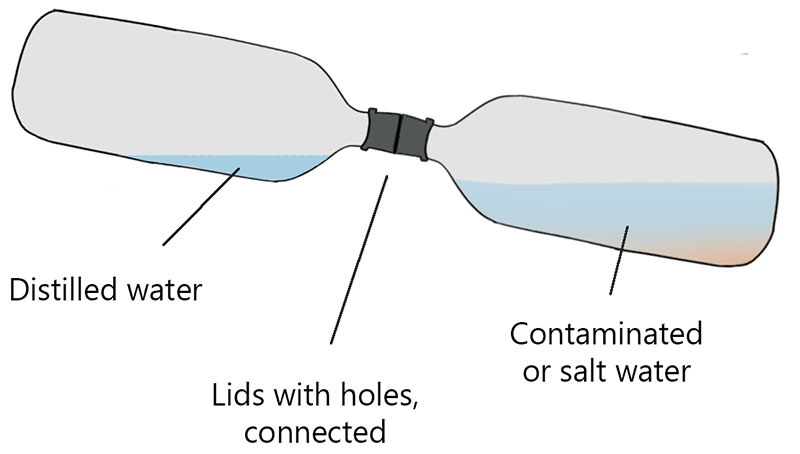
Here’s another way to make a solar still with plastic bottles. It only works if you have a source of dirty water. You’ll need two bottles which have lids and also some tape. You’ll also need a sharp knife for cutting the bottle lids.
Instructions:
- Cut the top out of the bottle lids.
- Line up the lids and tape them together. Or connect them with hot glue.
- Put dirty/salty water in one bottle. It should be no more than 1/2 full
- Screw the connected lids onto the dirty water bottle.
- Attach the second water bottle.
- Position the connected water bottles in the sun so the empty bottle is upwards. It needs to be angled so condensation will collect in the area below the lid.
- When enough water collects, unscrew the top water bottle. You have to be very careful when doing this so the clean water doesn’t drip out!
- Drink the water or pour it into a collection container.
Method 3: Dug Solar Still
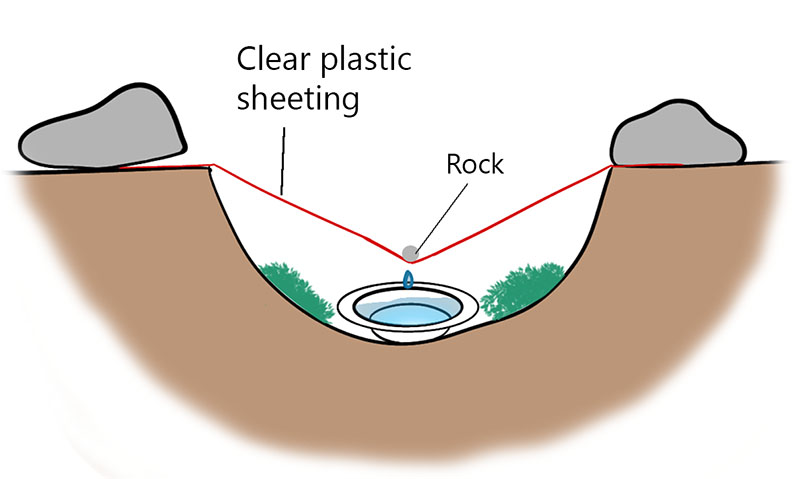
The dug solar still is the design that is most often mentioned in survival guides. I don’t like it for many reasons. For starters, you need clear plastic sheeting to make it (who carries this with them?). In theory, you can make a dug solar still with a white plastic shopping bag that you cut open, but it won’t work as well.
The sheet also needs to be very large. Myth Busters and Ray Mears did episodes on this where they used GIANT plastic sheets and only managed to collect about a cup of water. I’ve tried making dug solar stills for fun and barely got any water from them.
Despite these flaws, dug solar stills still have their place. They are an okay option on the beach where you have plenty of water and sunlight and digging a hole is easy.
They may be suitable for desert survival when extracting water from cacti. You can even pee into the hole you dug and distill your urine! However, it’s debatable whether it’s wise to dig a hole in the desert, as any physical exertion could cause you to lose more water than you’d gain from the solar still…
Instructions:
- Dig a hole.
- Put a wide, flat container of dirty water in the middle of the hole. Or fill the hole with cut-up nontoxic plants. If doing this on the beach, dig until you get to wet sand.
- Put a water collection container in the middle of this.
- Optional: If you have a long tube to use as a straw, run it from the water collection container to the exterior of the hole you dug.
- Cover the hole with clear plastic sheeting. A cut-open plastic bag could work in a pinch. Anchor the sheeting in place with rocks or sand.
- Put a small weight (such as a rock) in the middle of the plastic sheeting. You want the plastic to dip down directly over your water collection container.
- Wait for condensation to collect in the container and then drink.
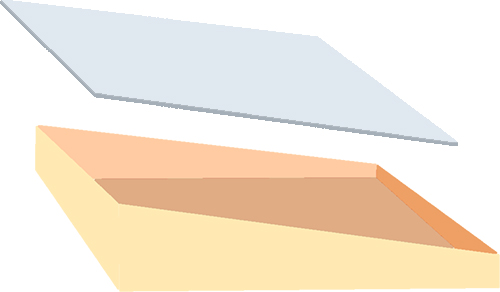
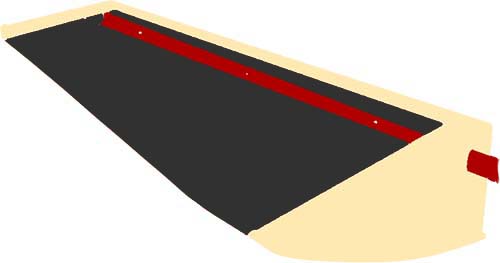
Method 4: Built Solar Still
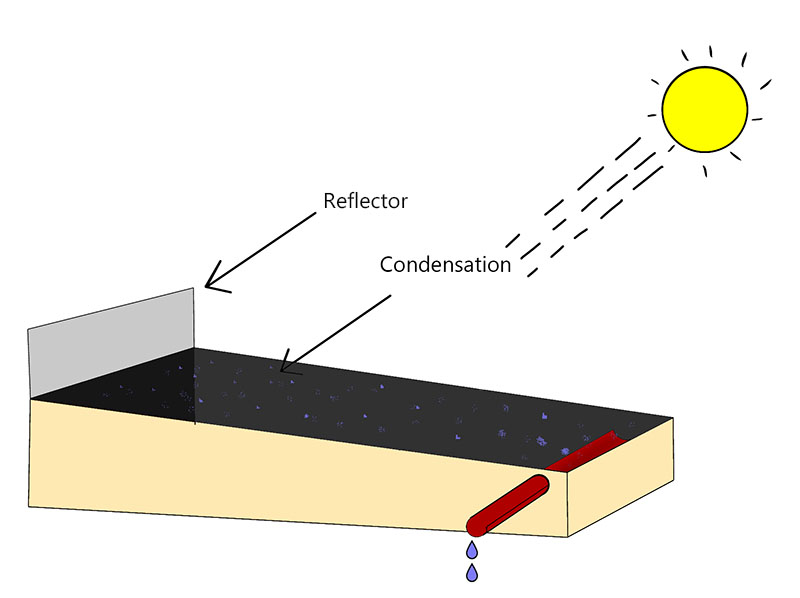
This DIY solar still requires you to build a box with materials like plexiglass, paint, and piping, so it isn’t suitable for survival. However, it could be a good solar still to have on hand in case of droughts, especially if you live near the ocean.
Instructions:
- Construct a wooden box with slanting sides, as shown in the picture below.
- Paint the inside of the box black. Use high-temperature paint, if possible.
- Cut a 1” piece of PVC pipe in half lengthwise. It should be at least 4 inches longer than the width of your box.
- Attach the PVC pipe to the interior edge of the box using screws or a glue gun. The pipe should SLOPE downwards towards the hole. Part of the pipe will stick out of the hole.
- Cut a piece of Plexiglas to fit on top of your box.
- Put a tray or pan of salt water/dirty water in the box. Ideally, use glass baking pans. Stainless steel pans are also good. Avoiding using any materials which will release chemicals as they heat up, such as cheap plastic containers.
- Put the Plexigas cover on top of the box.
- Optional: Put a reflective surface at the head of the box, such as cardboard with tinfoil glued to it.
- Put a collection cup under the pipe and wait for water to drip into it.

I always wondered how those worked. Now I know. Thank you.